|
I received this product for free from Moms Meet (momsmeet.com) to use and post my honest opinions. Compensation for this post was provided and this page may contain affiliate links.
Have you heard of Vitapod? I have been trying out my new Vitapod machine for about a month now and love it. It mixes fresh. flavored vitamin water at home using 90% less waste than bottled vitamin water and blending it so much better than trying to blend powder and water by hand. Vitapod’s mixing chamber blends the pods with water at 690 RPMs, which is faster than the blades of a helicopter! It makes the smoothest drinks without any unmixed powder left in the bottom of your cup. You can see it work in my video below.
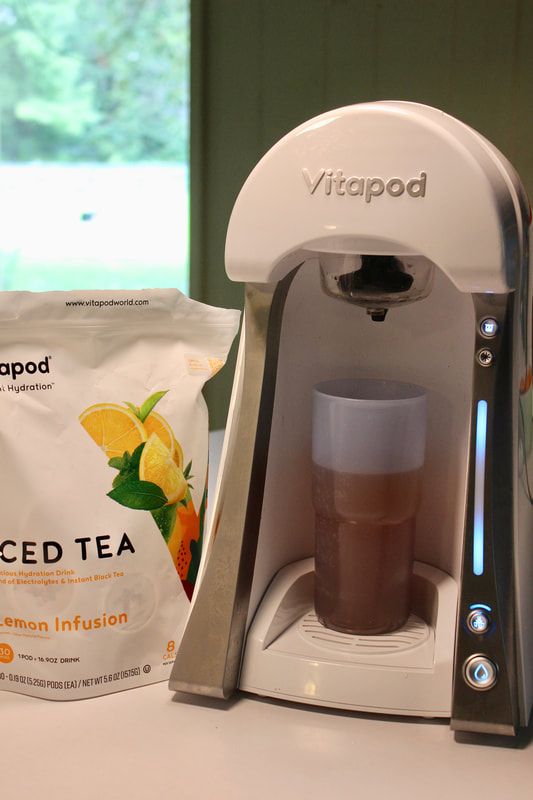
In addition to mixing the best vitamin water, Vitapod’s multi-pass filtration system purifies water better than market leaders. You can use the Vitapod machine to make vitamin water or just filter water when you need to quench your thirst. `
You can see the Vitapod in action in my short video. Subscribe to my youtube channel while you're there so you can see my homesteading and foodie videos when I post them.

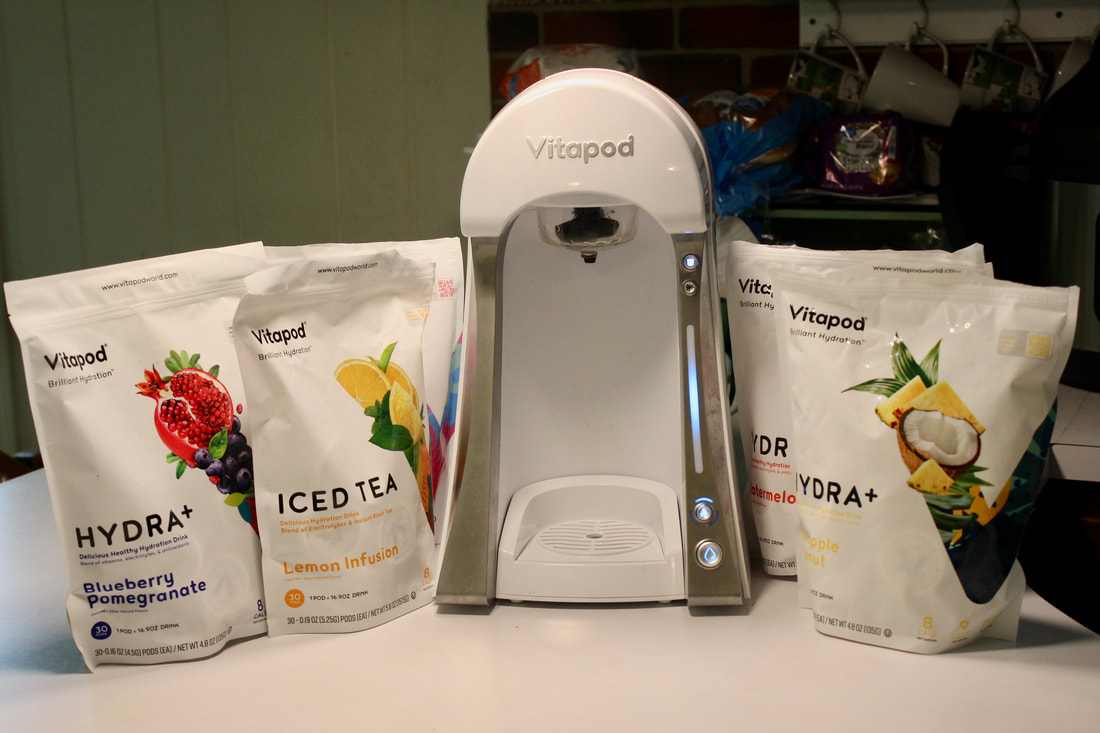
There are 11 Vitapod flavors which are all made of 100% natural ingredients. The Iced Tea+ (60mg), Sports+ (100mg), and Energy+ (200mg) pods contain caffeine and are recommended to drink in moderation if pregnant or breastfeeding. All other pods are fully pregnancy and breastfeeding safe. I received the five flavors pictured above to try, and while they are all delicious, my favorites are lemon infusion iced tea and pineapple coconut. All of the flavors I tried were light and fresh, better than any bottled vitamin water I have tried before.
If you are interested in a Vitapod, you can get $15 off your machine order through my referral link http://rwrd.io/vlqmtwz?c (If you order through my referral link, I earn points toward future purchases).
Or Save $15 on a Vitapod Machine or Vitapod Machine Starter Pack at vitapodworld.com when you use code MOM15. Expires 9/30/21.
Pin on Pinterest


0 Comments
I received this product for free from Moms Meet (momsmeet.com) to use and post my honest opinions. Compensation for this post was provided and this page may contain affiliate links.
My family does not have any allergies to dairy, but I know people who do and was curious to try Wayfare Dairy-free pudding to see what it was like. We tried all three flavors, chocolate, vanilla, and butterscotch which are all delicious.
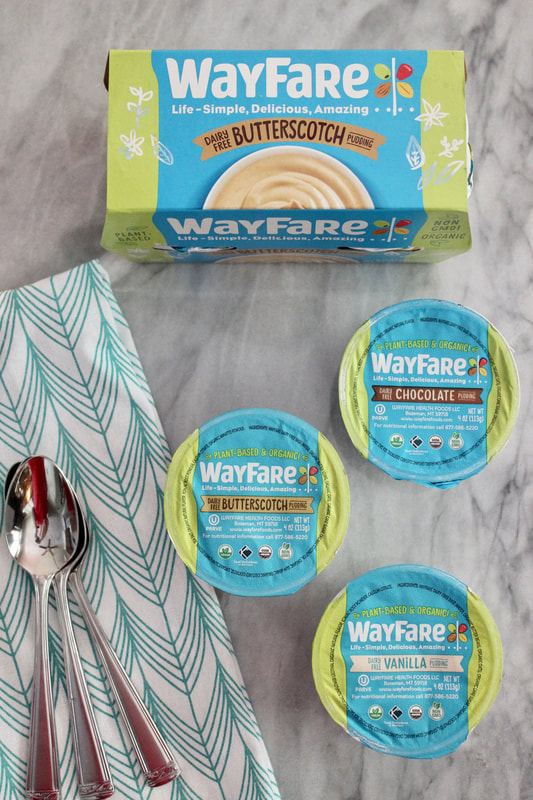
Wayfare pudding is made of plant-based ingredients. It has a base made from organic butter beans and organic oats. Their pudding is free of the top 10 allergens, certified organic, kosher, vegan, and gluten free. It is also free of soy, nuts, and palm oil. I am happy with the ingredient list and feel like this is a healthy alternative to dairy pudding. It does have organic cane sugar, so should be consumed as a treat.
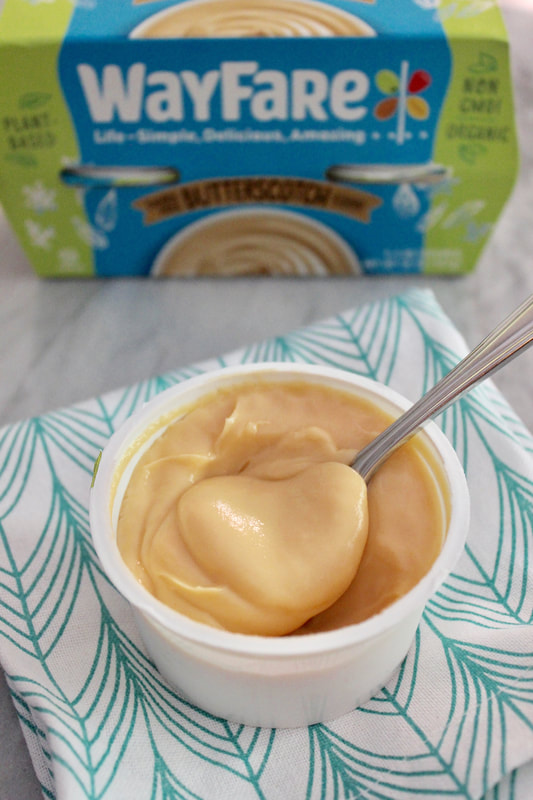
This pudding is smooth and creamy. I thought it had a nice mouthfeel. The texture is slightly thicker than conventional dairy pudding, but feels very similar to what you think of as pudding. The chocolate pudding has a good chocolate flavor from cocoa. The vanilla flavor is mild. I would prefer a stronger vanilla flavor. The butterscotch flavor is my favorite! It is the most flavorful of all three varieties and has a wonderful butterscotch flavor.
You can find WayFare Chocolate, Vanilla, and Butterscotch Puddings at Wegmans, Lucky’s Save Mart, Mom’s Market, Festival Foods, Woodman’s, and Tony’s Fresh Market.
Save 20% on any product on wayfarefoods.com with code shareWF20. Expires 4/26/22. (WayFare currently only ships to 36 states but will be expanding to nationwide shipping in June.)
I received this product for free from Moms Meet (momsmeet.com) to use and post my honest opinions. Compensation for this post was provided and this page may contain affiliate links.
We have been fans of PACT Organic clothes for several years. Their socks are my absolute favorite! In fact I have giftedPact Organic Christmas sock gift packs several times to family members.
Two things I love about PACT Organic is that the fabrics are super soft (you will notice the softness when you wear them) and their clothing is better for both us and the environment. I wrote more about it a few years ago which you can read here. 
These pajamas are made of soft, breathable, 100% organic cotton that is made without toxic chemicals and with 91% less water than conventional cotton. Did you know that organic cotton uses 91% LESS water than conventional cotton when produced? I think that is amazing!

PACT Dream Big Pajamas are available in kids’ sizes 18 months to 10. My 9 year old is wearing a size 10 and my 4 year old is wearing a size 5. I ordered up in size so they had some growing room and could get more use out of the pajamas. They are a little loose on my slender boys since I ordered up in size, but they stay on nicely.

These pajamas provide a snug fit for safety, with a pull-on waistband and banded cuffs at the wrists and ankles. They are also made with a tagless label on the back to prevent discomfort and skin irritation. The fabric is prewashed and shrink resistant. They wash well and are so snuggly and soft when they come out of the dryer.

These pajamas are tough too. They hold up to all the wrestling and tumbling in our busy house of four boys.
Pin on Pinterest

I received this product for free from Moms Meet (momsmeet.com) to use and post my honest opinions. Compensation for this post was provided and this page may contain affiliate links.
We are a participant in the Amazon Services LLC Associates Program, an affiliate advertising program designed to provide a means for us to earn fees by linking to Amazon and affiliated sites.
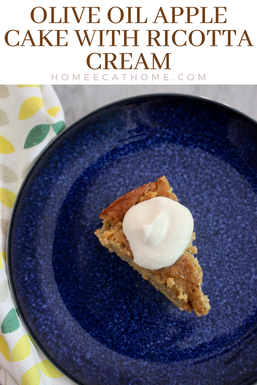
Have you ever baked with 100% Italian Extra Virgin Olive Oil? I love to sauté and roast with it, but haven't used it a lot in baking, except to bake bread. For the Flavor Your Life Campaign, I made this delicious olive oil apple cake which is a new family favorite.
To learn more about the rich history and delicious properties of 100% Italian Extra Virgin Olive Oil and the culinary culture that’s been harvested in Europe for generations, visit Flavor Your Life.
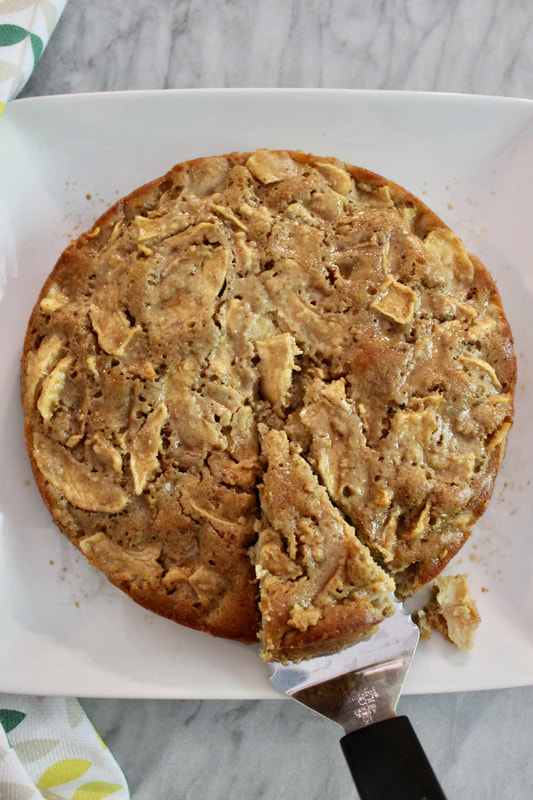
This olive oil apple cake is an Italian classic. A light cake batter infused with apple slices and made with extra virgin olive oil.
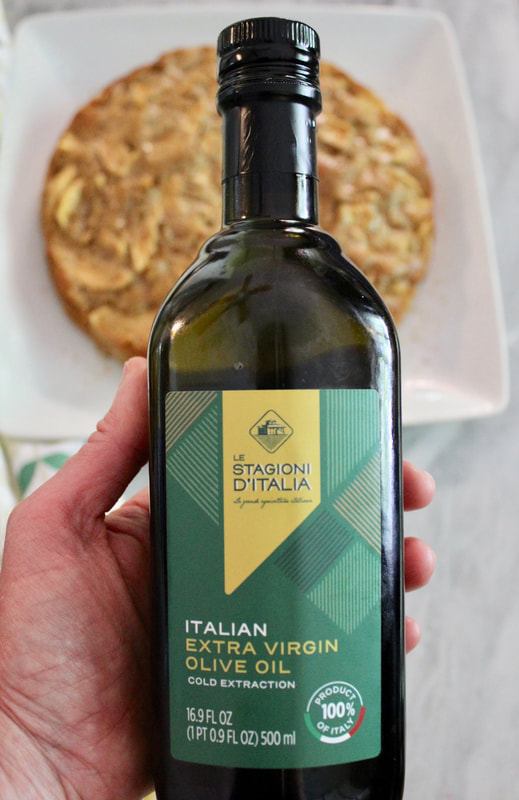
Le Stagioni d’ Italia means “the seasons of Italy” in Italian.
About Le Stagioni d’ Italia
• Le Stagioni d’ Italia’s short, fully traceable supply chain is guaranteed sustainable and the great care they take with processing creates exceptional taste.
• 100% Italian Extra Virgin Olive Oil is the first cold pressed olive oil from the first round of extraction of fresh, intact olives. It has not been heated during processing, so it retains its full nutritional value. • Harvested in Italy, it is vegan, gluten free, and contains no additives or preservatives. • It has a robust flavor of artichoke and almond, with a medium bitter and spicy aftertaste, as well as a green, ripe, fruity aroma with a leafy feel. • 100% Italian Extra Virgin Olive Oil typically retails for $19.99 for a 500 mL bottle. 
With hints of citrus and cinnamon this olive oil apple cake is moist, delicious and perfect served warm or room temperature with a dollop of ricotta cream.
About Extra Virgin Olive Oil
• Extra virgin olive oil is made by pressing olive oil, without heat or chemicals; it’s known as the first cold pressed olive oil.
• Olive oils are tested for peroxide values. Lower values indicate fresher oil and more rapid processing. • Extra virgin olive oil is virtually free of acidity, below 0.8%. If the percentage of oleic acid (fatty acid) is too high, it indicates improper production and rancidity. • A panel of trained, expert tasters tests for taste defects and the presence of positive attributes of fruitiness, bitterness, and spiciness. If the oil doesn’t have the signature fruity taste and harmonious balance, it won’t receive an Extra Virgin rating. • Extra virgin olive oil has a high smoking point of 400°F, so it is suitable for cooking and baking. • Between use, store your oil somewhere dark and cool (around 57°F, if possible), not on the counter or near a stove, and never in the refrigerator. Keep the lid screwed on tight, and use your oil within six months of opening. How should you cook with Extra Virgin Olive Oil?
• Experiment with different oils for different occasions.
• Use delicate oils for salad dressings or as a condiment over mild foods, like vegetables, fish, eggs, or potatoes. • Pair robust oils with hearty foods that can stand up to the intense flavor, like steak or spicy soup. • With a high smoking point of 400°F, extra virgin olive oil is suitable for cooking and can enhance any dish by drizzling on as a finisher.
Olive Oil Apple Cake with Ricotta Cream
Recipe Notes: This recipe is adapted from a recipe provided by Flavor your Life. Since it has European origins, the measurements and instructions are different than what I normally publish. I noticed a few discrepancies in the original instructions and reconverted the measurements to the U.S. system. I weighed dry ingredients as needed and then measured them to get accurate U.S. equivalents. The original recipe listed 80 ml as = to 4 Tbsp., however when converted it is actually 5.41 Tbsp. or 16.23 tsp. For this reason, I would measure Extra Virgin Olive Oil using the metric system if possible or measure just under 5 1/2 Tbsp. The original recipe also calls for 1/2 cup ground hazelnuts for which I substituted 1/2 cup almond flour (affiliate link). Cake Ingredients: 5-6 medium apples (any variety) 1 orange 1 cup, 1 Tbsp., and 2 tsp./150 grams all purpose flour 1/2 cup/50 grams almond flour (affiliate link) 1/2 cup/100 grams brown sugar + more for sprinkling on the cake Pinch of salt 1/4 tsp. ground cloves 1 tsp. cinnamon 2 tsp./10 grams baking powder 2 large eggs 80 ml/5.41 Tbsp. Extra Virgin Olive Oil 1/2 tsp. vanilla extract 3 Tbsp.milk Ricotta Cream Ingredients: 8 oz. ricotta cheese 1 Tbsp. clear honey 1/2 tsp. vanilla extract 1-3 Tbsp. milk 1. Preheat oven to 350 degrees F. /180 degrees C. 2. Butter a 10 inch springform cake pan. 3. Peel apples and slice thinly, about 16 slices per apple. 4. Zest and juice the orange. 5. Set the zest aside and toss the apples in the orange juice. 6. In a large mixing bowl, combine all purpose flour, almond flour, brown sugar, salt, cloves, cinnamon, and baking powder. Mix well with a whisk. 7. In another bowl, mix the eggs, Extra Virgin Olive Oil, vanilla extract, orange zest, and milk. Beat until thoroughly mixed. 8. Add the egg mixture to the dry ingredients and stir briefly to combine. 9. Fold in the sliced apples. 10. Spoon the cake batter into the prepared pan. Smooth it out with a spatula. 11. Bake for 35-45 minutes until the cake is golden and a toothpick inserted in the center comes out clean. 12. Let cool in the pan on a wire rack. 13. If desired, sprinkle the top with extra brown sugar. 14. Remove from the pan and place on a serving platter. To make the ricotta cream combine the ricotta cheese, honey, vanilla extract and 1 Tbsp. milk. Check the consistency and if desired add 1-2 Tbsp. more milk. We prefer it thicker with only 1 Tbsp. milk. Serve the cake with a dollop of ricotta cream.
You might also like these easy and delicious bread machine breadsticks which I make with 100% Italian Extra Virgin Olive Oil.
Pin on Pinterest
Yum on Yummly
We are a participant in the Amazon Services LLC Associates Program, an affiliate advertising program designed to provide a means for us to earn fees by linking to Amazon and affiliated sites.
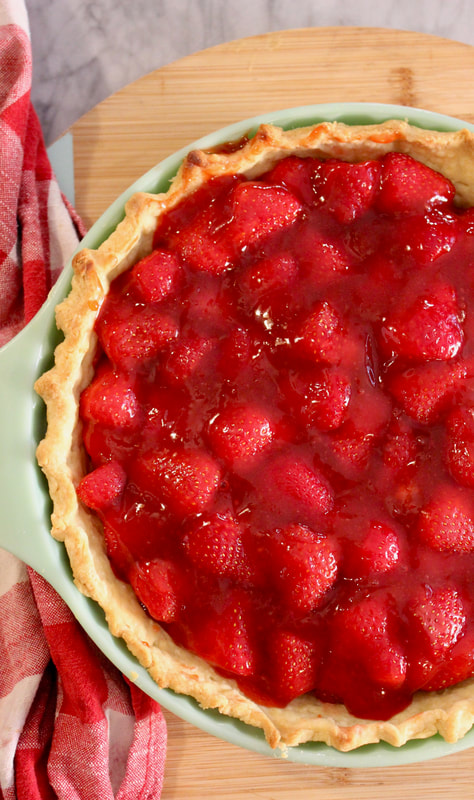
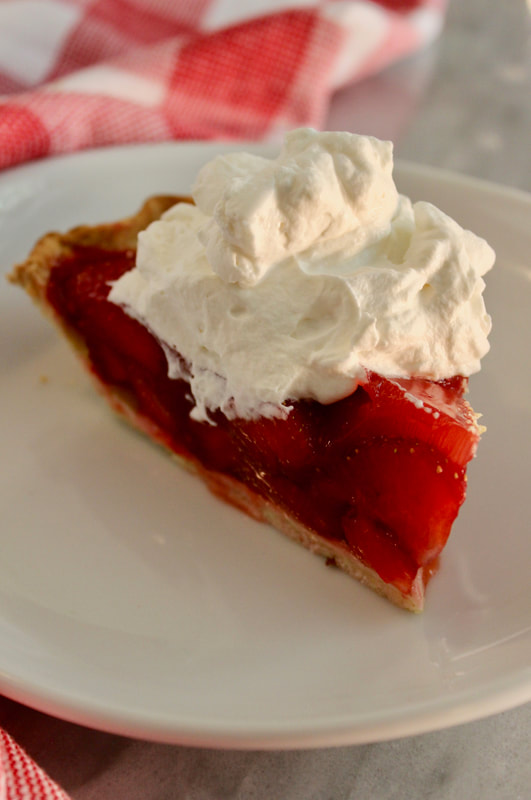
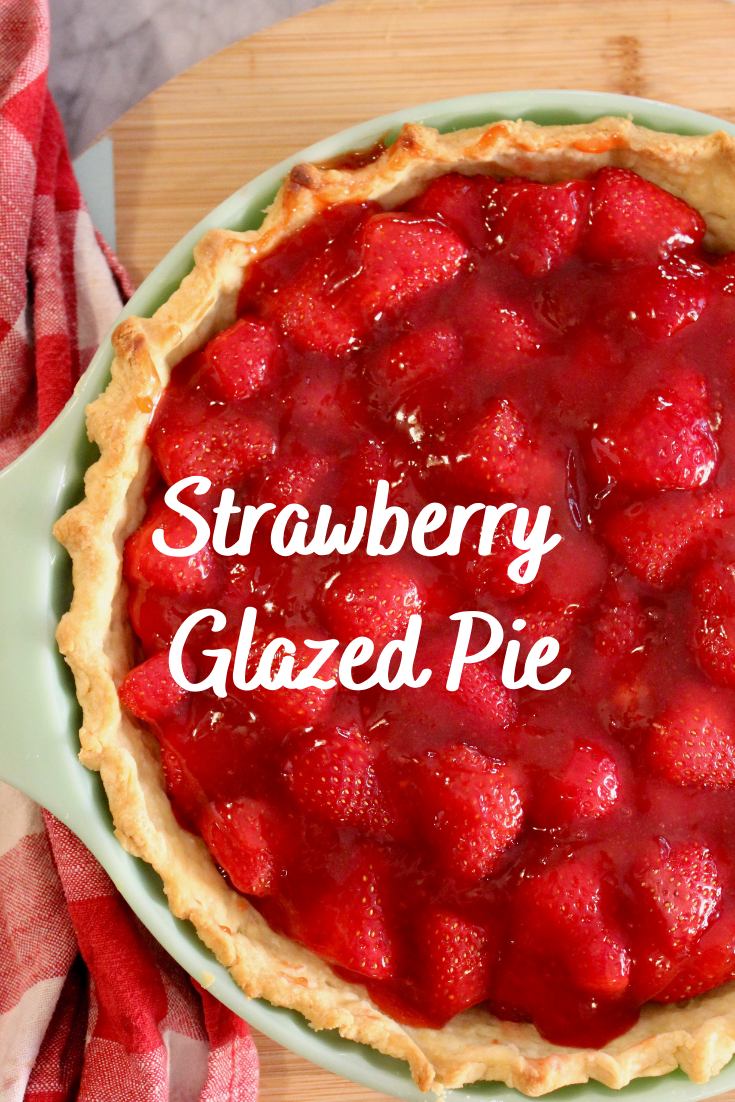
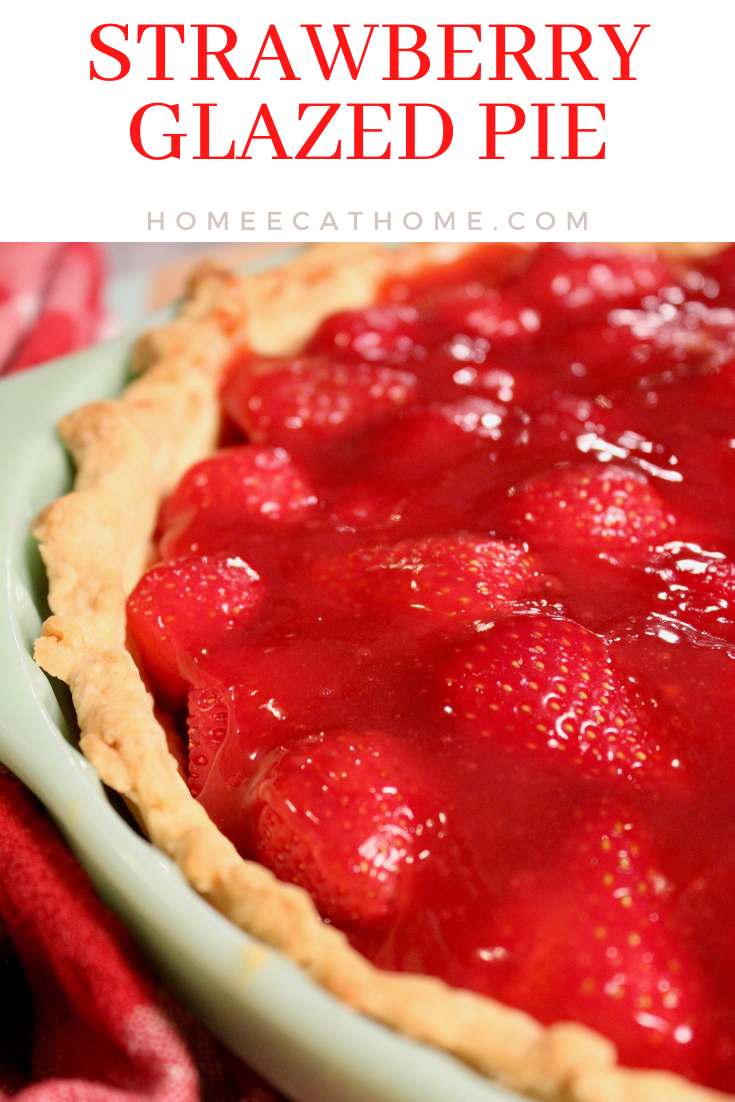
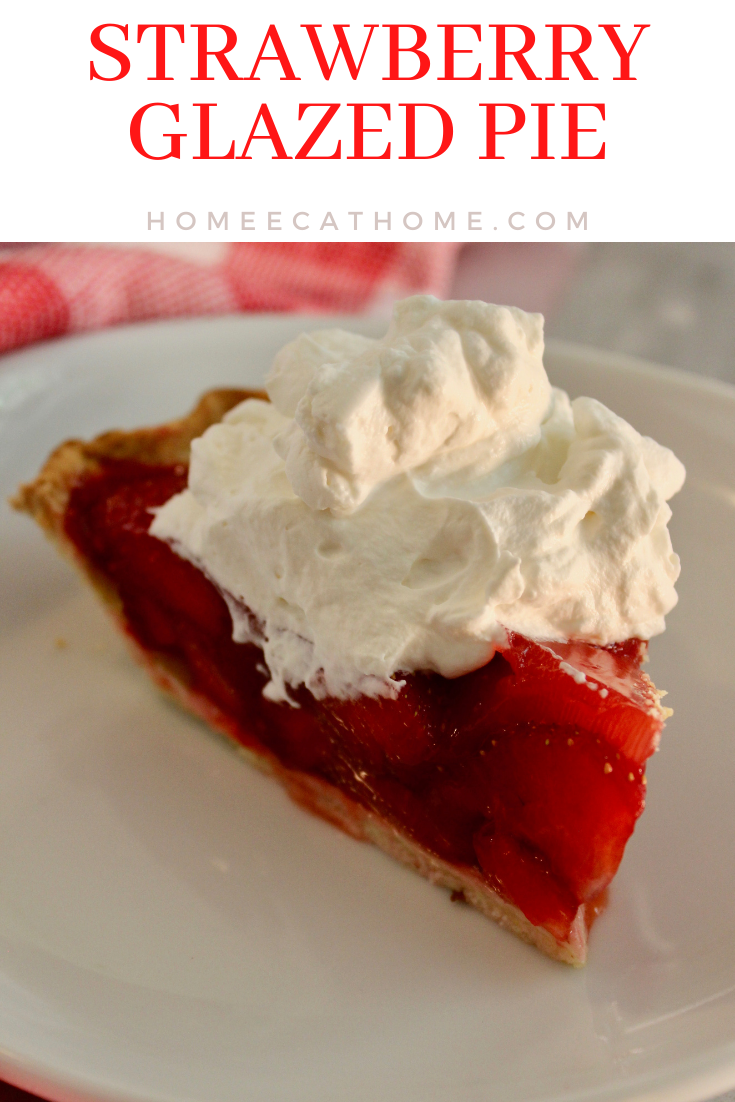
Strawberry pie, with layers of juicy strawberries surrounded by sweet glaze on a crispy crust must be the quintessential summer dessert. I remember bringing home a strawberry pie from Shoney's restaurant when I was a kid and thinking it was the best thing ever.
When your husband goes to a farm auction and brings home a gorgeous tray of strawberries, you make strawberry pie or easy strawberry chia seed jam. These strawberries were so sweet on their own, the boys literally ate half of them before I could make anything.
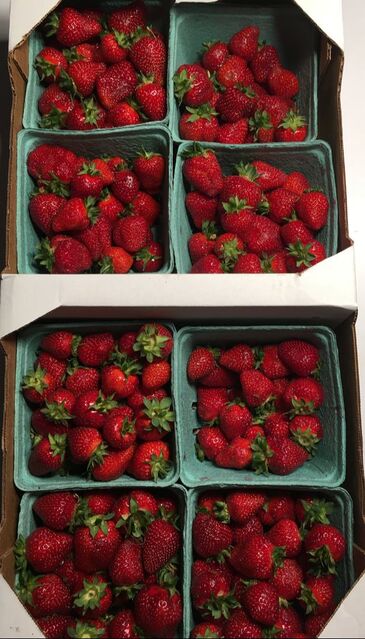
*Fresh picked strawberries are sweeter and juicier than strawberries that are picked before they ripen to go to grocery stores. If using fresh picked strawberries that are naturally sweet, use less sugar to make this pie. If using store ripened less sweet strawberries, you may want to use more sugar. The recipe below has a range in the amount of sugar so that you can adjust depending on the sweetness of your strawberries.
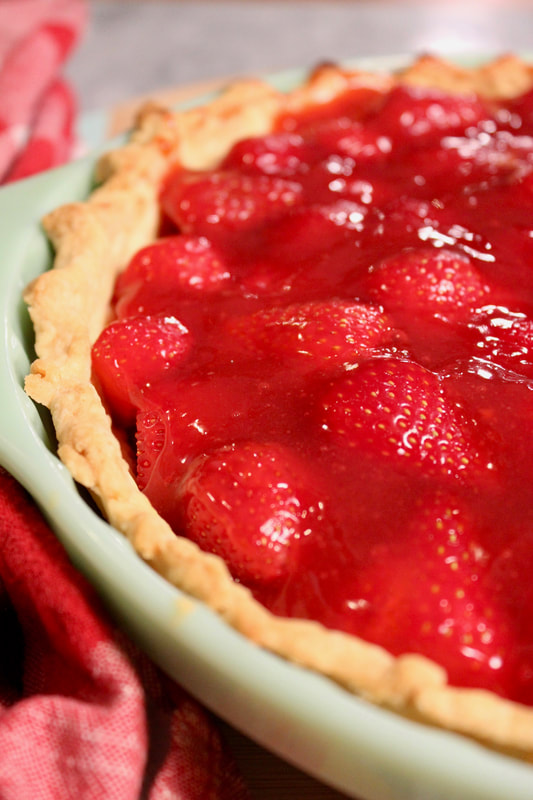
This pie is both delicious and simple. I love using homemade glaze made with common ingredients. No artificial dyes or flavorings that you would find in packaged store bought glaze. The best part is that making homemade glaze is really pretty easy.
1. Crush about 1/2 lb. strawberries with a meat chopper (pictured below) (affiliate link) or a potato masher.
2. Cook the mashed berries and 1 cup water at medium high heat for about two minutes to help break down the strawberries. 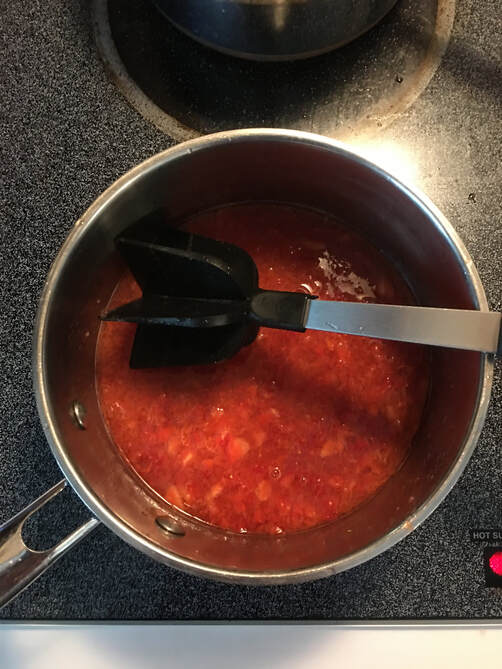
3. Sieve the cooked berries to get the juice. Discard the berry pulp. 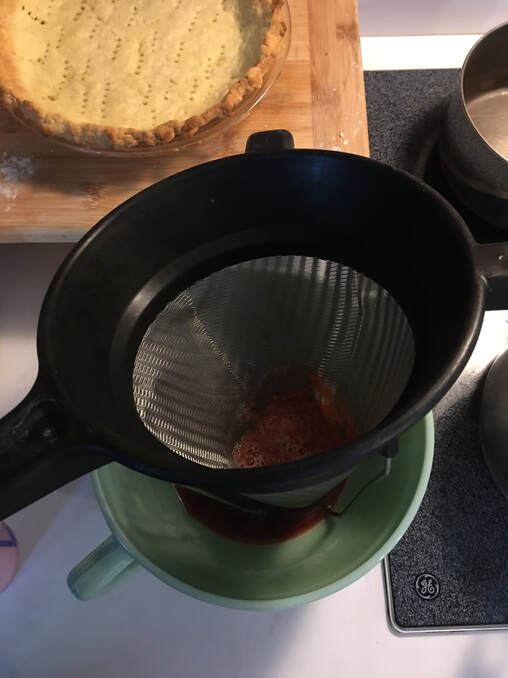
4. Combine the sugar and cornstarch in a saucepan. Gradually stir in berry juice. Cook stirring constantly till thick and clear.
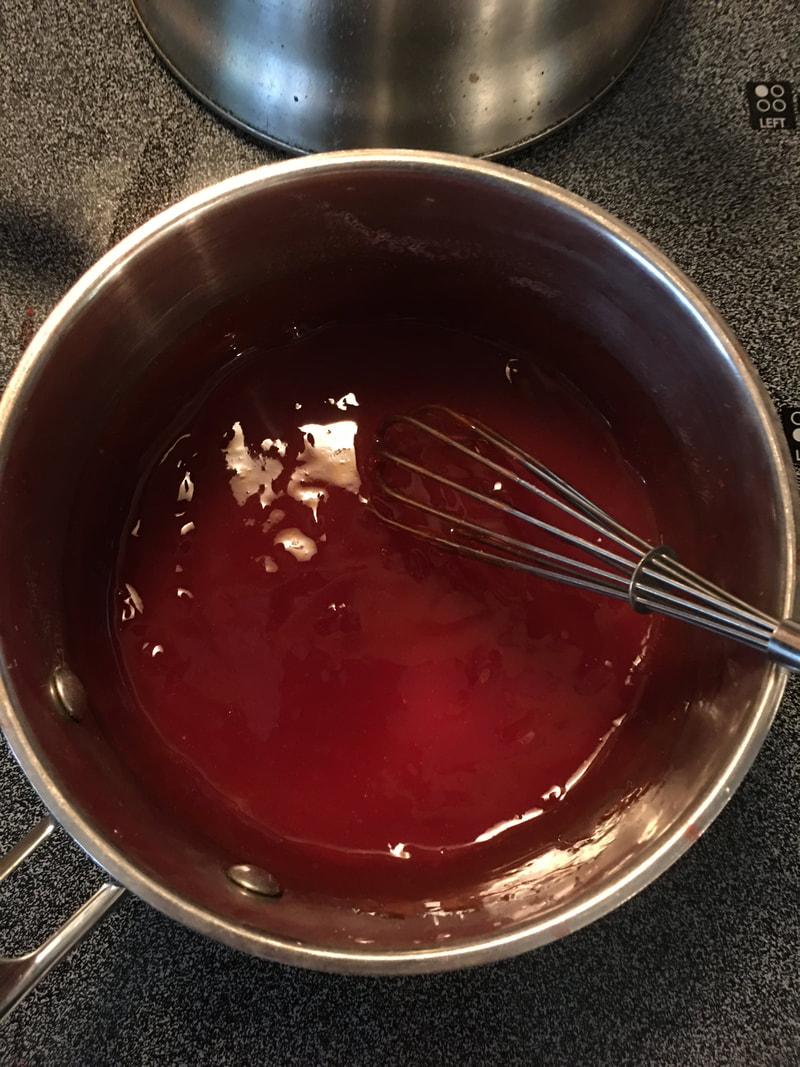
5. Line pie crust with a layer of sliced strawberries. Drizzle slightly cooled strawberry glaze over berries. Layer on more sliced strawberries and pour remaining glaze over berries.
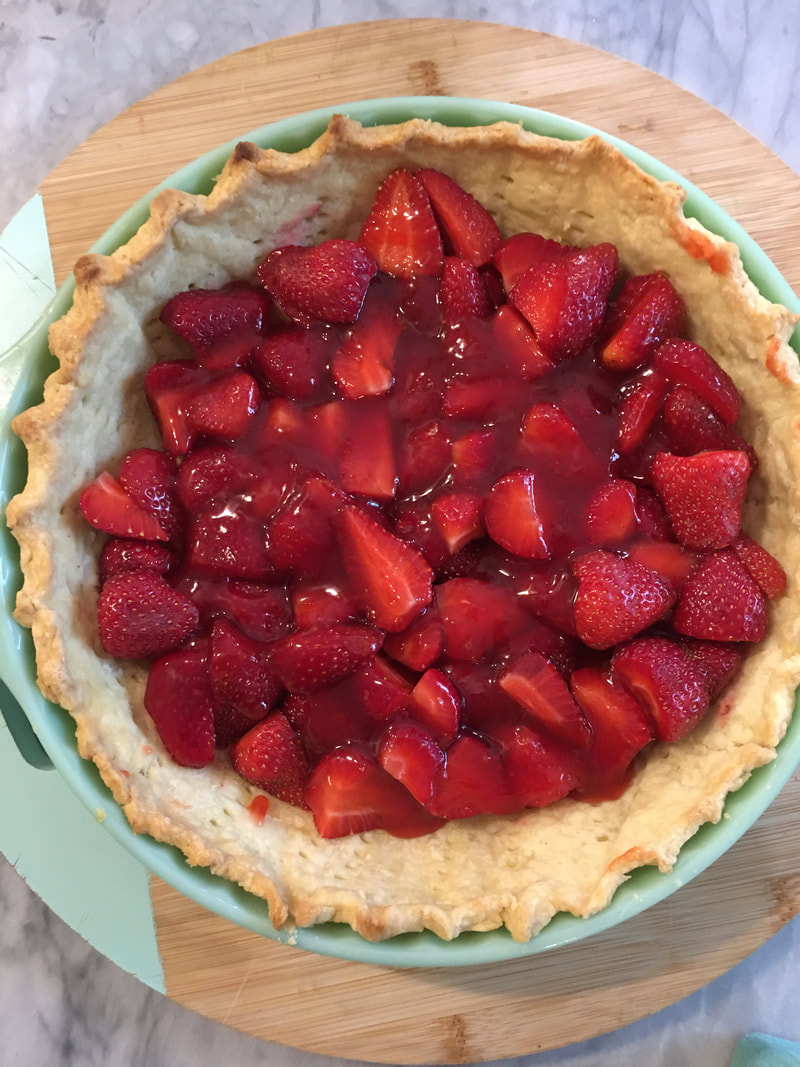 Pie crust with half of the berries and half of the strawberry glaze. Pie crust with half of the berries and half of the strawberry glaze.
Strawberry Glazed Pie
Ingredients: 2 lb. fresh strawberries 1/3 to 1/2 cup sugar* 1 Tbsp. and 2 tsp. cornstarch (I think this amount works nicely to thicken it, if you want it extra thick like jello when chilled, use 2 Tbsp. cornstarch.) Cooled, baked pie shell 1. Crush about 1/2 lb. strawberries with a meat chopper or a potato masher. 2. Cook the mashed berries and 1 cup water at medium high heat for about two minutes to help break down the strawberries. 3. Sieve the cooked berries to get the juice. Discard the berry pulp. 4. Combine the sugar and cornstarch in a saucepan. Gradually stir in berry juice. Cook stirring constantly till thick and clear. 5. Line pie crust with a layer of sliced strawberries. Drizzle slightly cooled strawberry glaze over berries. Layer on more sliced strawberries and pour remaining glaze over berries. 6. Refrigerate until serving time. Serve with whipped cream.
Pin on Pinterest
Yum on Yummly
We are a participant in the Amazon Services LLC Associates Program, an affiliate advertising program designed to provide a means for us to earn fees by linking to Amazon and affiliated sites.
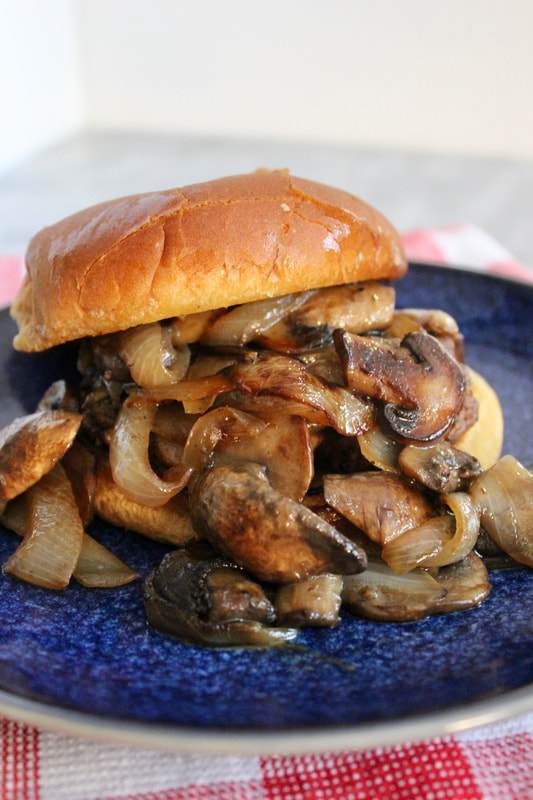
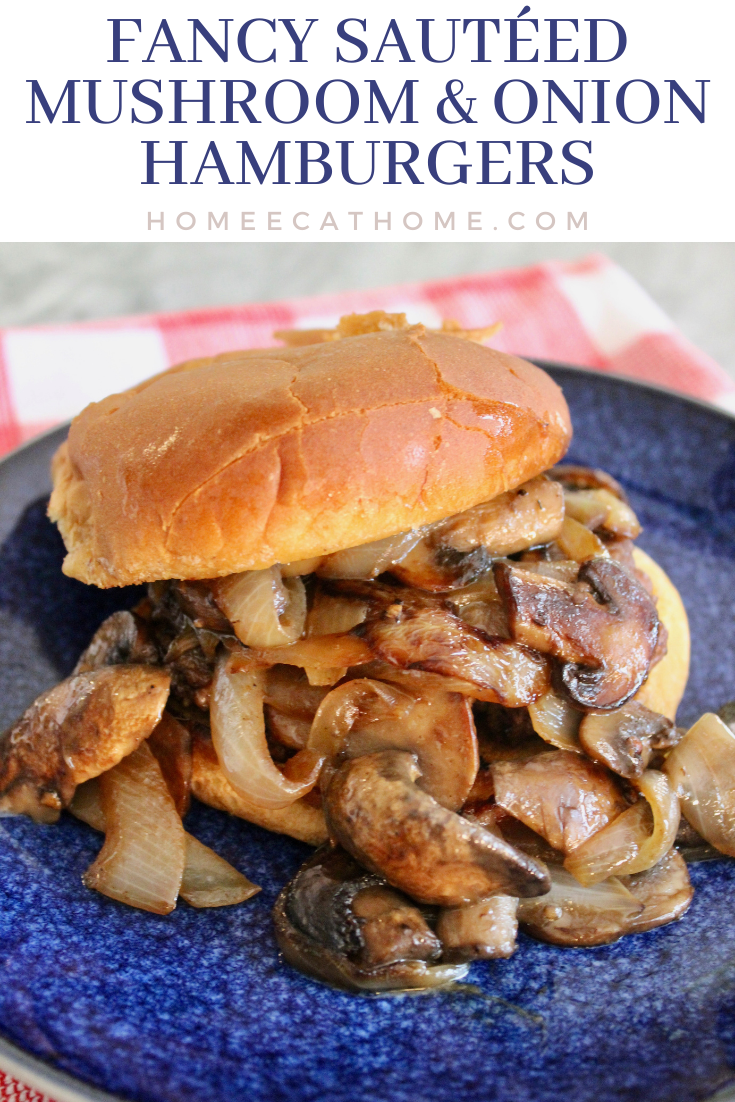
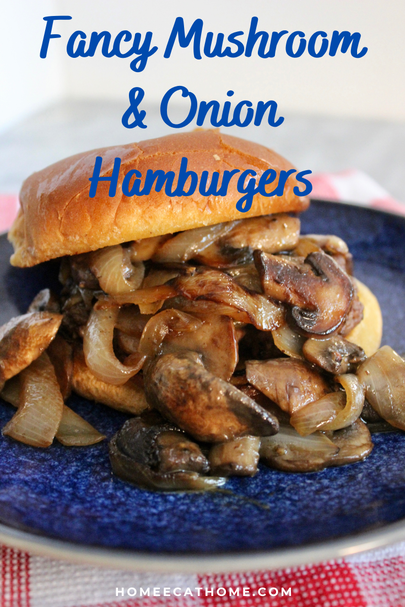
I did not plan on writing a blog post for this easy mushroom and onion hamburger recipe. It almost seems too easy to warrant a recipe post, but when I created a story pin and typed the ingredients and instructions into the pin, I decided there was enough content to actually write a post. So here ya go...Fancy Sautéed Mushroom and Onion Burgers!
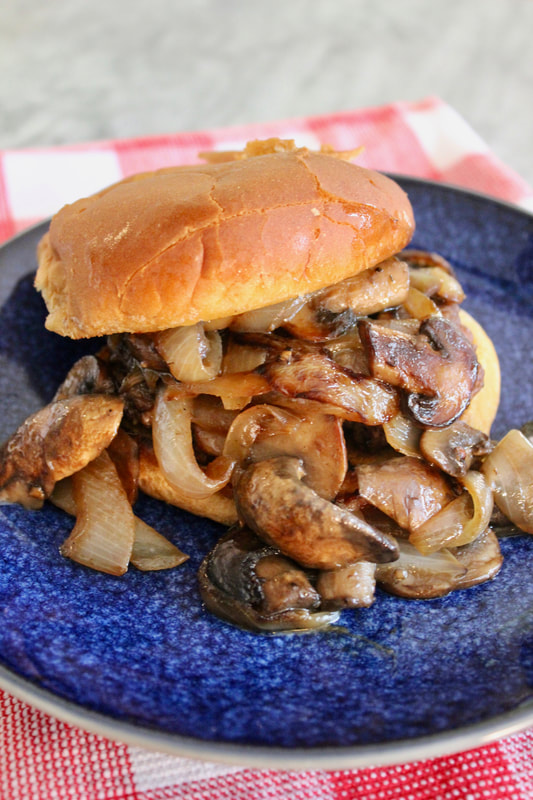
Hamburgers are one of our busy day staples, but sometimes we like to take it up a notch with sautéed mushrooms and onions. They add so much flavor and texture and truly make a mouthwatering burger experience.
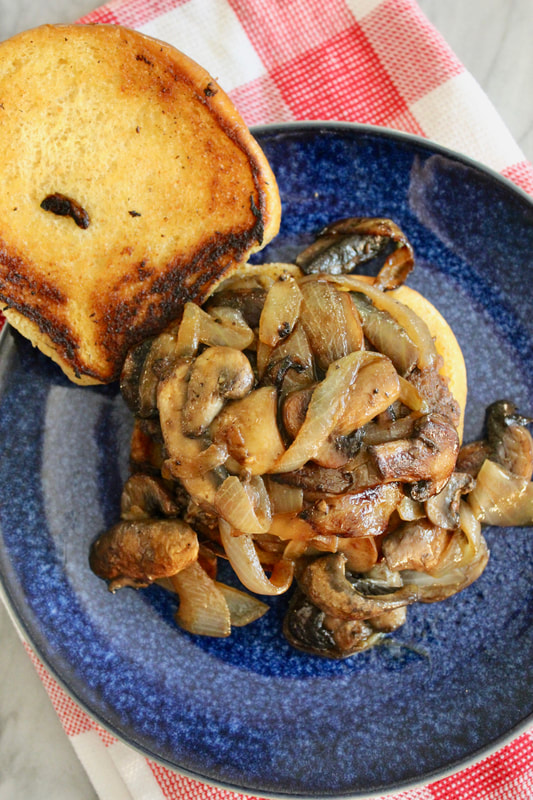
Make this burger even more memorable with a toasted bun or if you are eating low carb, skip the bun and enjoy it with a knife and fork.
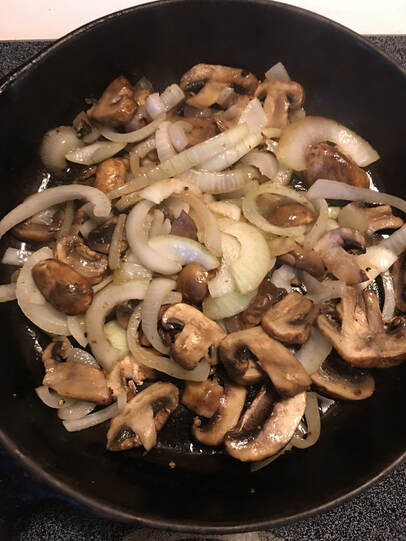
How do you sauté mushrooms and onions?
I sauté mushrooms and onions in olive oil and butter in a separate skillet while cooking the burgers. I always add some fresh ground salt and pepper for flavor. You could use just olive oil or just butter, but I like the combination of flavors from both fats.
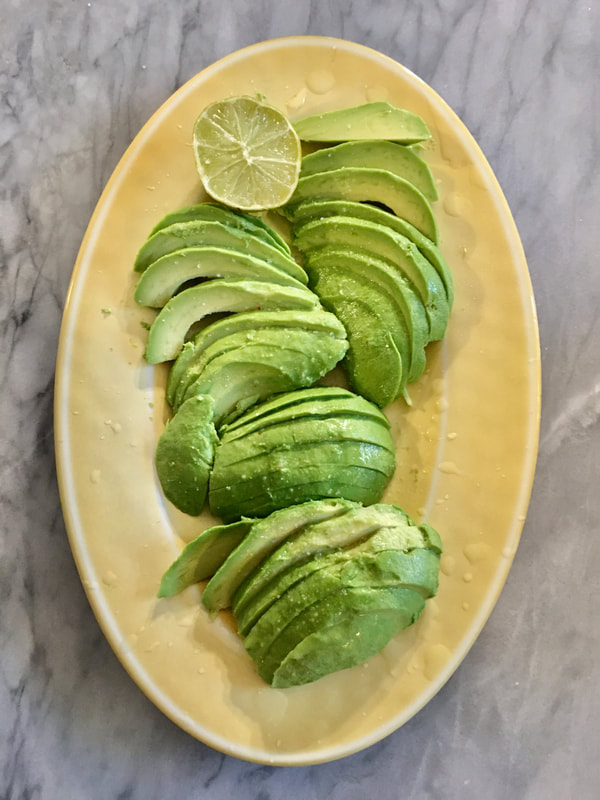
One of our favorite sides and condiments with hamburgers is sliced ripe avocado with fresh squeezed lime juice and fresh ground salt.
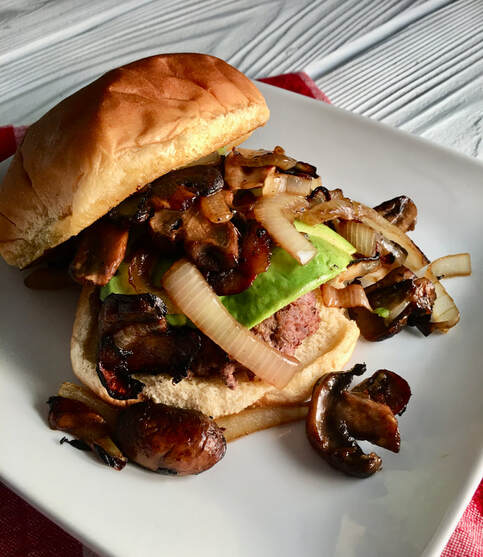
Add some healthy fat and lots of flavor by putting sliced avocado right on the burger.
What sides would you serve with hamburgers?
I like to keep things simple when serving hamburgers.
Here are a few of our favorite sides: Baked beans (you can use your favorite store bought beans) Onion rings (We love store bought frozen onion rings) Corn on the cob or when not in season, frozen corn Sliced tomatoes or when not in season, canned stewed tomatoes Sweet Potato Chips Pickles Potato salad Simple side salad Asian crunch shredded Brussels sprouts salad
Fancy Mushroom and Onion Hamburgers
Serves 4 Ingredients: •1 Tbsp. Butter •Drizzle olive oil •1 onion, sliced •8 oz fresh mushrooms, sliced •1 lb. ground beef •1-2 avocados •1 lime •Creole seasoning (affiliate link to the one I use) •Fresh ground salt and pepper •Hamburger buns Optional condiments: •Sliced cheese (Swiss, cheddar, colby-jack, etc.) •Lettuce •Sliced tomatoes •Pickles •Mustard •Ketchup •Mayonnaise 1. Sauté mushrooms and onions in olive oil and butter over medium heat. Season with salt and pepper. Cook while burgers are cooking. When burgers are almost done, turn up heat to medium/high to caramelize the mushrooms and onions. 2. In another skillet cook ground beef in patties. While cooking, salt, pepper and add a little creole seasoning. Make sure to use beef with some fat in it. I like 80/20 or 85/15 for making burgers. Save the lean beef for recipes and casseroles. Season both sides as you are cooking. You don’t need to grease the skillet if your meat has some fat in it. Cook until burgers are cooked through. 3. Slice avocados, drizzle with lime juice, then salt. 4. If you like toast buns in buttered skillet. 5. Assemble burgers to your liking.
Pin on Pinterest
I received this product for free from Moms Meet (momsmeet.com) to use and post my honest opinions. Compensation for this post was provided and this page may contain affiliate links.
We are a participant in the Amazon Services LLC Associates Program, an affiliate advertising program designed to provide a means for us to earn fees by linking to Amazon and affiliated sites.
Did you know that COVID-19 has increased screen time for kids by 500%? Nearly half of American children spend more than six hours a day in front of a screen. Add in remote learning and this number gets even higher.

I know it can be hard to monitor screen time, especially with so many of us working from home and trying to manage distance learning at the same time. Luckily my kids are back in school, but we went through many long months of them working at home to complete school assignments and attend zoom meetings with their teachers. I found it difficult to monitor three school-aged children and their younger brother when I had my own work to complete and they could easily distract themselves with video games or YouTube videos. I am glad to have Circle Home Plus now, but wish we would have had it then. If the boys go back to remote learning for any reason in the future, Circle Home Plus will be a lifesaver!

Circle Parental Controls (affiliate link) is the simplest way for families to manage screen time and filter content on all their Internet-connected devices, from tablets and smartphones to gaming consoles and smart TVs. I am not the most tech savvy person so I was a little intimidated to set up the Circle Home Plus device, but it was really easy. Once I downloaded the app, I was able to follow the step by step onscreen instructions (which are also included in printed form with the device) to set it up.
Circle Home Plus (affiliate link) has so many useful features. • Age-appropriate filters for different websites and apps (or block content all together) • Time limits for both individual apps and categories of content • Bedtimes that automatically disconnect devices from the Internet • Pause/temporarily turn off Internet-connectivity for a single family member or everyone at the same time • Focus Time to restrict access to certain sites for specific periods of the day—a perfect tool to keep distance learning or homework time on track • Rewards: Reward your child with more screen time or a later bedtime, at the touch of a button • History: Check out visited and filtered sites from the day's activity • Track usage for yourself and your family. This information is insightful if trying to reduce screen time or stay on track with projects for work and school. 
• With the Off Time feature, you can set up Off Times when internet is restricted to selected devices for important family times like dinner and game nights.
Circle Home Plus typically retails for $69 for a three-month subscription, $129 for a one-year subscription, or $299 for a lifetime subscription (all plans include the Circle Home Plus device and Circle App access).
Want to learn more? Visit Circle for more info. Enjoy this exclusive offer and save 20% on your purchase of a Circle Home Plus device + 1 year app subscription or Circle Home Plus device + Lifetime app subscription at moms meet with promo code MOMSMEET2021! Valid until 10/15/21. One promo code use per person.
We are a participant in the Amazon Services LLC Associates Program, an affiliate advertising program designed to provide a means for us to earn fees by linking to Amazon and affiliated sites.
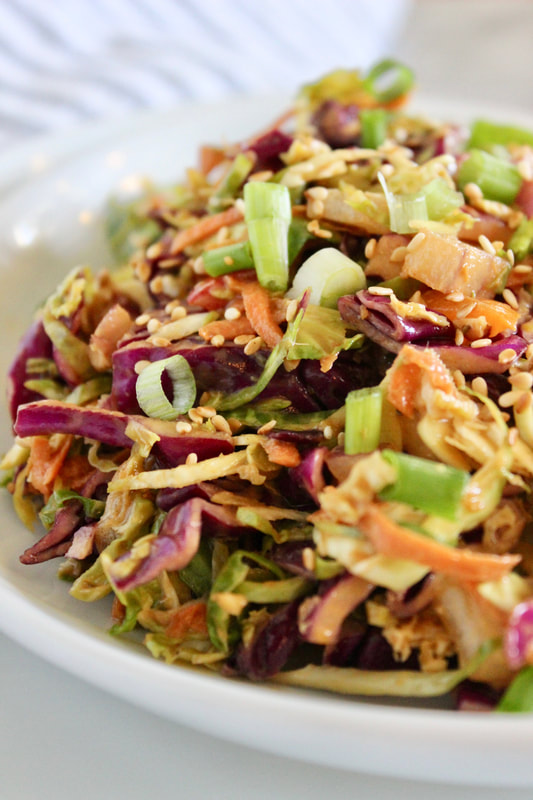
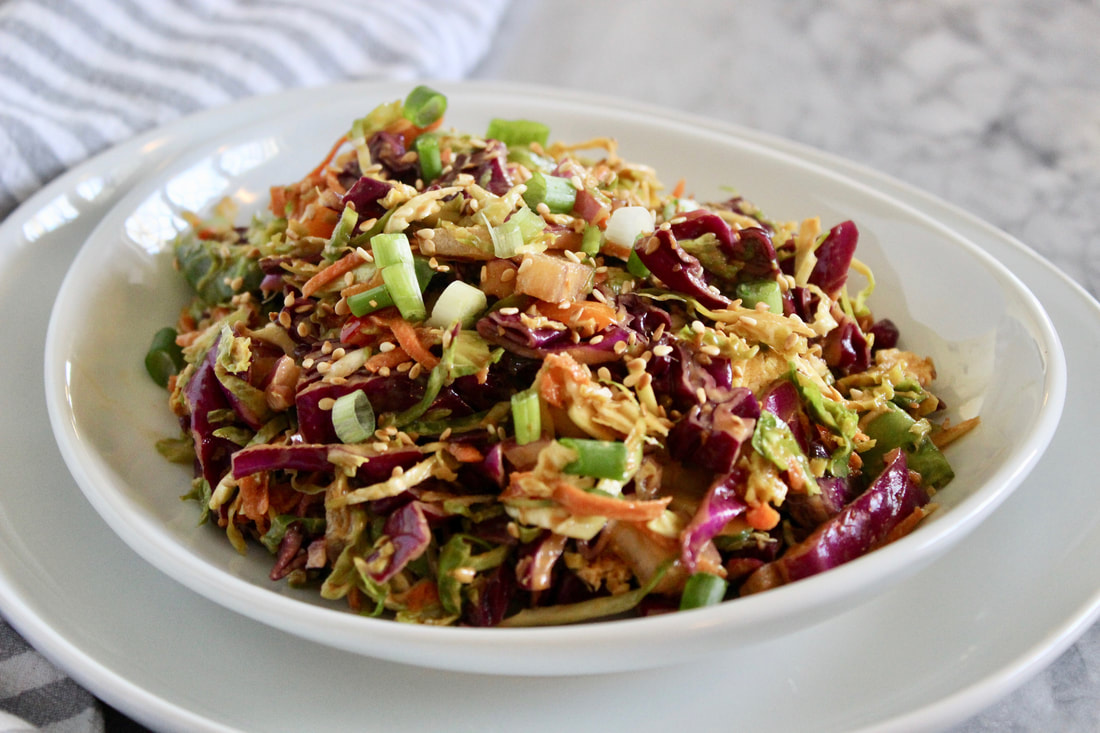
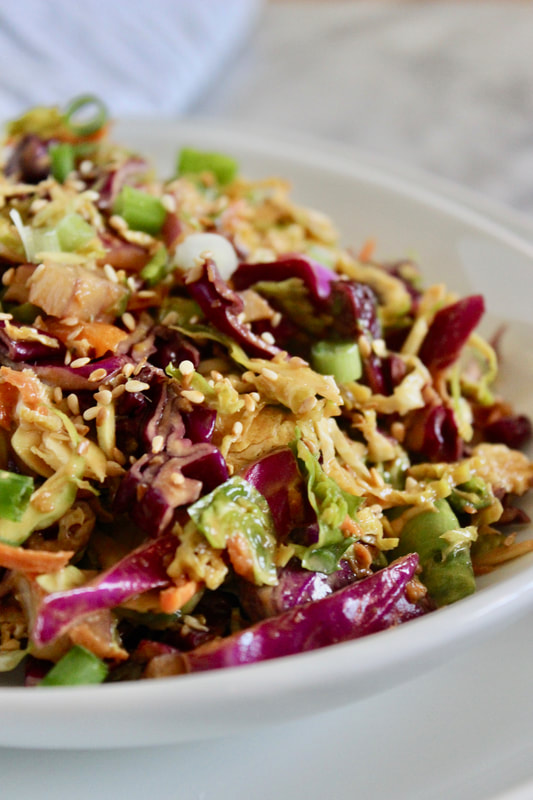
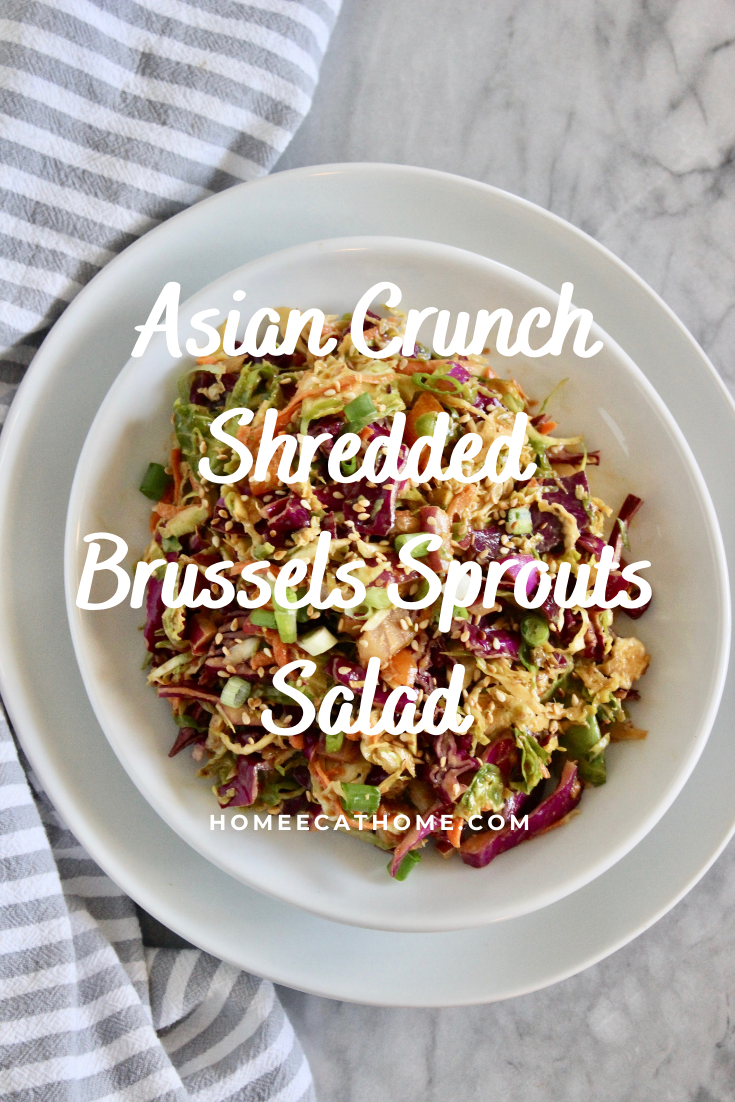
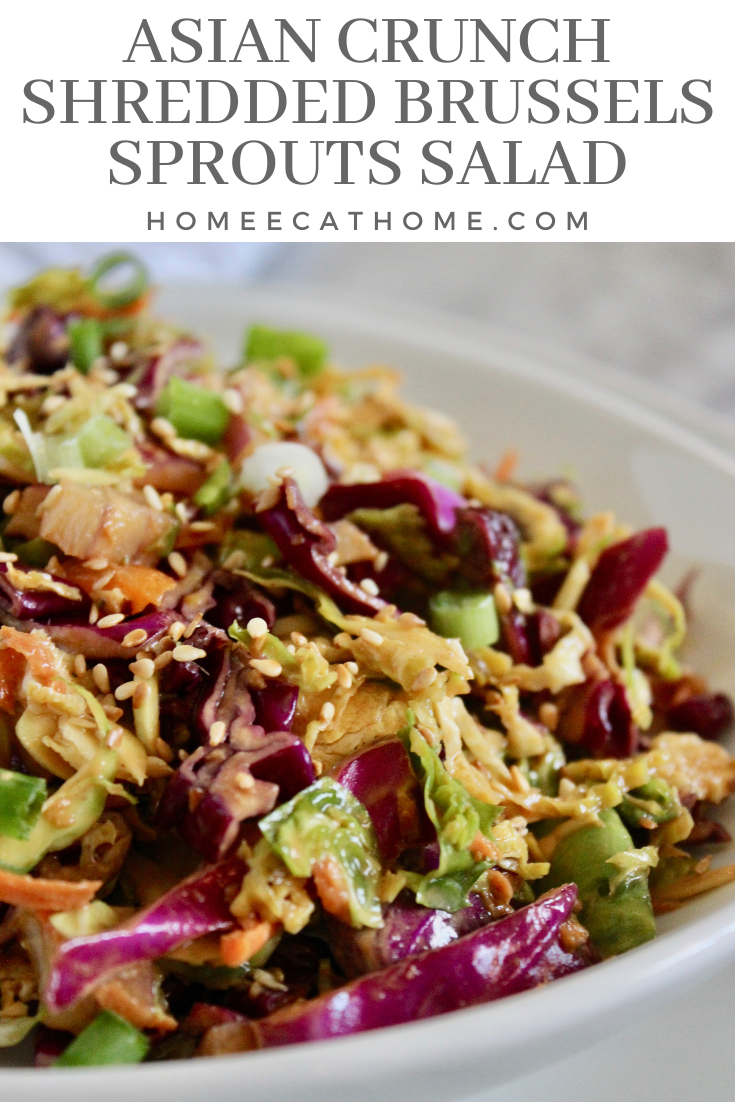
This Asian Crunch Shredded Brussels Sprouts Salad has all the wonderful flavors you would expect from a good Asian slaw/salad, but without the high carb ramen noodles. This salad gets its crunch from fresh shredded vegetables, pistachios and almonds.
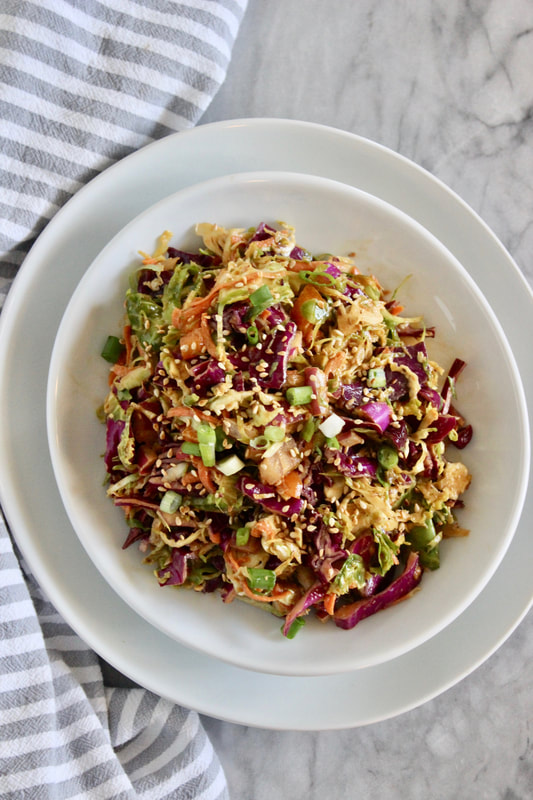
Tossed in a homemade peanut, ginger, sesame dressing, this salad is full of flavor and freshness.
We are big Brussels Sprouts fans and usually eat them cooked, but love the fresh crunch they add when shredded in this salad. My neighbor grew beautiful Brussels Sprouts last year, so I am trying to grow some this spring. I'll keep you posted. (My instagram account where you can see more of the day to day.)
What is the best way to chop/shred vegetables for salads and slaw?
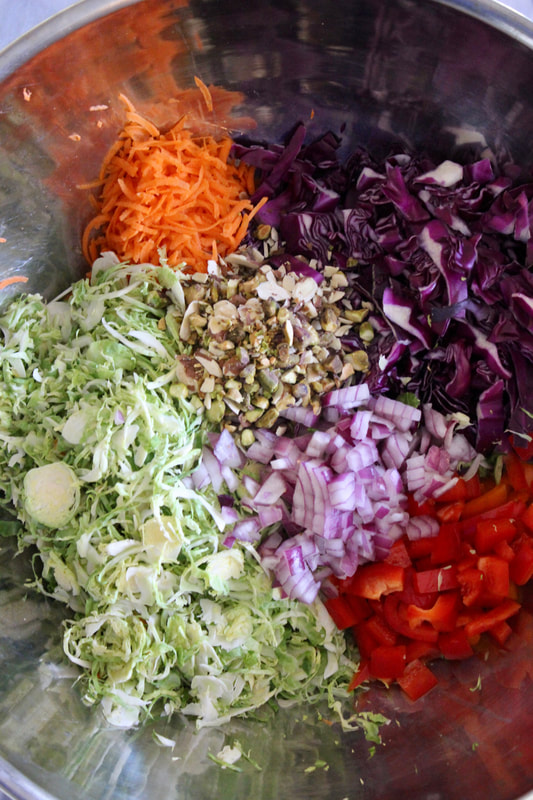
I think it comes down to personal preference as to how fine, thin, uniform, etc. you want vegetables to be in homemade salads and slaws. It is certainly easiest to use a food processor to process vegetables, but if you want larger pieces, you may prefer slicing and shredding by hand. I like to do a little of both, using my food processor for some vegetables and slicing some by hand.
If you have a food processor (amazon affiliate link to the one I have), this salad is a cinch to make. I use the slicing blade to shred the Brussels Sprouts in my food processor which is easy to do and produces thinly sliced sprouts that are perfect for this salad. I also shred the carrot in my food processor with the shredding blade because it is so much easier than shredding it with a box shredder. The cabbage pictured was cut by hand, but it is a little on the thick side, so you may want to use a food processor for cabbage too or slice it thinner. I like to dice the pepper and onion by hand to give it more crunch and thickness, but again this is my personal preference. I also chop the pistachios by hand since they are so easy to chop on a cutting board and we are only using a few in this salad. 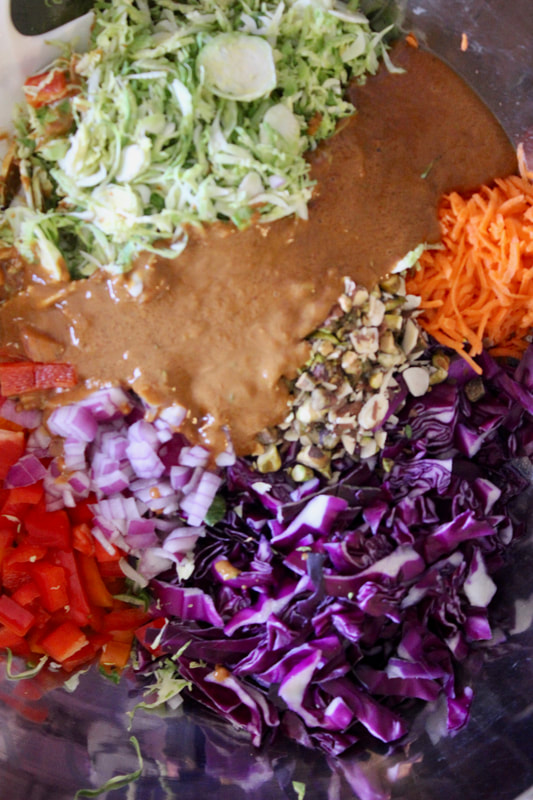
To make the dressing, put the dressing ingredients in a food processor, blender, or emersion blender (amazon affiliate link) and blend until creamy. I use my food processor to blend the dressing since I already have the appliance out.
What is the difference between Tamari soy sauce and regular soy sauce?
To make this dressing, I use Tamari soy sauce which has a richer, milder, more complex flavor than regular soy sauce. It is made from 100% soy and does not contain wheat like regular soy sauce making it a good choice for those avoiding gluten. It tastes less salty than regular soy sauce and is more complex which makes it a nice choice for Asian salads. I included an affiliate link in the ingredient list, but it is less expensive if you can find it in the Asian section of your local grocery store or in your local Asian grocery store.
|


|
|
Yum on Yummly
We are a participant in the Amazon Services LLC Associates Program, an affiliate advertising program designed to provide a means for us to earn fees by linking to Amazon and affiliated sites.
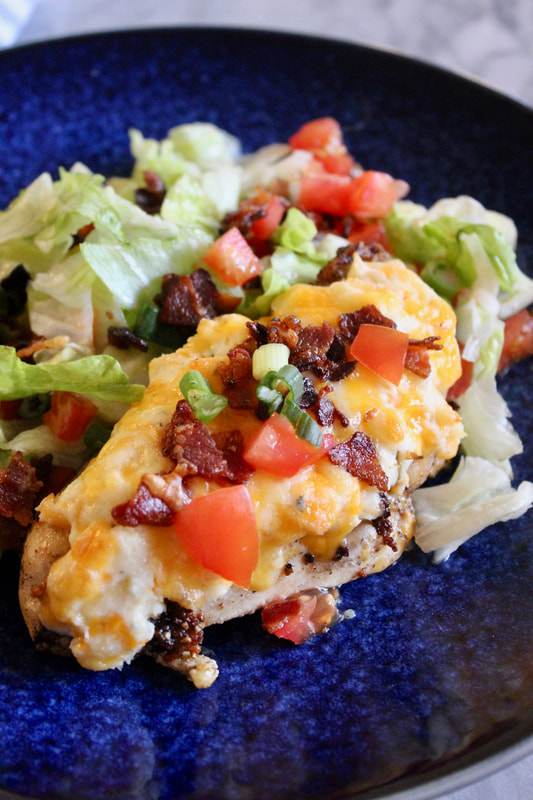
Since my husband and I have been following a low carb diet again, this baked keto crack chicken has quickly become a family favorite. Your entire family will love this. It is kid friendly with all the cheesy goodness and bacon. My boys love it. One of them even used the word exquisite to describe this chicken which is pretty cute coming from an 11 year old.

Why is it called crack chicken?
Crack chicken is a common name for this style of ranch flavored cheesy chicken because it so good, you will want more. When I make this 8 serving recipe for my family of 6, we don't have any leftovers.
Can you double this recipe?
I have doubled this recipe for company and it's pretty easy to double since everything goes in the oven at once. I brown the chicken in the skillet in batches and then assemble everything in the pan. If on the other hand you are only cooking for two, you can easily halve this recipe and still have plenty plus maybe some leftovers for lunch the next day.

What sides would you serve with Low Carb Keto Crack Chicken?
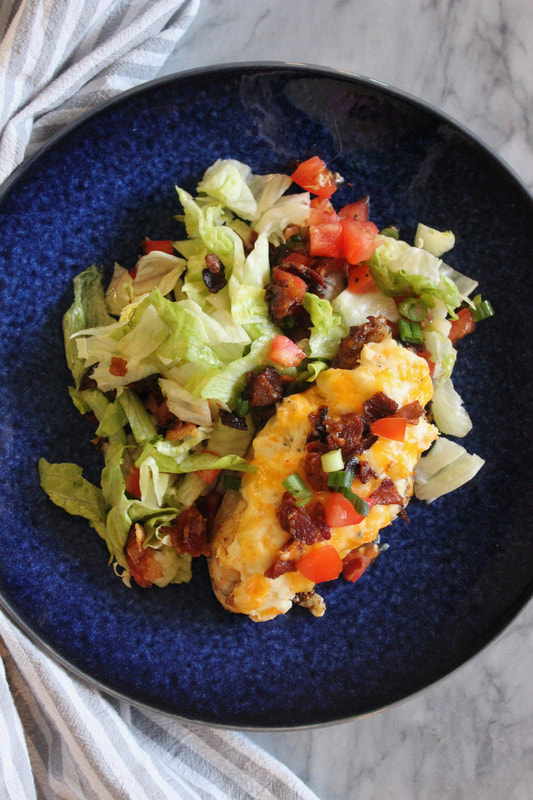
To keep the whole meal low carb, I would serve with a large salad like the BLT salad pictured or some steamed broccoli. A fresh spinach salad or wilted spinach would be nice too. Grilled cabbage is always one of our favorites and since you are already using the oven, you could just roast some cabbage wedges with olive oil, salt, and pepper in another pan while cooking the chicken. If you really want to impress, you could make some crispy bacon wrapped asparagus which is in season now and requires the same oven temperature as the chicken.
Low Carb Baked Keto Crack Chicken
Serves 8
Ingredients:
4 large boneless, skinless chicken breasts (about 2 ½ -3 lb. total)
6 oz bacon
8 oz. block cream cheese
2 Tbsp. Ranch flavored dressing mix (amazon link)
¾ C. shredded sharp cheddar cheese plus extra for topping
Salt and Pepper
Optional toppings:
Sliced green onions
Diced Roma tomatoes
Directions:
1. Preheat oven to 400 degrees F.
2. Slice the chicken breasts in half lengthwise to make 8 thinner chicken breast slices.
3. Cut bacon into small pieces (I use kitchen shears) and fry in a skillet until crisp.
4. Set bacon aside.
5. Mix ranch dressing into cream cheese then mix in ¾ cup shredded cheese.
6. Brush some of the bacon grease in a large baking pan to grease it or use oil of choice.
7. In the same skillet brown chicken breast halves in bacon grease for 2-3 minutes on each side until golden brown. Salt and pepper each side while cooking.
8. Place chicken breast halves in baking pan.
9. Spread cream cheese mixture on top of each chicken breast.
10. Top with extra shredded cheese and bacon crumbles.
11. Bake for about 15 minutes until cheese is melted and chicken is cooked through.
12. Optional to top finished dish with diced Roma tomatoes and sliced green onions.
Pin on Pinterest

|

|
We are a participant in the Amazon Services LLC Associates Program, an affiliate advertising program designed to provide a means for us to earn fees by linking to Amazon and affiliated sites.
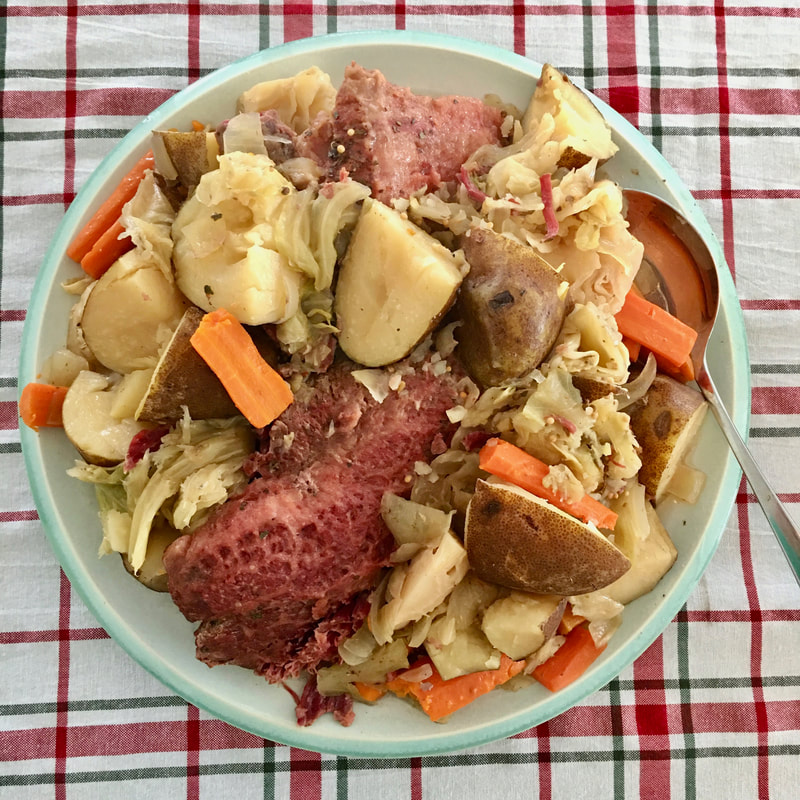
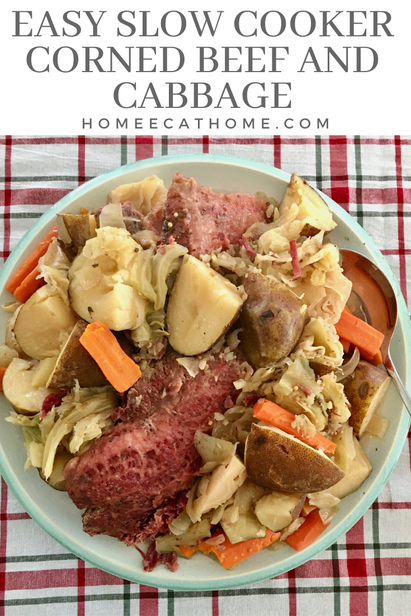
Every year on St. Patrick's Day I make corned beef and cabbage. It's the easiest meal since I make it in the slow cooker and our family loves it. They love it so much that I now make two cuts of corned beef. Life with four growing boys!
I simply put everything in the slow cooker, almost cover with water and cook on low all day. It doesn't get much easier than that.
Here is a quick video showing how to make this easy slow cooker corned beef and cabbage.
I started with two packages of point cut corned beef (about 5 1/2 total lbs.) because we have a big family who loves corned beef and cabbage. You can buy packaged ready to use corned beef in point cut or flat cut. Flat cut was a little more expensive so I bought point cut, since we don’t have a preference.
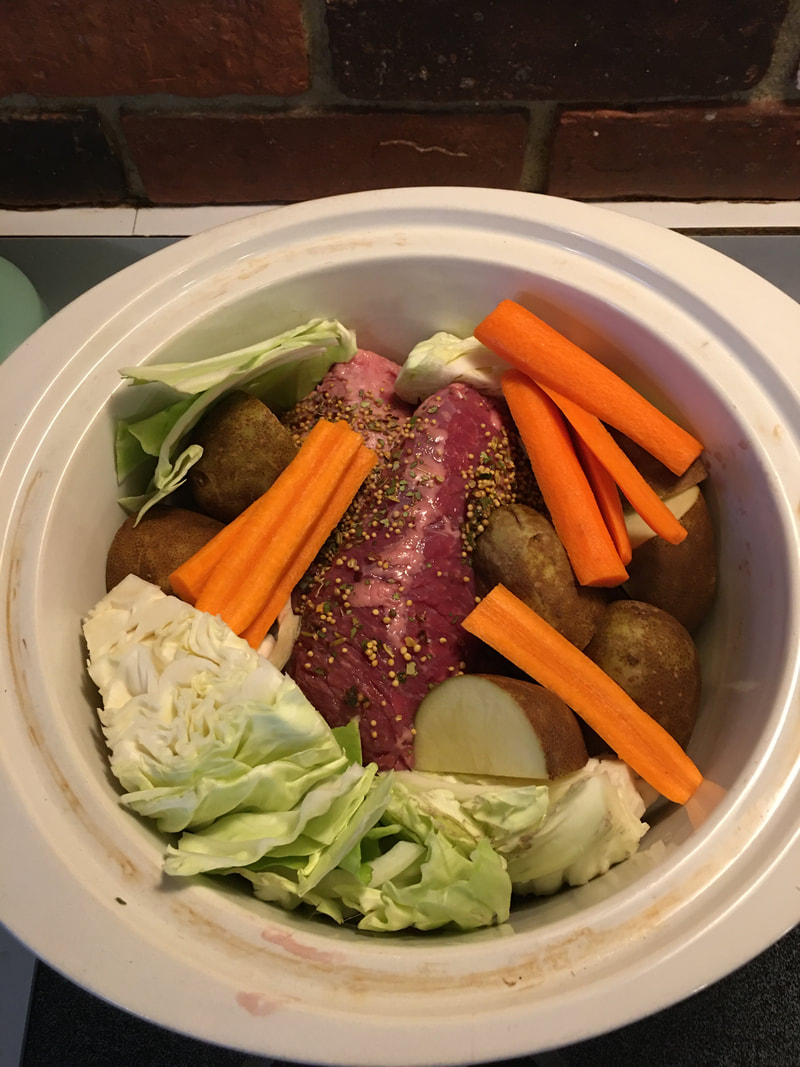
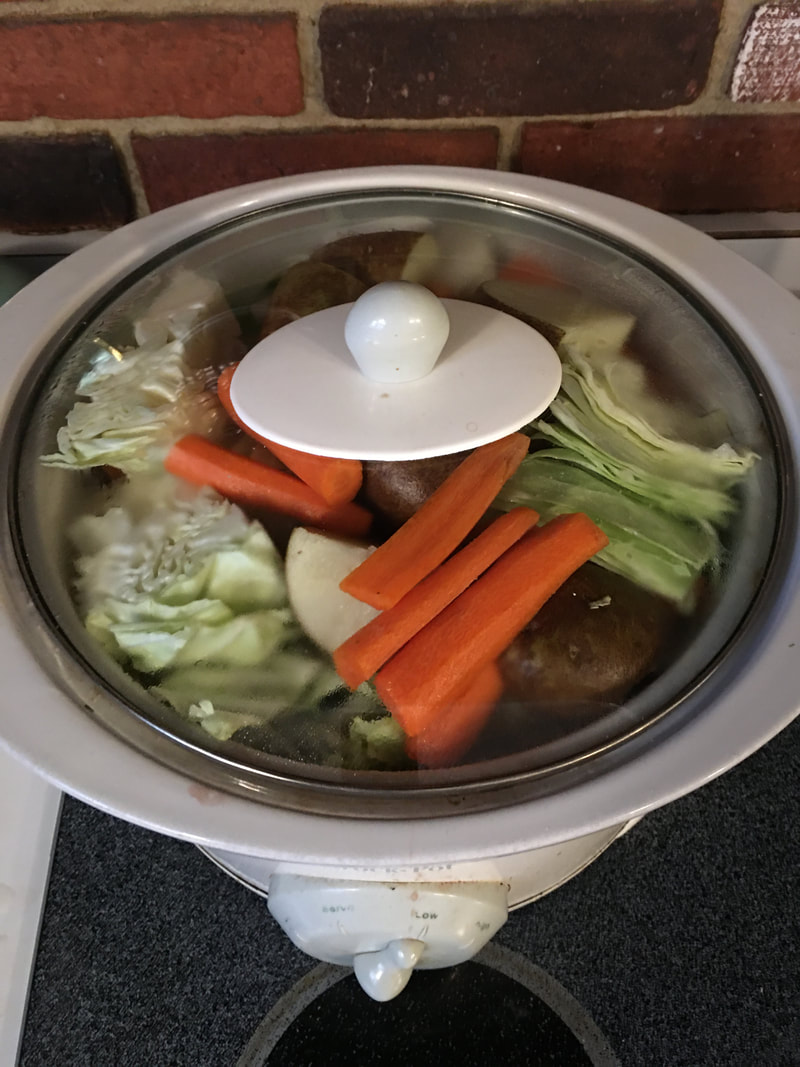
I put the meat in the slow cooker (amazon link) then sprinkle the spice packets over the meat. The spice packet comes in the package of meat. Then I add some chopped onion, quartered russet potatoes, carrot slices and small wedges of cabbage. I pour water into the slow cooker to almost cover everything and added a little fresh ground salt and pepper over the vegetables. I cook on low all day, until vegetables are tender and meat is done, around 8 hours or so.
This is such an easy dinner to prepare and it is always a treat. We make it every year for St. Patrick’s day, but really should make it more often. Happy St. Patrick’s Day!
Pin on Pinterest
Yum on Yummly

Welcome to Home Ec @ Home
Hi, I'm Faith, a former Family and Consumer Science teacher turned food blogger. I love God, my family, and food. You can usually find me in the kitchen preparing family friendly, homemade recipes and taking lots of pictures.

Still Goldens, Southern, IL

Fan Favorites

The Best Dry Brined Turkey with Citris and Fresh Herbs

 Dehydrating Pears and Apples in the Instant Pot Duo Crisp
 RSS Feed


