|
Disclosure: This post is sponsored, but all opinions are honest and are my own. #WEGGSDAY
We are a participant in the Amazon Services LLC Associates Program, an affiliate advertising program designed to provide a means for us to earn fees by linking to Amazon and affiliated sites.
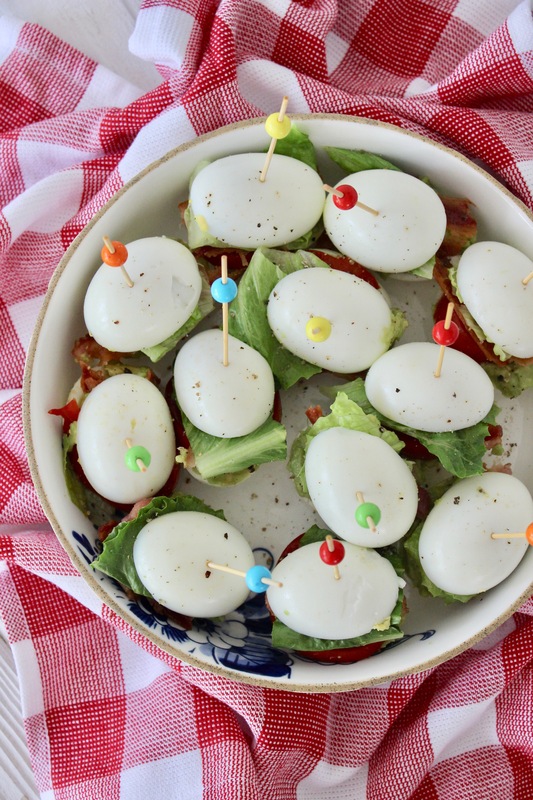
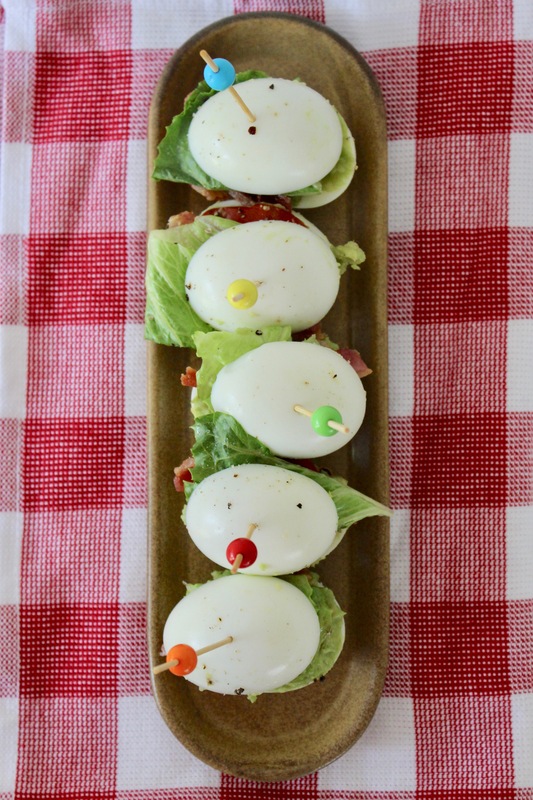
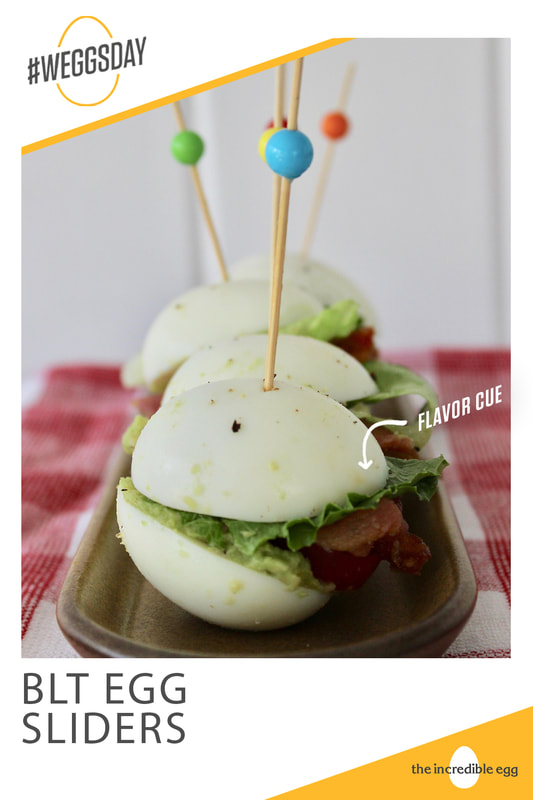
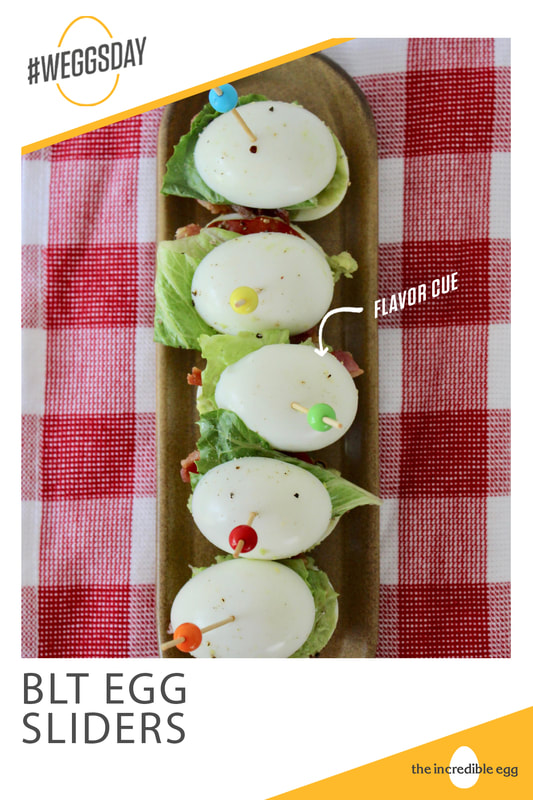
How do like your eggs on Wednesday? Celebrate #Weggsday with these delicious BLT Egg Sliders. Layers of crisp bacon, fresh tomatoes, lettuce, and homemade guacamole sandwiched between cold hard boiled eggs make these sliders your easy weekday go-to for lunch, dinner or anytime in between.
I love cold hard boiled eggs in the heat of summer. They are one of my favorite breakfasts, lunches or snacks. Plus eggs are a nutritional powerhouse, with one egg containing 6 grams of high-quality protein and nine essential amino acids, all for 70 calories.
We love these BLT egg sliders. They are such an easy, delicious, and healthy meal or snack on warm summer days. For more inspiring #weggsday recipe ideas visit The Incredible Egg.
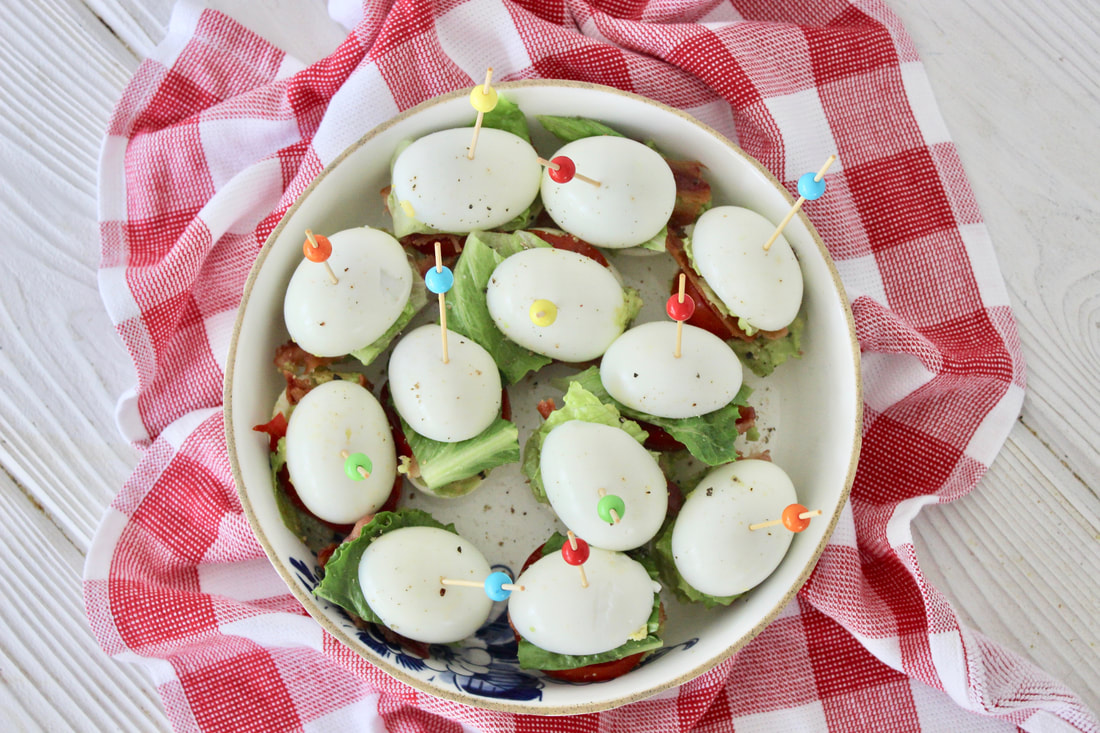
These are so easy to make. Boil some eggs ahead of time so they have time to chill. Prepare a small batch of easy homemade guacamole or use store-bought. Cook some bacon until crisp. I microwave it and it is so easy. Slice or tear a couple of slices of romaine lettuce into small pieces. Slice small or cherry tomatoes into round slices. Then just slice the eggs in half, spread with some guacamole and layer on the good stuff. Finish with some fresh ground salt and pepper.
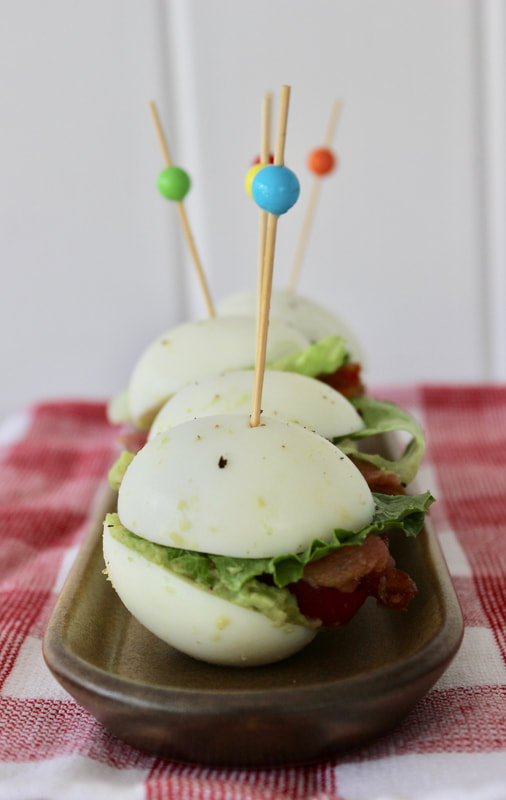
Serving hint: These BLT egg sliders do tend to roll a little, but sit really well next to each other in a sided dish.
Serves 6
Prep Time: 30 minutes plus time to boil and chill eggs Ingredients: 12 boiled eggs 2 to 3 small tomatoes or a pint of cherry tomatoes 2 leaves romaine lettuce, each torn into 6 small pieces 4 slices cooked, crisp bacon, each slice torn into 3 pieces Decorative picks to hold the eggs together Fresh ground salt & pepper Small batch easy guacamole 1 ripe avocado Juice from 1/2 lime (gentle squeeze to taste) Fresh ground salt For small batch guacamole mash the avocado and add fresh lime juice and salt to taste. 1. Slice boiled eggs in half. Leave the yolks in the whites. 2. Spread guacamole on one egg half. 3. Layer tomatoes, lettuce, and bacon in eggs like a sandwich. 4. Hold together with decorative picks. 5. Salt and pepper egg sliders to taste 
Pin on Pinterest

You might also like:

Yum on Yummly
6 Comments
Disclosure: We are a participant in the Amazon Services LLC Associates Program, an affiliate advertising program designed to provide a means for us to earn fees by linking to Amazon and affiliated sites.
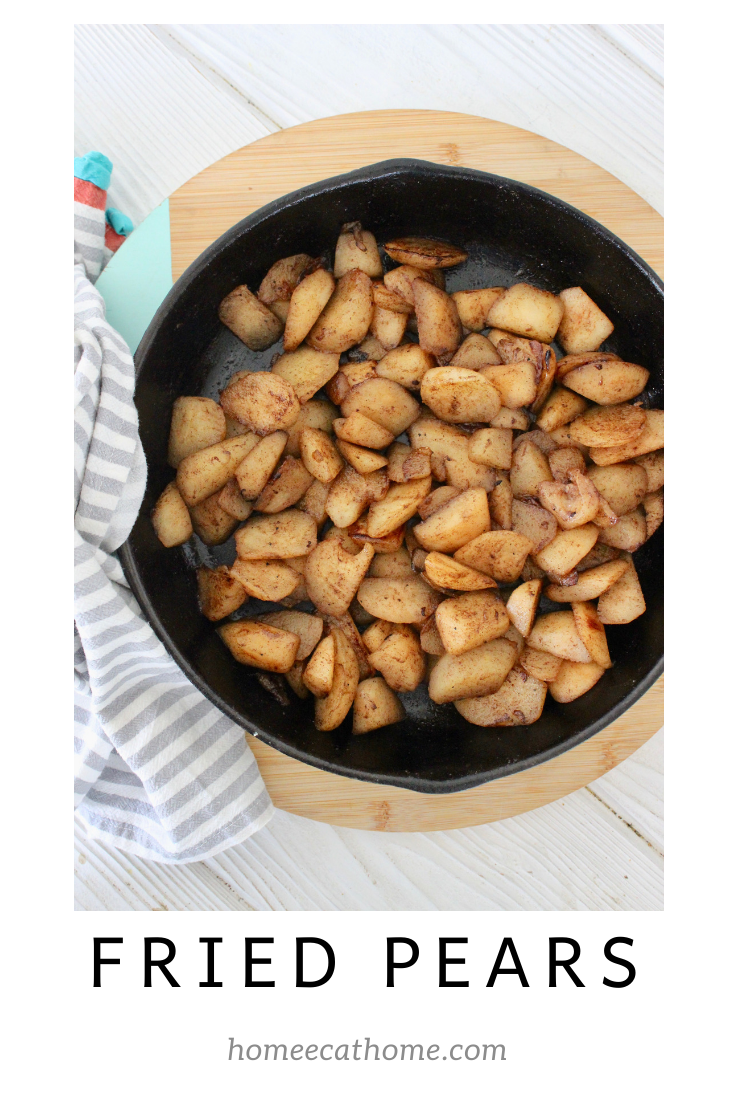
We recently picked a bushel of pears from a friend's pear tree so I have been making pears all kinds of ways. This morning, I made waffles and decided to make fried pears the same way I make fried apples. Fried pears or apples are so easy you don't even need a recipe.
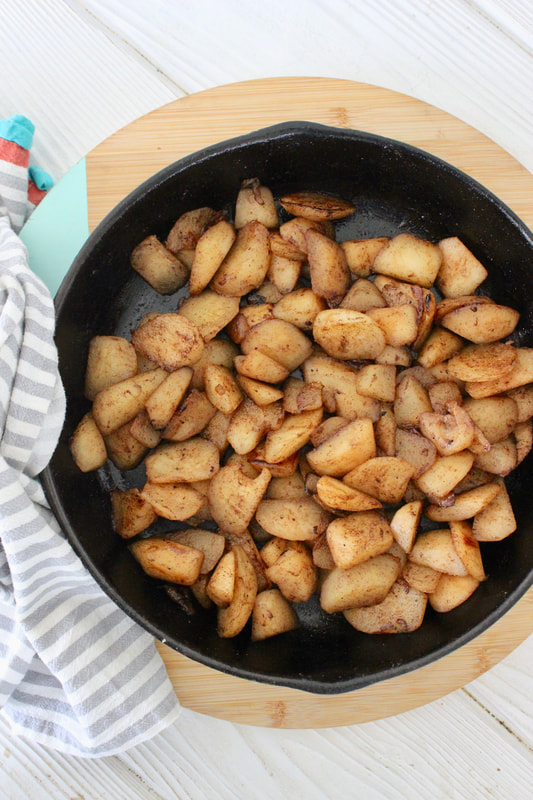
I peeled these pears because the skins are so thick, but you can also just slice the pears and leave the skins on.
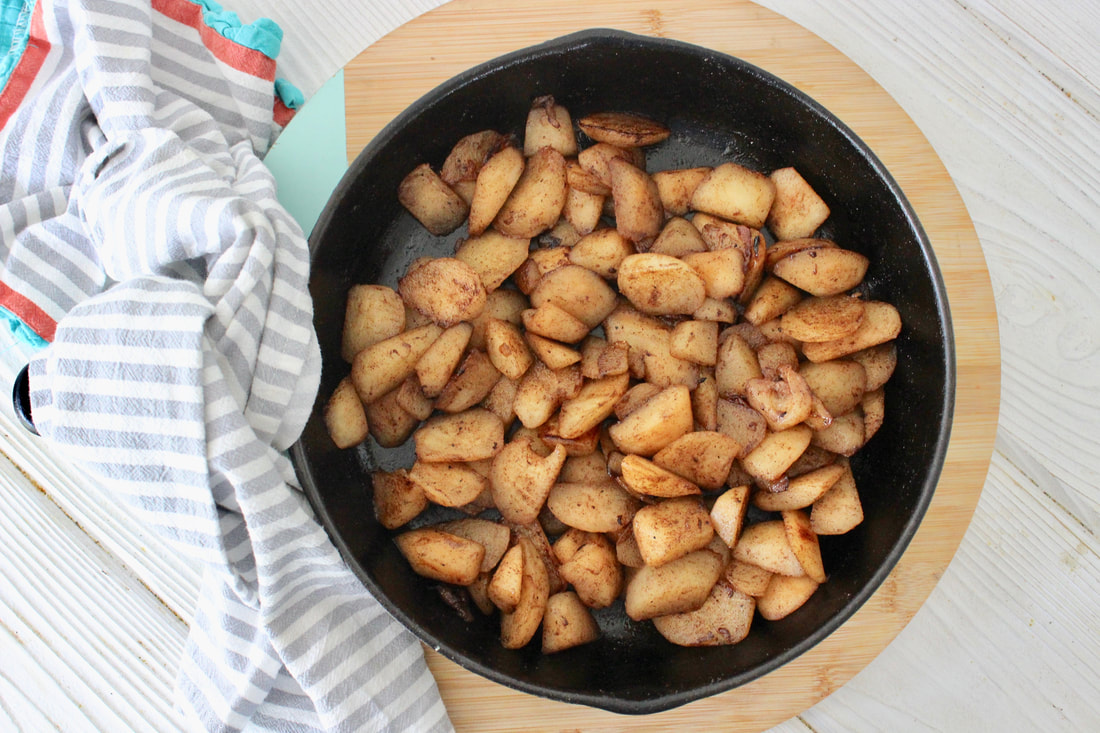
An iron skillet (amazon link) is my favorite for frying pears or apples. It helps to give a nice caramelization and is so easy to clean afterwards with just hot water and a quick scrubbing.
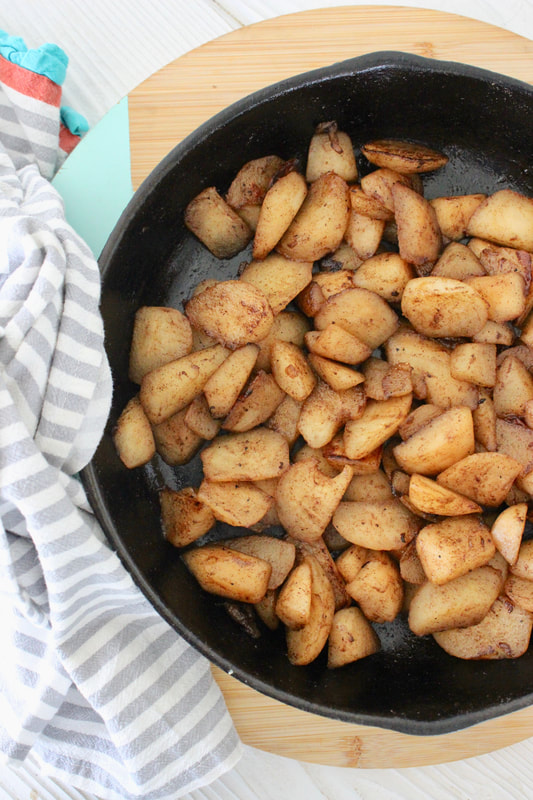
Tender, caramelized fried pears are the perfect side for breakfast, brunch, or dinner. Enjoy over waffles or alongside a juicy pork roast for a delicious end of summer treat.
You don't really need a recipe for this, but here is the general idea.
Ingredients: Pears, maybe 6 or so, whatever fills your skillet 2 T. butter, you can use more or less Cinnamon, I just shake some in a couple of times while cooking Sugar, optional. I lean towards less because you don't need much. I used about 2 Tbsp. in this skillet to get the pears to juice. Melt the butter in the skillet. Add the rest of the ingredients and cook over medium heat until the pears are fork tender and start to caramelize. Stir from time to time to help pears cook evenly.
You might also like our favorite Pear Crisp.

Pear Crisp
Disclosure: We are a participant in the Amazon Services LLC Associates Program, an affiliate advertising program designed to provide a means for us to earn fees by linking to Amazon and affiliated sites.
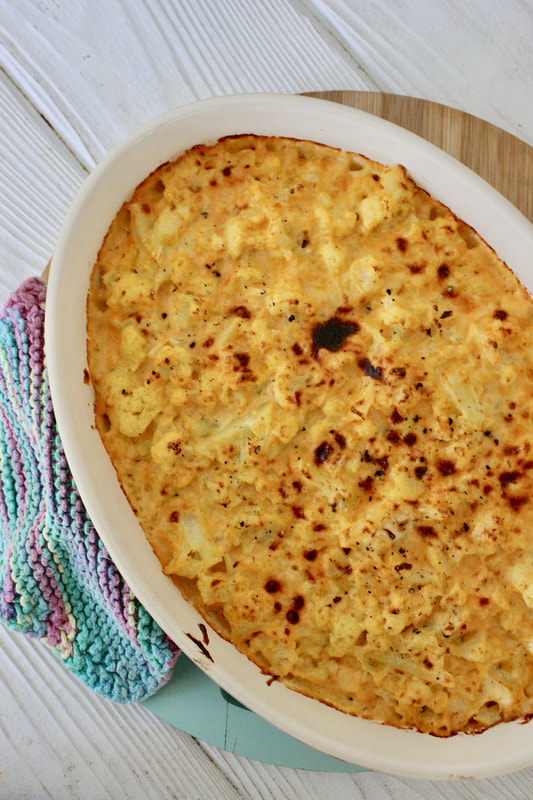
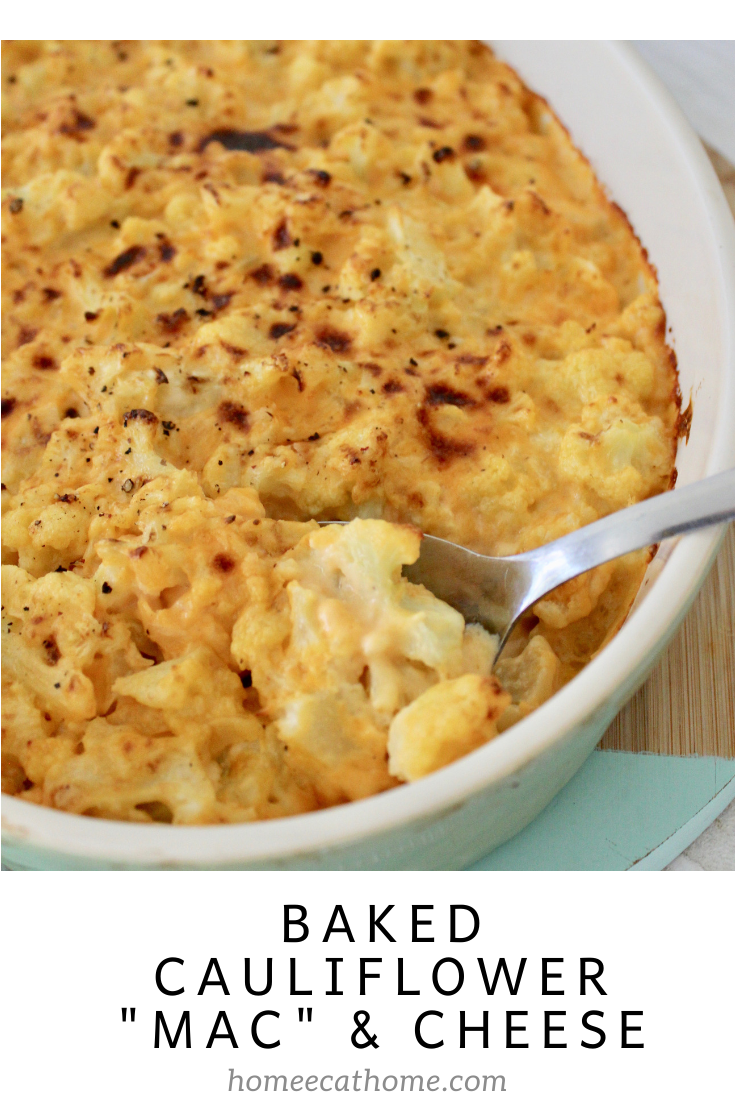
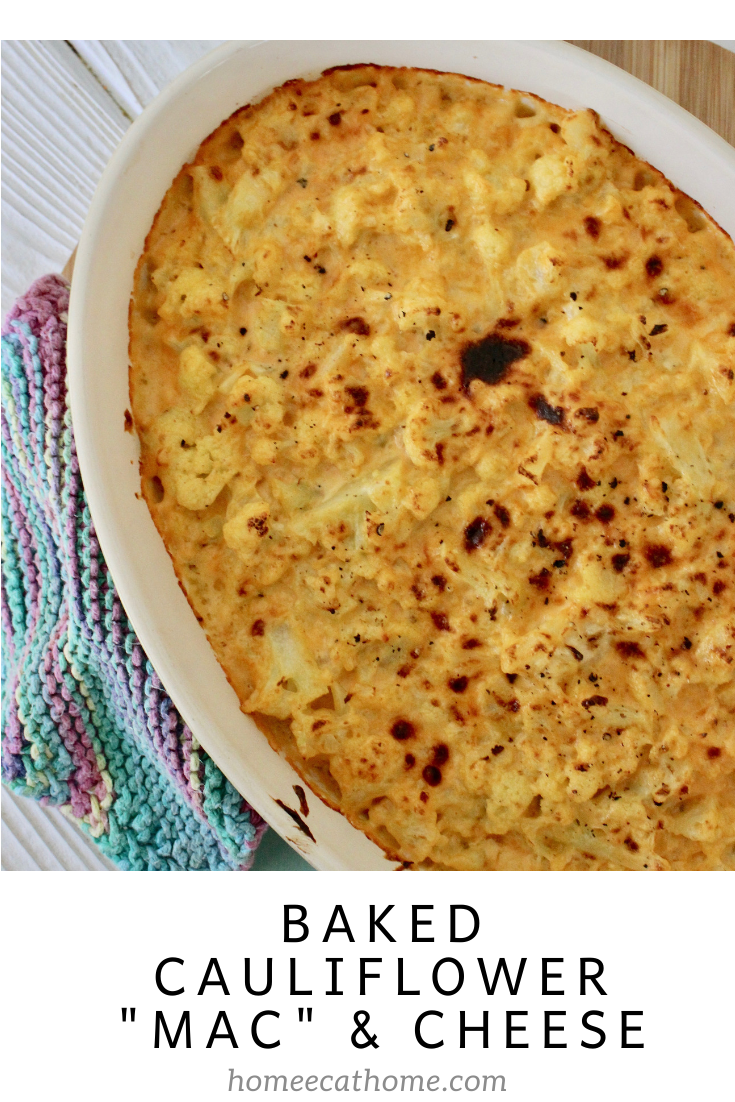
We love this baked cauliflower "mac" and cheese! It is such a treat and lower in carbs than traditional mac and cheese made with macaroni pasta. One cup of raw cauliflower contains only 5 grams of carbs and 3 of those grams are fiber.
Plus cauliflower is rich in vitamins and minerals. It is a very good source of vitamin C which boosts the immune system and it contains some of almost every vitamin and mineral that you need.

I think what makes this cauliflower "mac" and cheese so good is all the wonderful flavors that come together...butter, sweet onion, dijon mustard, garlic, salt, pepper, and sharp cheddar. The cream cheese and heavy cream give it just the right amount of richness. It is delicious, filling, and with all those nutrients packed inside you know you are serving something good.
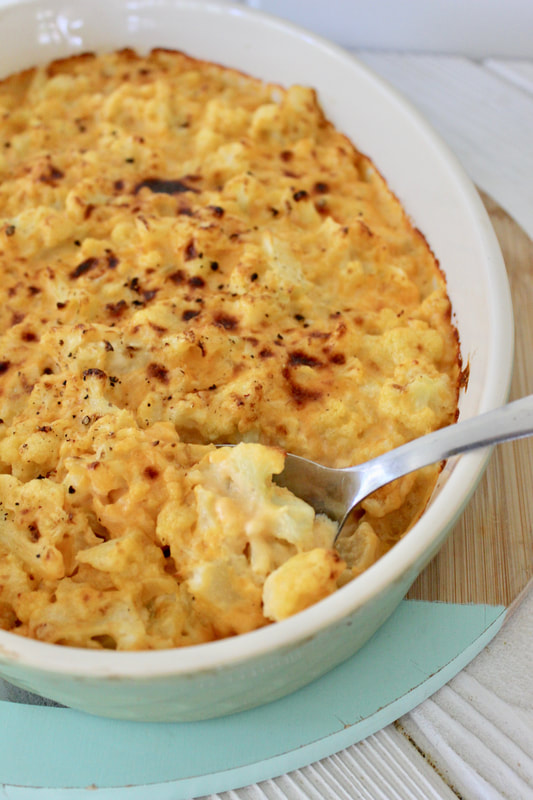
This low carb baked cauliflower "mac" and cheese is the healthy and delicious comfort food you need.
Recipe note: It will be perfectly done after about 15 minutes in the oven, but to get that nice golden brown top, place the casserole on the top rack of the oven, set the temperature to broil, crack the oven door open and broil for a minute or two until you see a golden brown crisp on top. Be careful not to burn.
Low Carb Baked Cauliflower "Mac" & Cheese
Serves: 8 Ingredients: 1 large or 2 small heads of cauliflower 2 Tbsp. butter 1/4 cup finely diced sweet onion 2 oz. cream cheese 1 1/2 tsp. dijon mustard 1/4 tsp. garlic powder 1/2 tsp. salt 1 cup heavy whipping cream 8 oz. (2 cups) shredded sharp cheddar cheese Fresh ground salt & pepper Preheat oven to 375 degrees F. 1. Cut cauliflower into small 1/2 inch pieces. You want it to be small like macaroni noodles. Boil cauliflower until fork tender about 5-6 minutes. Drain in a colander and leave cauliflower in the colander to drain off more moisture while preparing the cheese sauce. 2. In a skillet sauté onion in the butter over medium heat until transparent. 3. Add cream cheese, dijon mustard, garlic powder, salt, heavy whipping cream and stir to combine. The cream cheese will melt into the other ingredients. 4. Remove from heat and stir in the shredded sharp cheddar cheese. 5. Spray a large casserole dish or a 9 X 13 pan with olive oil (amazon link) or cooking spray. 6. Combine the cheese sauce and cauliflower and spoon into your casserole dish. Salt & pepper the top to taste with fresh ground salt & pepper. 7. Bake for about 15 minutes until heated through and bubbly. 8. To toast the top, place under the broiler on the broil setting for 1-2 minutes until lightly browned. 
Pin on Pinterest

Disclosure: This post is sponsored, but all opinions are honest and are my own. #WEGGSDAY
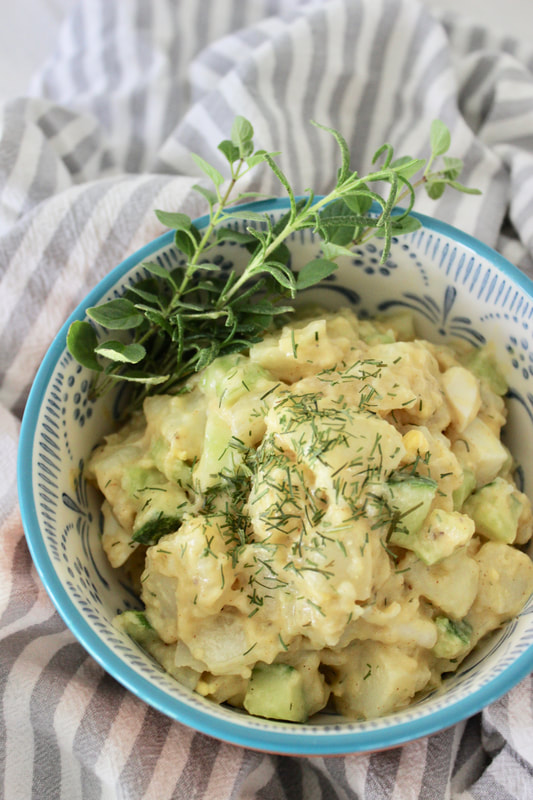
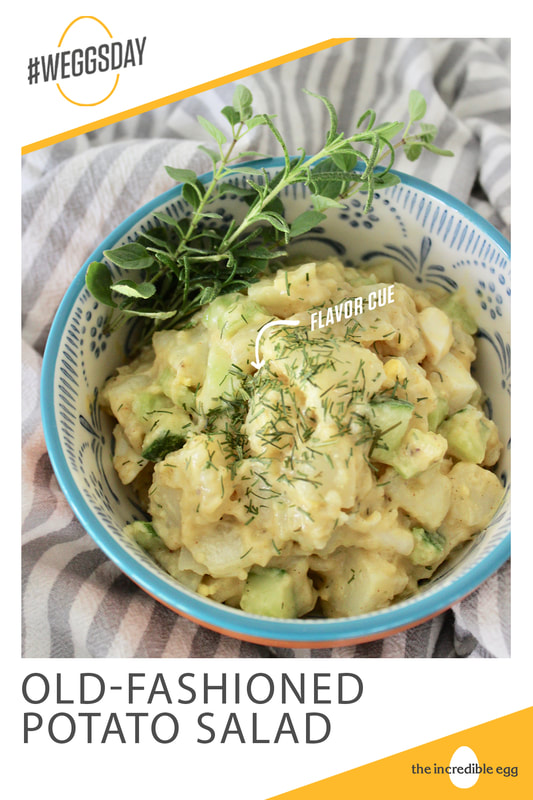
How do you like your eggs on Wednesday? Celebrate #Weggsday with old fashioned potato salad made with fresh hard boiled eggs. One of my favorite foods of summer is good old fashioned potato salad. This potato salad recipe is a keeper! Your family will love it and it's good enough to share.
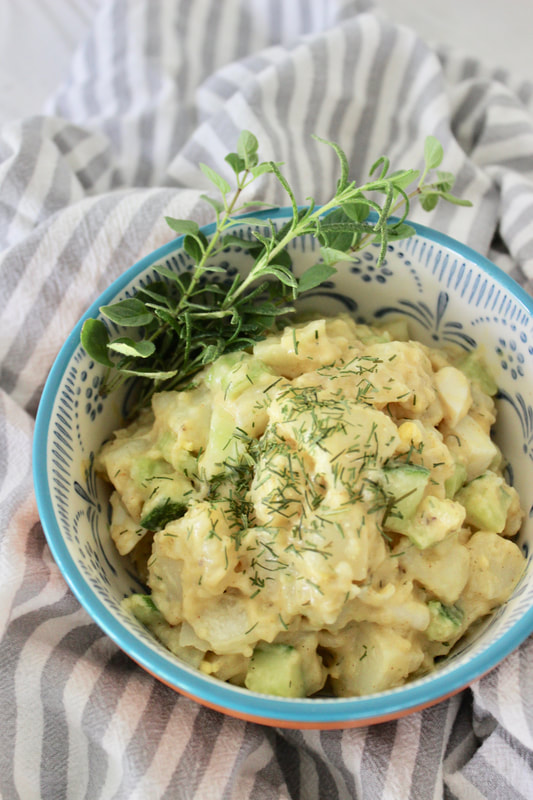
My favorite way to eat eggs in the heat of the summer is hard boiled. Cold, chopped hard boiled eggs add so much flavor and nutrition to potato salad. Did you know eggs are a nutritional powerhouse, with one egg containing 6 grams of high-quality protein and nine essential amino acids, all for 70 calories? Plus, eggs are one of the few natural food sources of Vitamin D.

We love this creamy potato salad full of fresh vegetables, eggs, and the most delicious dressing. It's the perfect side dish for warm summer days. For more inspiring #weggsday recipe ideas visit The Incredible Egg.
Since we love this potato salad so much and we are a family of 6, I double this recipe. I make a single batch of the French dressing because you only need 1/4 cup (1/2 if doubling) for the potato salad and the dressing makes about 3/4 cup. If making this for guests or a family pot-luck, I would double the potato salad recipe. When I make a double batch for our family, we have leftovers for another meal which is the best. This potato salad will keep beautifully in the fridge for 3-4 days.
Serves 6
Prep Time: 45-60 minutes Chill Time: 4-5 hours Ingredients: 6 Russet potatoes 1/4 medium onion, diced (I use sweet) 1/2 cucumber, diced 1/2 cup diced celery 2 boiled eggs, diced 1/4 tsp. paprika 1/2 tsp. salt 1/2 T. prepared mustard 1/2 cup whipped salad dressing (or if you prefer mayonnaise) 1/4 tsp. celery seed 1/4 tsp. dried dill plus more or fresh dill for garnish Fresh ground salt and pepper 1/4 cup French dressing (recipe below) French dressing: 1 tsp. sugar 1/2 tsp. salt 1/2 tsp. prepared mustard 1/2 tsp. paprika Dash cayenne pepper 2 T. fresh lemon juice 2 T. apple cider vinegar 1/2 cup olive oil To make the French dressing: Mix the ingredients in a jar and shake well. This recipe makes about 3/4 cup. I always double the potato salad recipe since we are a big family so I use about 1/2 cup of this dressing in the potato salad and keep the rest in the fridge for use on salads. If you like, you can halve the dressing recipe for a single batch of potato salad, but it is good as a salad dressing too. To make the potato salad: 1. Boil potatoes in their skins until they are fork tender. Do not let them cook until they are mushy. They will continue to cook after you remove them from the boiling water. Drain in a colander. Let sit until cool enough to handle. Peel potatoes, then cube. 2. For best flavor, salt and pepper potatoes and boiled eggs when chopping with fresh ground salt and pepper. 3. Make French dressing (recipe above). 4. Combine ingredients. Chill for a few hours before serving to enhance flavor. 5. Garnish with extra dried dill or fresh dill
Pin on Pinterest
Yum on Yummly
Disclosure: We are a participant in the Amazon Services LLC Associates Program, an affiliate advertising program designed to provide a means for us to earn fees by linking to Amazon and affiliated sites.
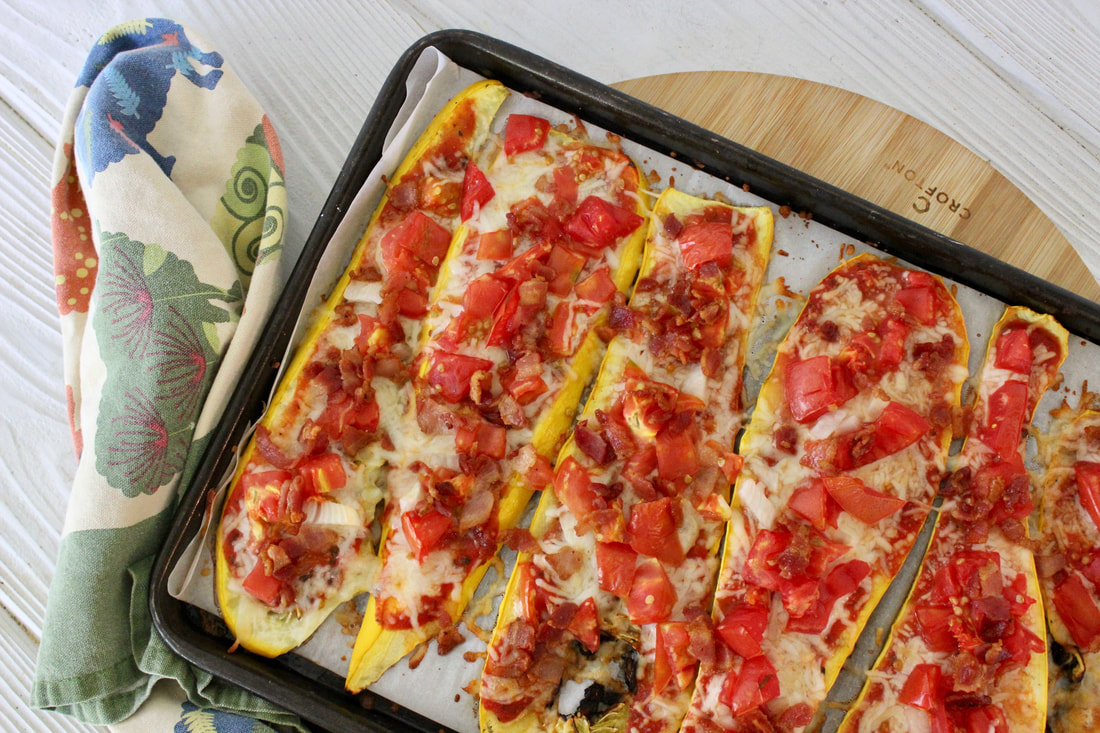
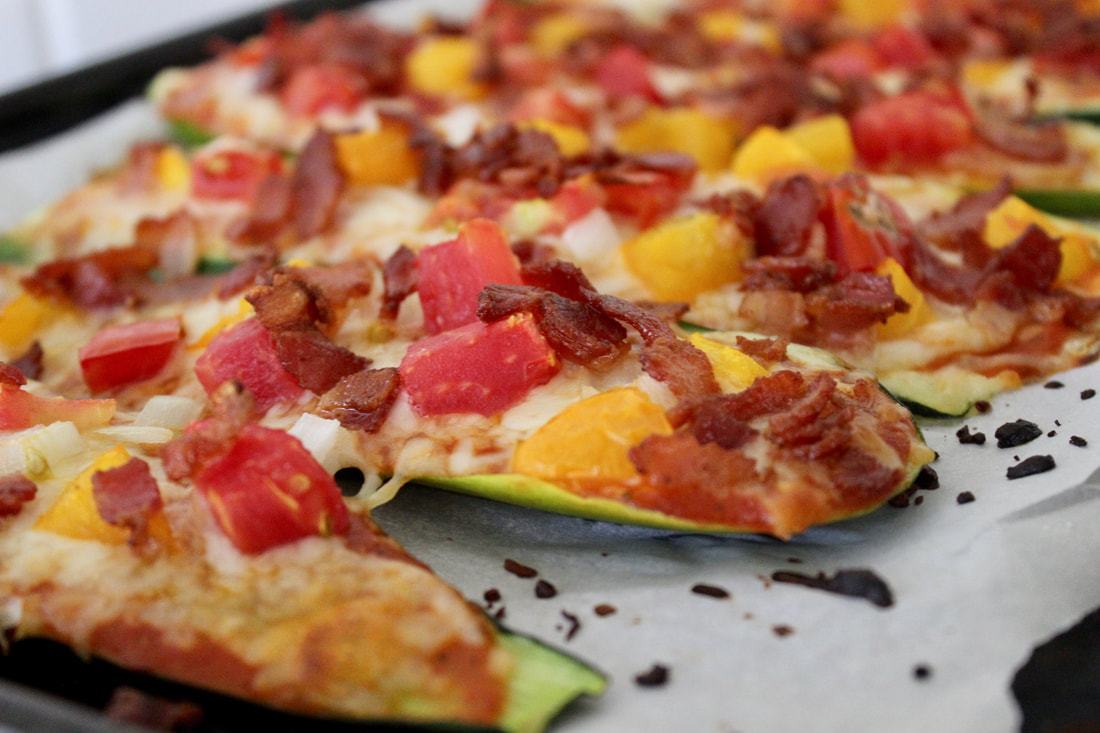
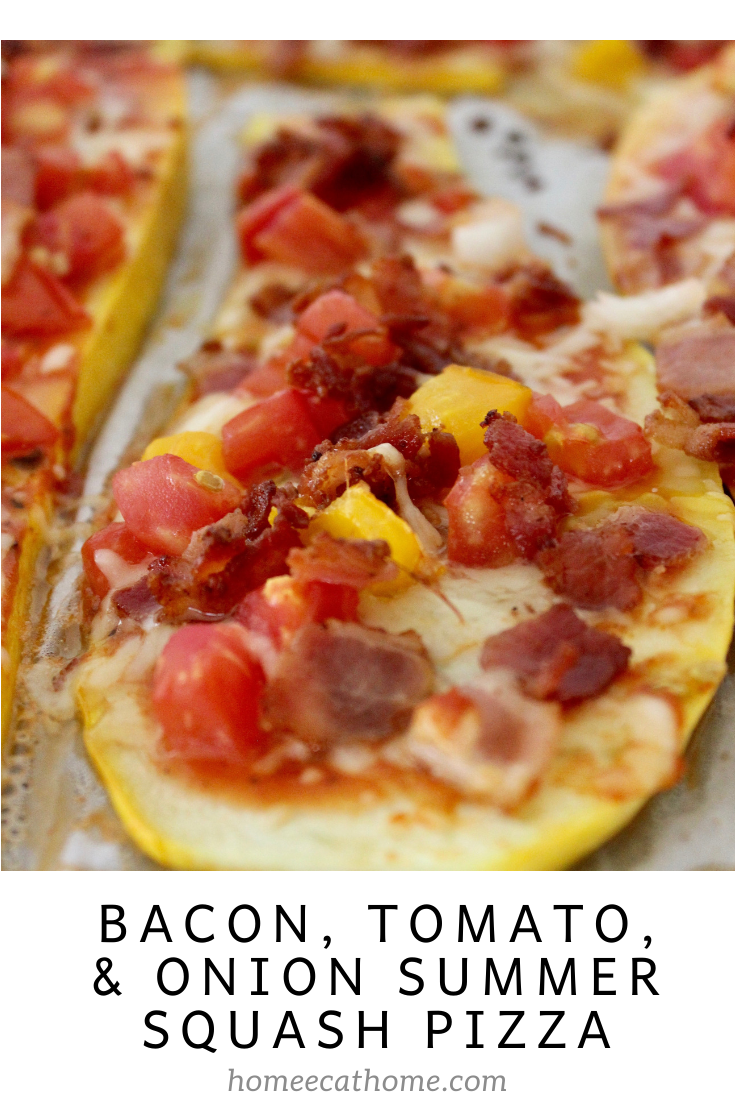
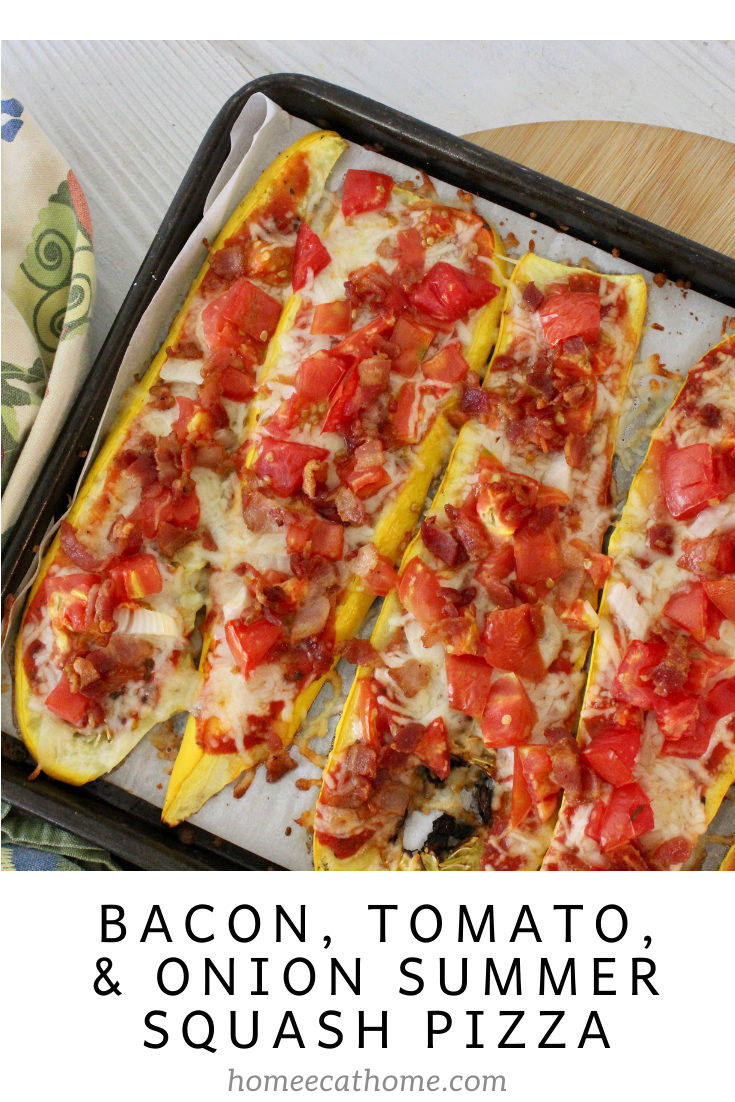
Our garden is producing squash like crazy this year so I have been coming up with creative ways to use it. This summer squash pizza has to be our favorite squash recipe I have made. It is a huge family favorite as my husband and the boys all love it!
My husband and I usually eat it with a fork and knife, but the boys just pick it up and eat it pizza style.
I have just made it and baked it and I have grilled the slices first before baking to dry out the squash and remove some moisture. Either way is delicious, but I think it is better when grilled first.
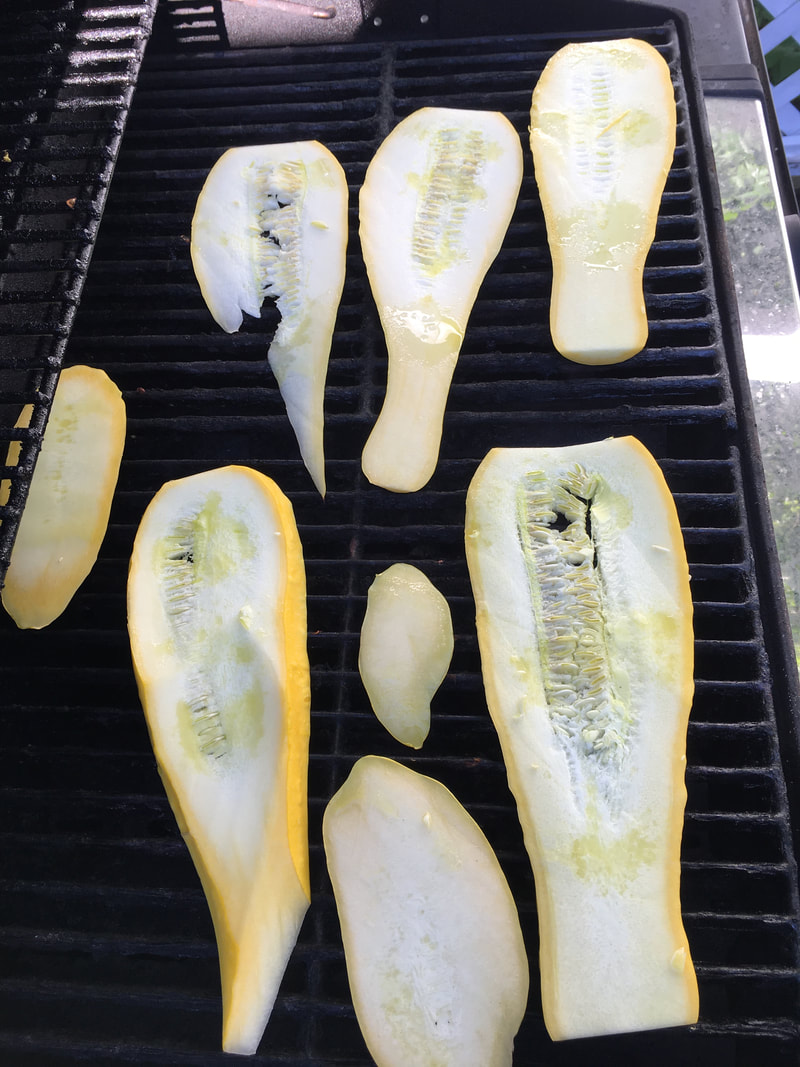
I spritz slices with a little olive oil. This is the spritzer I use and love and have had for years. (amazon link). If you don't have a spritzer, you can brush some olive oil on the slices. Then grill over medium heat for about 5 minutes per side. If you don't have a grill, you could try baking the slices in the oven for a few minutes on each side before putting sauce and toppings on. I have also just baked the squash without pre-cooking/grilling and it was very good, just had a little more moisture.
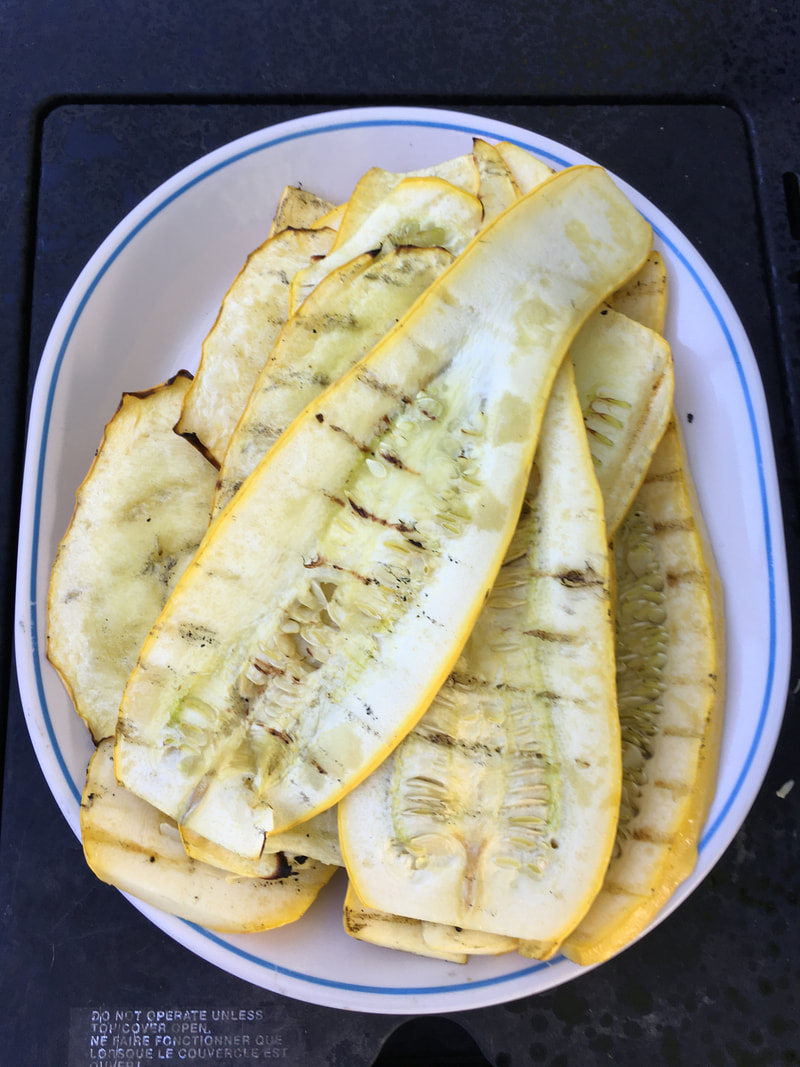
Grilled squash ready to make squash pizza.
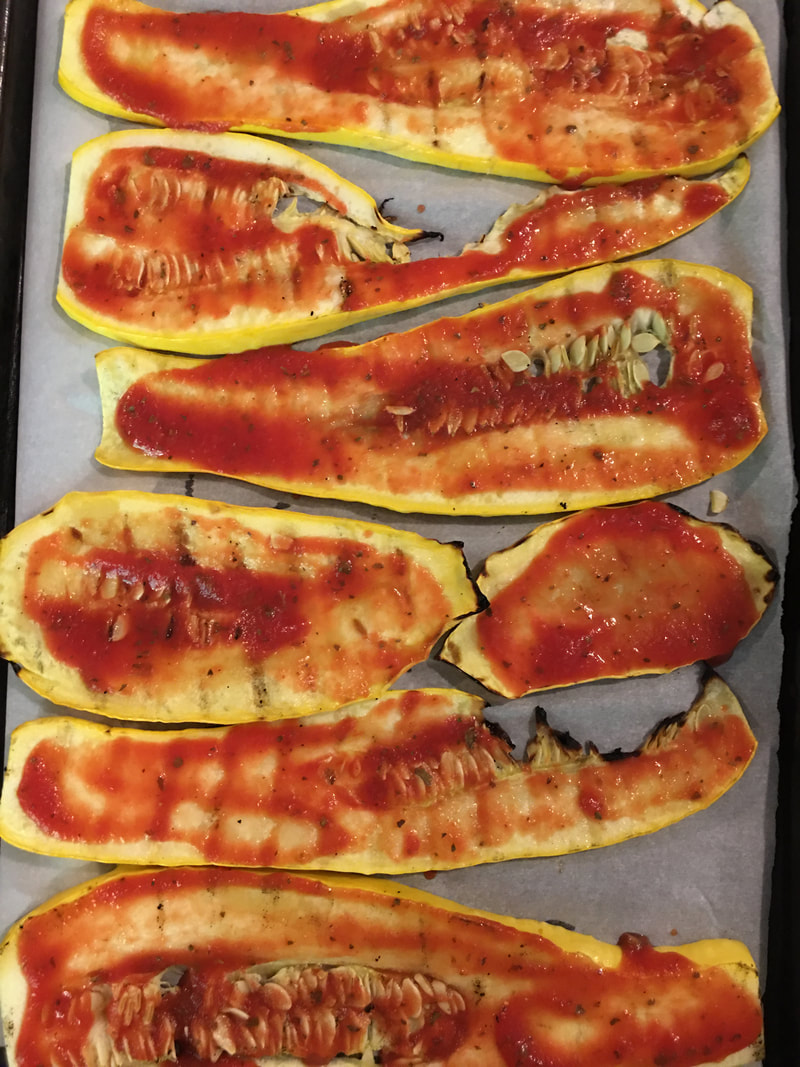
I place the squash slices on a parchment lined baking sheet then layer sauce and cheese and toppings.

You can use zucchini squash or yellow crookneck squash. I have made it with both and they are equally delicious. Our yellow crookneck squash plants are producing huge harvests this year so I have been making this a lot with yellow squash.
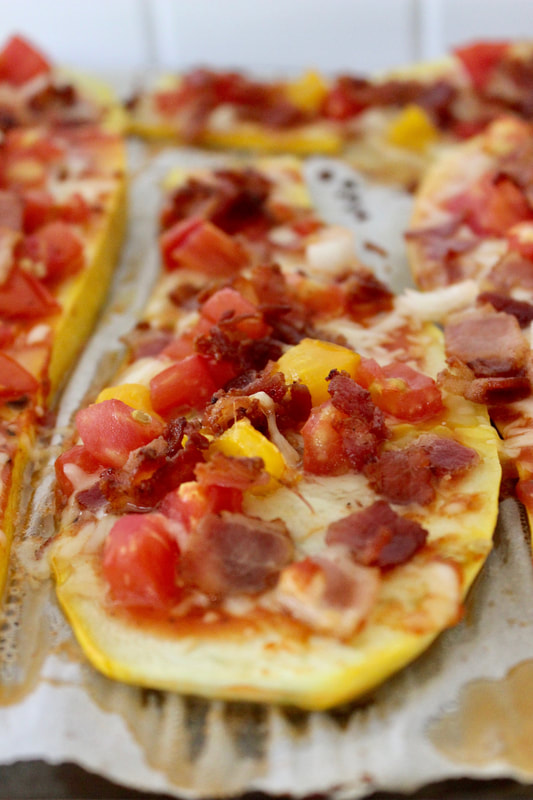
Enjoy this delicious fresh from the garden squash pizza. We love the bacon, tomato, onion combo, but the best part is that you can use your favorite toppings and make it your way. Plus, if you are watching your carbs, squash is a much better option than pizza dough and it is rich in vitamin C.
"Summer squash is an excellent source of copper and manganese. It is a very good source of vitamin C, magnesium, dietary fiber, phosphorus, potassium, folate, vitamin B6 and vitamin K. Additionally, it is a good source of vitamin B1, zinc, omega-3 fatty acids, niacin, vitamin B2, pantothenic acid, calcium, iron, choline and protein." (whfoods.com).
Serves 6
Ingredients: 2 large Zucchini or Yellow Crookneck Summer Squash Olive oil (optional) 1/2 Jar Pizza Sauce 16 oz. shredded mozzarella cheese 1/2 sweet onion, diced 2-3 tomatoes, diced 3/4 lb. bacon, cooked and crumbled 1. Preheat oven to 425 degrees F. 2. Slice 2 large zucchini or yellow crookneck summer squash (pick large straight pieces) into 1/4 inch thick slices lengthwise. 3. Option: Grill slices for about 5 minutes per side to remove some of the moisture. I spritz slices with olive oil before grilling. You could also brush them with olive oil. Or you can go straight to baking in step four. 4. Line two baking pans with parchment paper. 5. Place squash slices on parchment lined baking pans. Spritz or brush slices with olive oil if not already done in step 3. 6. Spoon pizza sauce onto slices and spread (like a pizza). 7. Sprinkle each slice with mozzarella cheese. 8. Then place onions, tomatoes, and bacon crumbles on the slices. 9. Bake for 10-12 minutes until cheese is melted and squash is tender.
Pin on Pinterest
|

Welcome to Home Ec @ HomeHi, I'm Faith, a former Family and Consumer Science teacher turned food blogger. I love God, my family, and food. You can usually find me in the kitchen preparing family friendly, homemade recipes and taking lots of pictures. 
Still Goldens, Southern, IL
 Fan Favorites

The Best Dry Brined Turkey with Citris and Fresh Herbs

 Dehydrating Pears and Apples in the Instant Pot Duo Crisp Dehydrating Pears and Apples in the Instant Pot Duo Crisp
 
 |
 RSS Feed