|
I find it amazing that in 11 years of hosting kids birthday parties, this is the first time that we have done a Star Wars party. We have been so busy, that we literally planned this party in less than a week. We decided it would be fun to show a Star Wars movie on the barn and planned the party around that. A quick email invite, late night on pinterest, amazon prime order and of course some effort and we had a party.
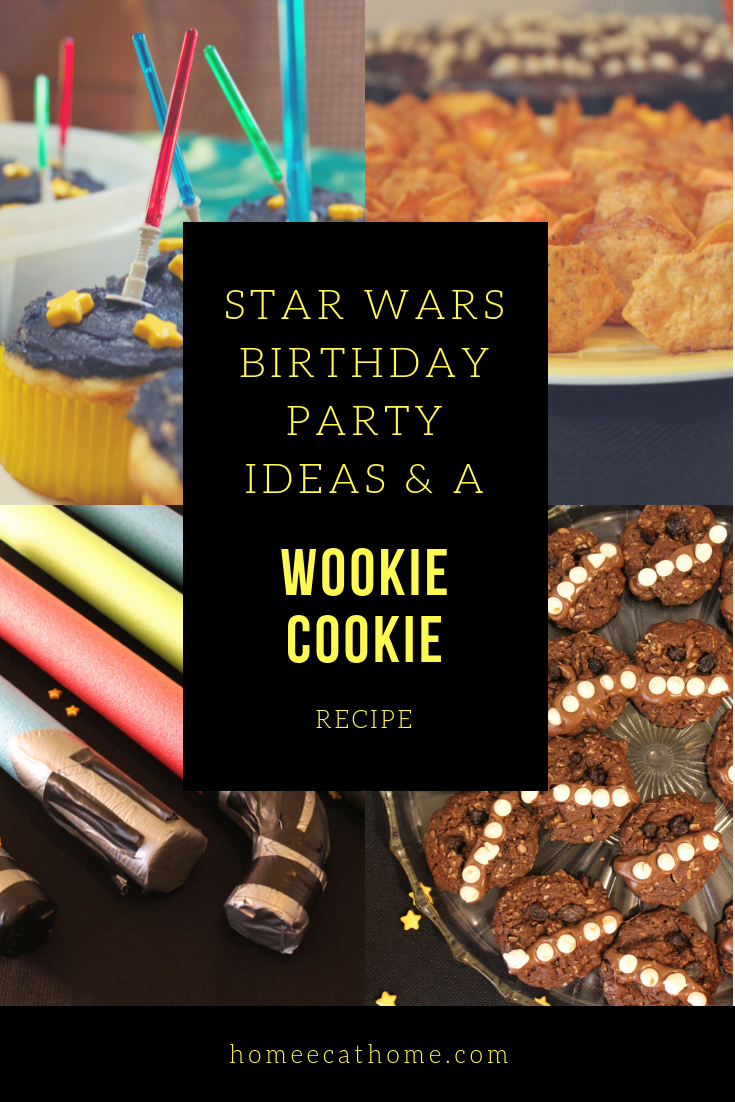

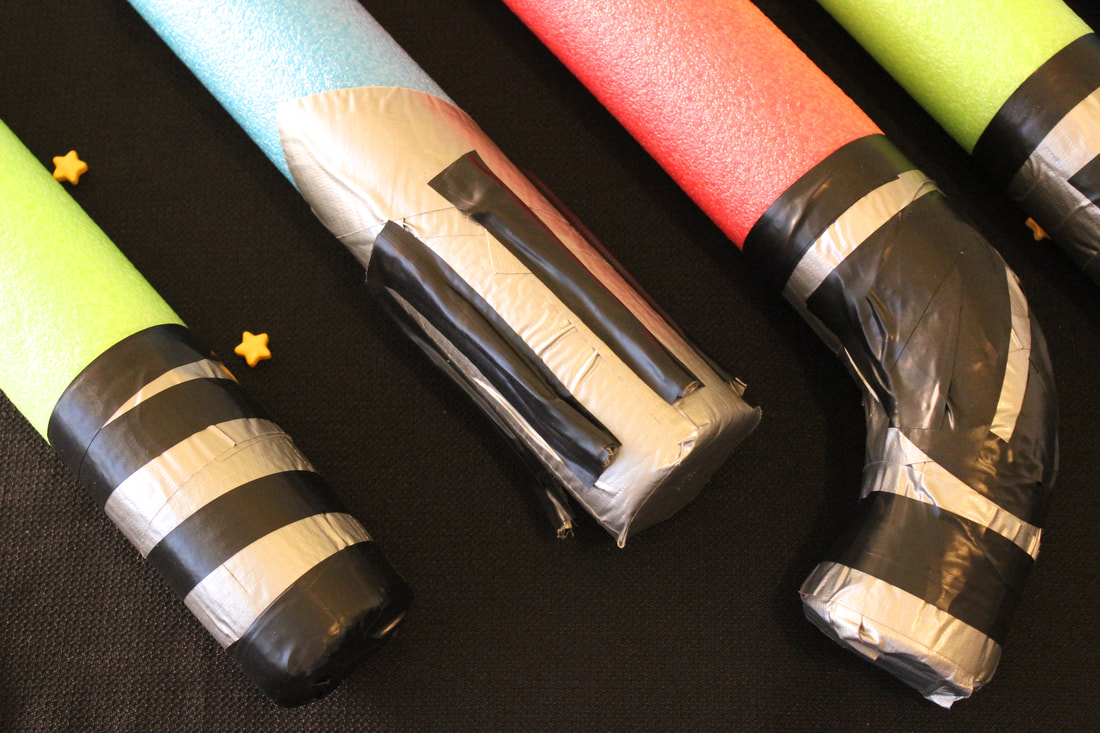
These pool noodle light sabers were a huge hit and made great party favors. In fact, our kids have been playing with them for days. My husband made most of the light sabers for the party, but the kids have been making things all week with the extra supplies. They even made an elaborate shield.
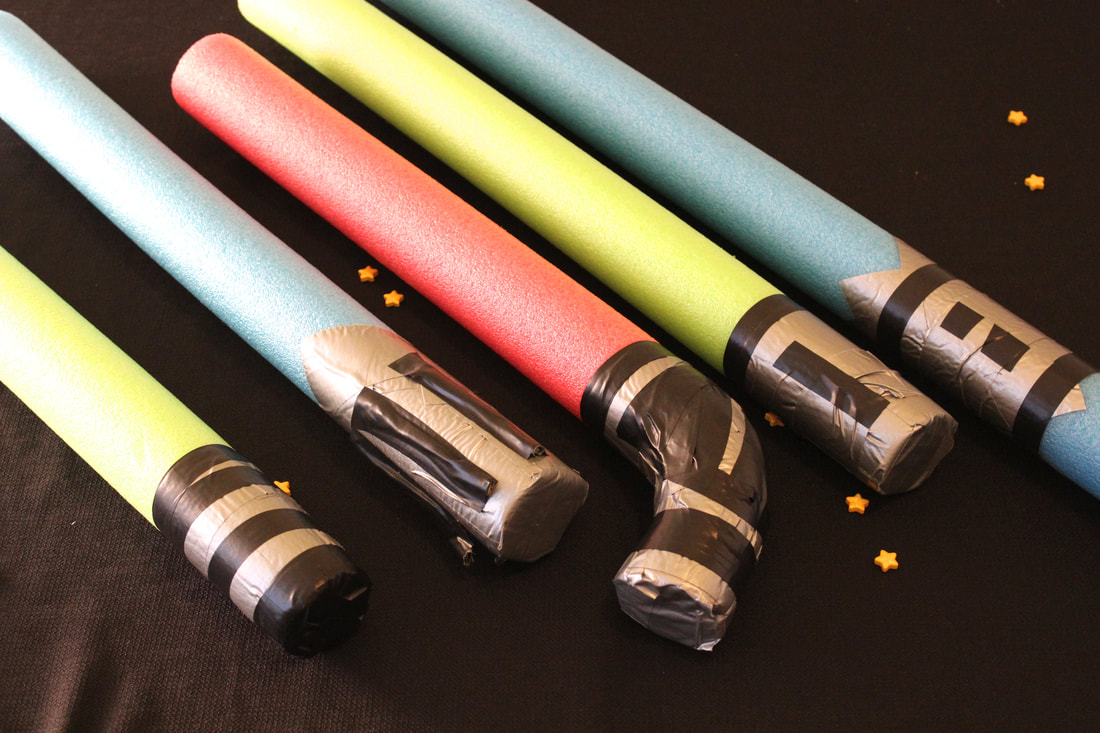
I bought the light saber supplies at Walmart. All you need are pool noodles (which are unfortunately seasonal), duct tape, and electrical tape. My husband got really creative and made all different kinds including a pair of numb chucks. For most of the light sabers, he used a half length of pool noodle, but made some of different lengths too.
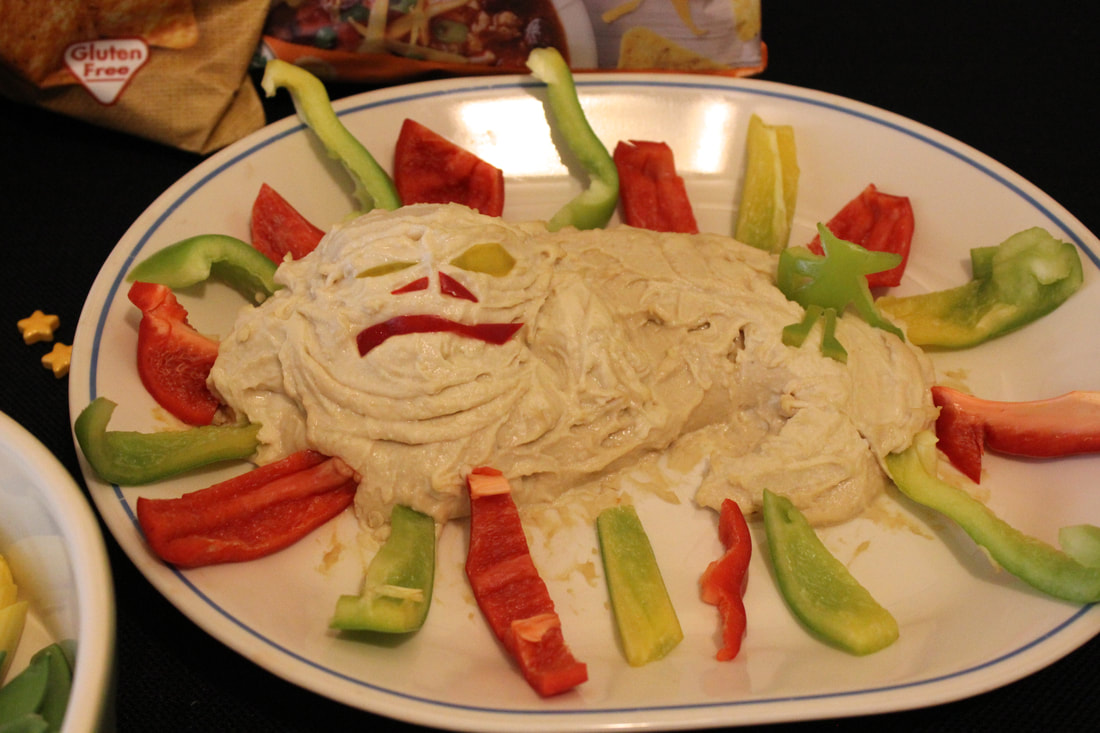
I always make a meal for our parties, but don't usually make theme food. This time I made some things with a Star Wars theme. There were so many great ideas online and it was fun to bring the theme into the kitchen. My husband formed this Jabba the hummus out of some store-bought hummus and peppers. It was adorable and delicious too.
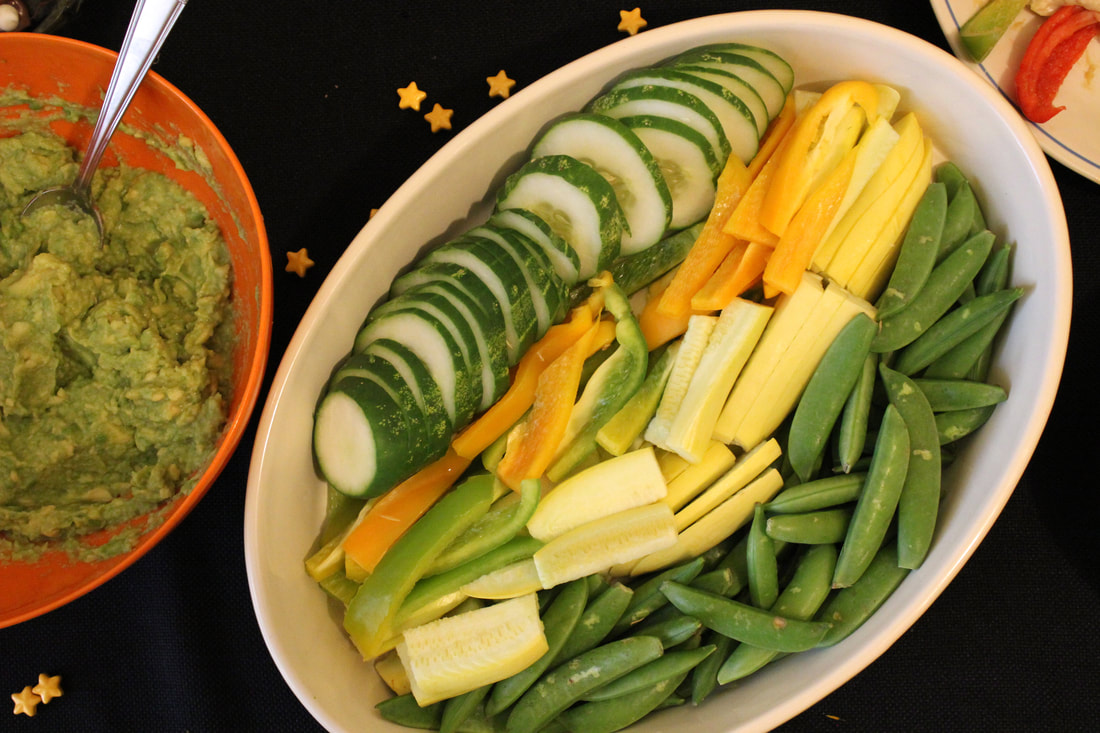

We served with fresh cut vegetables for something healthy since we had sugary cookies and cupcakes. Gotta have some balance or the kids will bounce off the walls, LOL. I always make guacamole so I served some with chips. I saw some creative Yodamoles online, but didn't try to sculpt a Yoda out my guacamole. We can only do so much...
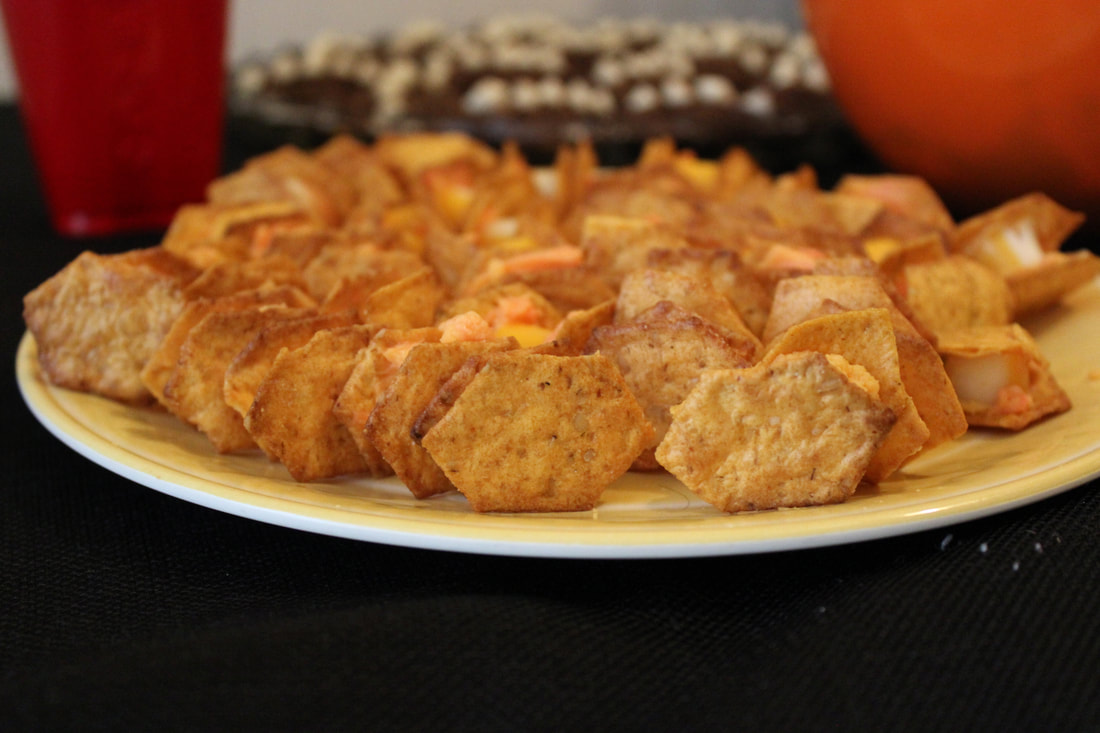
I didn't get the best picture to represent what these are, but these are cheese and cracker tie-fighters. I used some port wine cheese spread to "glue" hexagon shaped crackers to small slices of cheese sticks to make the tie-fighters. The only crackers I could find in this shape, were these small gluten free crackers which broke easily when handling, but they were delicious and a fun food for the party.
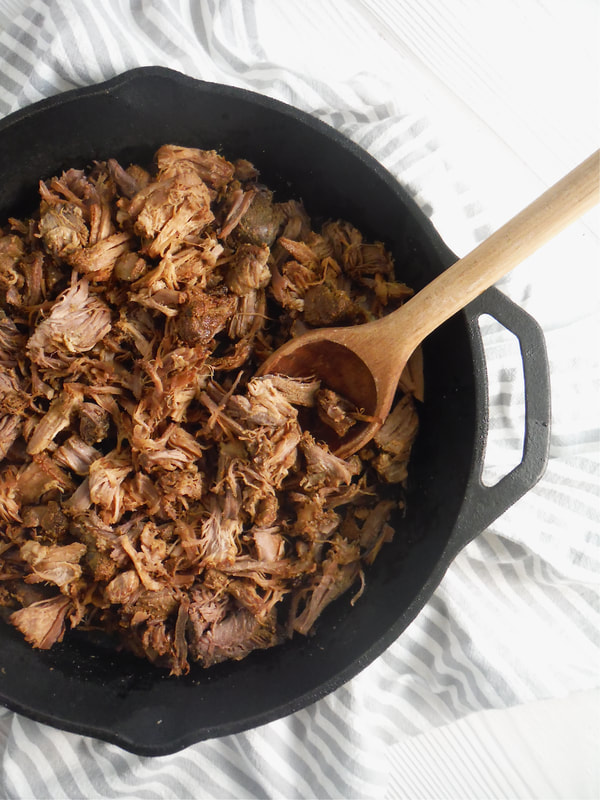
Pork carnitas has nothing to do with Star Wars, but it's one of our favorite meals and has become our party go-to main dish. So we served our favorite pork carnitas.
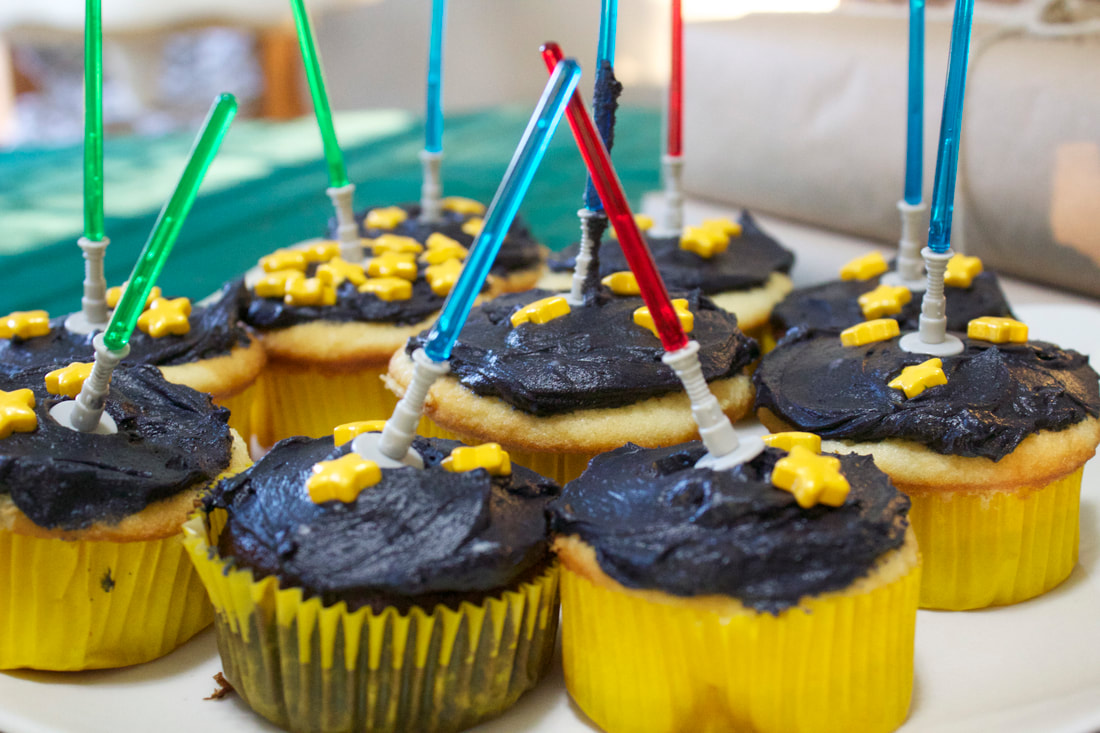
I wanted something really simple for the cake because with four kids I don't have time to do anything elaborate. I bought yellow cupcake liners at Walmart, made simple cupcakes in vanilla, chocolate, and lemon from cake mixes, and frosted them in homemade buttercream frosting tinted black,
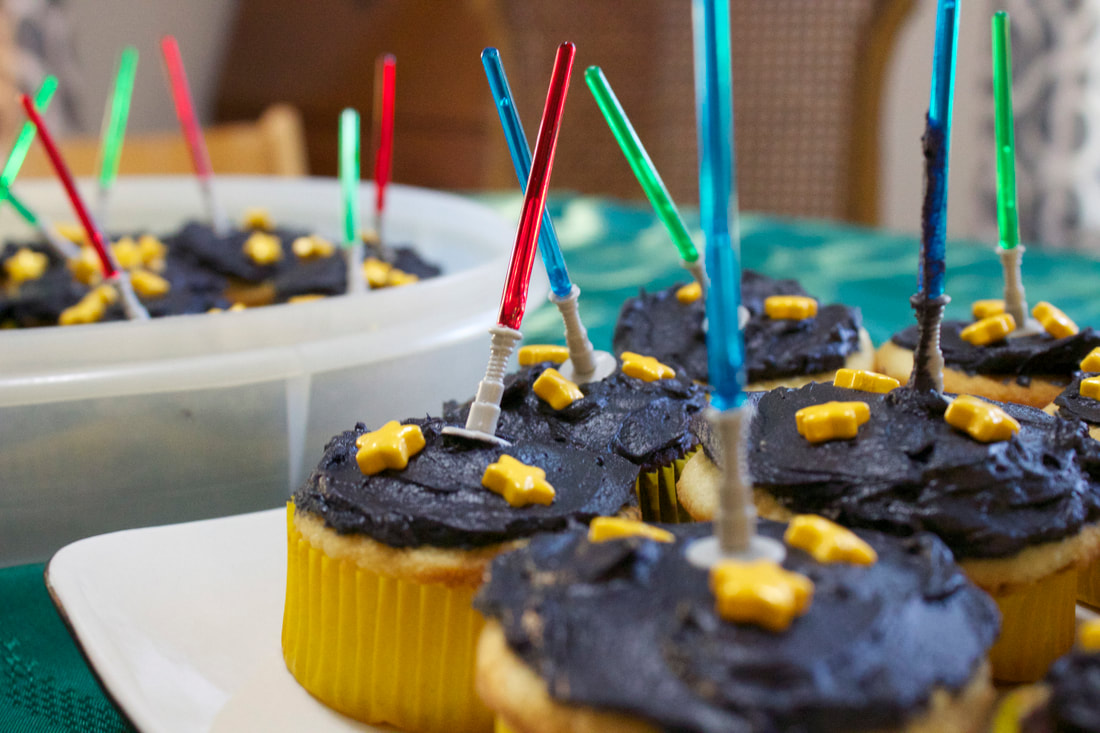
I ordered yellow star candies and light saber cupcake toppers on amazon. Also, if using a cake mix, the Betty Crocker Original Recipe is my favorite, although it is getting harder to find in my local stores. It is the old fashioned fewer ingredients version and tastes more like homemade. I may have to order some to have on hand for cake emergencies, ha! Although, from my link it looks like its $15.99 a box! Yikes! I will have to see if I can find a better source. I used extra star candies as a decoration scattered on the black tablecloth on the food table.
Wookie Cookies
I decided to make Wookie Cookies, but wanted to keep them pretty simple. I used one of my favorite recipes adding cocoa powder to make them brown and eliminating the nuts and chocolate chips in the cookies. I melted chocolate chips to make the bandoliers and used white chocolate chips to finish them. I ran out of brown sugar so I used coconut sugar which works well too. I used this recipe because we love them and because the coconut and oatmeal would give them a bumpy texture like hairy Chewbacca. Wookie Cookies were a big hit at the party.
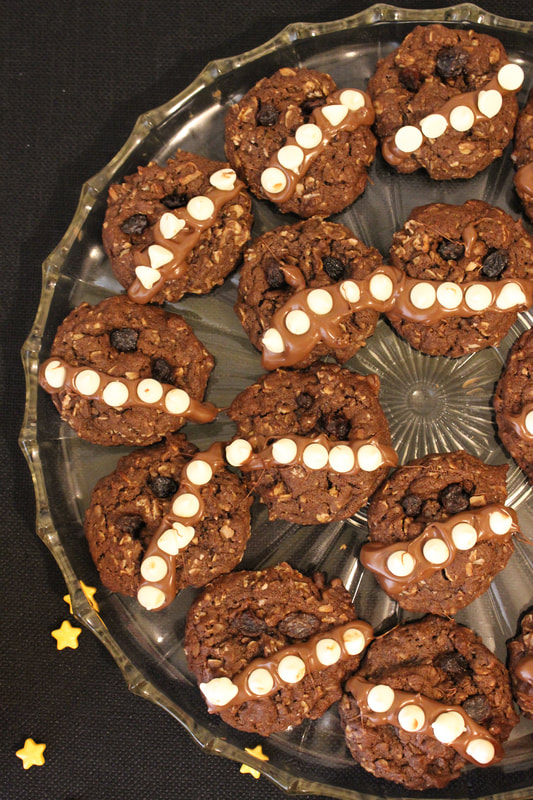
I doubled this recipe for the party.
Ingredients: 1 ¼ cups flour ½ tsp. baking powder ½ tsp. baking soda ¼ tsp. salt 1/4 cup cocoa powder ¾ cup (1 ½ sticks) butter softened ¾ cup packed brown sugar or coconut sugar 1/3 cup granulated sugar 1 ½ tsp. vanilla extract 1 egg 2 Tbsp. milk ½ cup sweetened coconut flakes 1 cup old fashioned oats Chocolate chips (for melting) Raisins (for the eyes) White chocolate chips for the bandoliers 1. Preheat oven to 375 degrees F. 2. Combine flour, baking powder, baking soda, salt and cocoa powder in a bowl. Set aside. 4. Beat butter, brown sugar, granulated sugar and vanilla extract in large mixer bowl until creamy. Beat in egg. Gradually beat in flour mixture and milk. Stir in, oats, and coconut. 5. Drop by rounded tablespoons on parchment lined baking sheets. 6. Bake for 10 to 12 minutes or until edges are crisp but centers are still soft. Cool on baking sheets for 2 minutes; press raisins onto warm cookies for the eyes. Remove to wire racks to cool completely. 7. Melt chocolate chips in the microwave then pour melted chocolate into a plastic zipper seal bag. Seal the bag and cut one corner so that the chocolate can pour out like from an icing bag. Draw a bandolier in a diagonal line across the cookie with the melted chocolate. Then place white chocolate chips on the melted chocolate to finish the bandolier. Makes 2-3 dozen cookies.
Linking up at Inspire Me Monday
1 Comment
We get really excited about holidays at our house. Not just the big ones like Easter and Christmas, but the little ones like Valentine's Day, Mardi Gras, and St. Patrick's Day too. You can bet we're having corned beef and cabbage and shamrock shaped green jello next weekend. Since we love holidays so much, I wanted to do something special for the boys for Valentine's Day, so I made a strawberry waffle cake.

Talk about happy kids! They loved it and it was pretty simple to make. I actually enjoy making waffles so we eat them fairly often...well once or twice a month which is a lot in my book since I like to keep breakfast simple. Here is the recipe I always make.
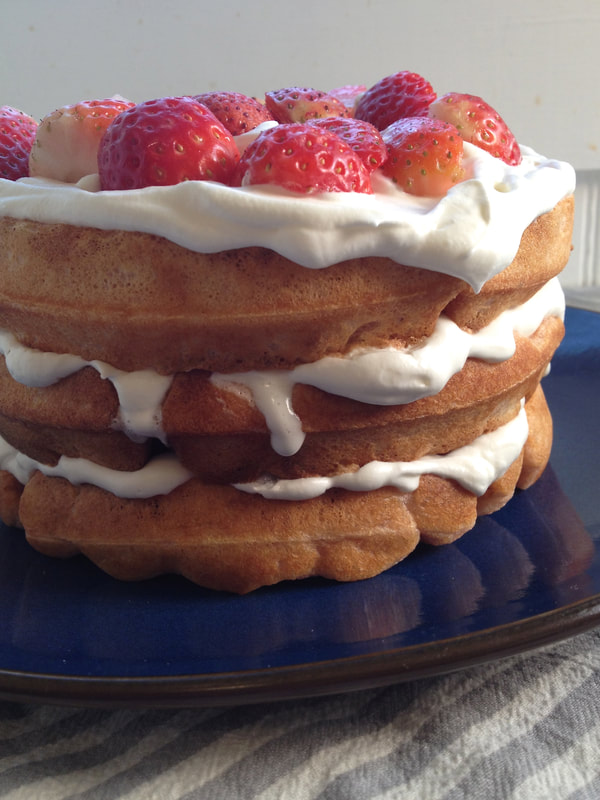
I actually mashed up some strawberries and added them to the batter, but don't think I really tasted them in the waffles. I doubt I will go to the trouble to do that again since it didn't change the flavor of the waffles, but it's always fun to try new things.
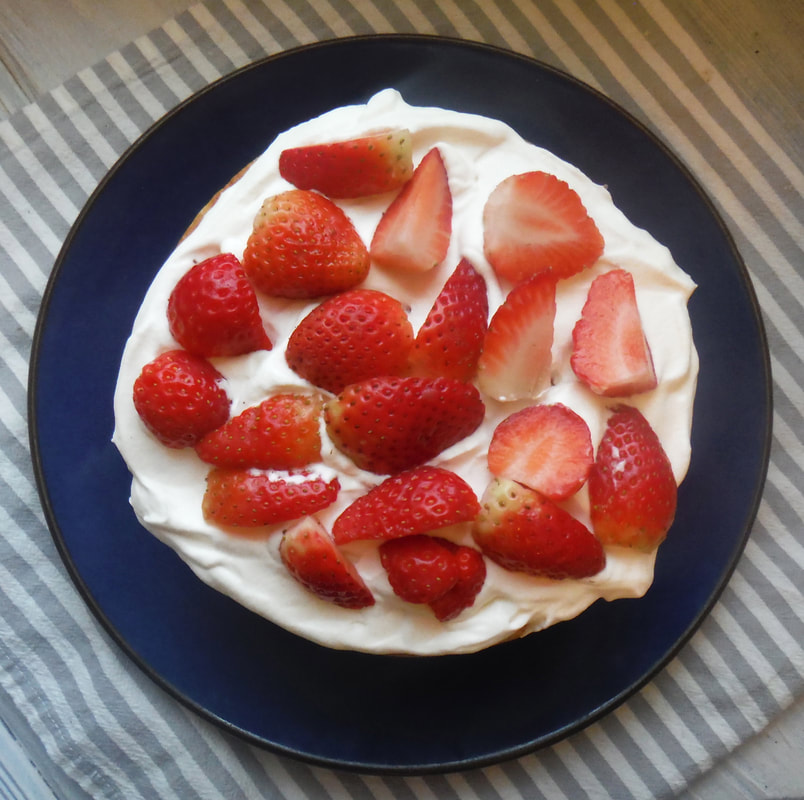
I love the simplicity of this. Waffles, whipped cream, and strawberries layered to make a beautiful cake. I make homemade whipped cream which is super easy if you have a mixer. I put cream and strawberries between each layer, cutting the strawberries thinner for the inner layers so they will stack easier. You will want to serve this treat shortly after assembling to prevent the waffle layers from getting too soft, although it's still good if it has set awhile.
Ingredients:
Waffles (my favorite recipe) Whipped cream (homemade or store bought, honestly homemade is easy and so much better) Strawberries, washed and sliced Prepare all ingredients then layer as pictured for a fun sweet treat. 
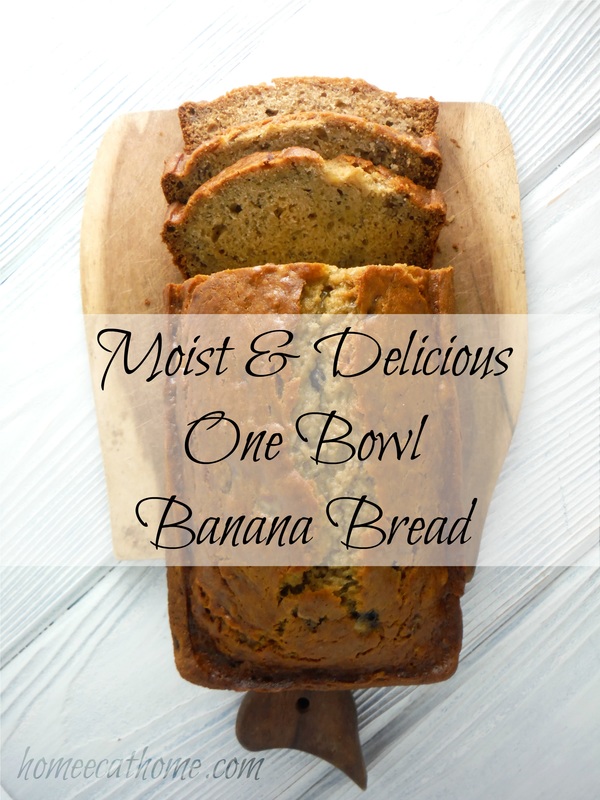
My boys don't usually leave any bananas lying around to ripen for banana bread, but what a treat it is when they do. Waking up to a fresh loaf of banana bread makes my day. Plus, it is so easy to slice and serve with deli meats and cheeses for a fast school morning breakfast.
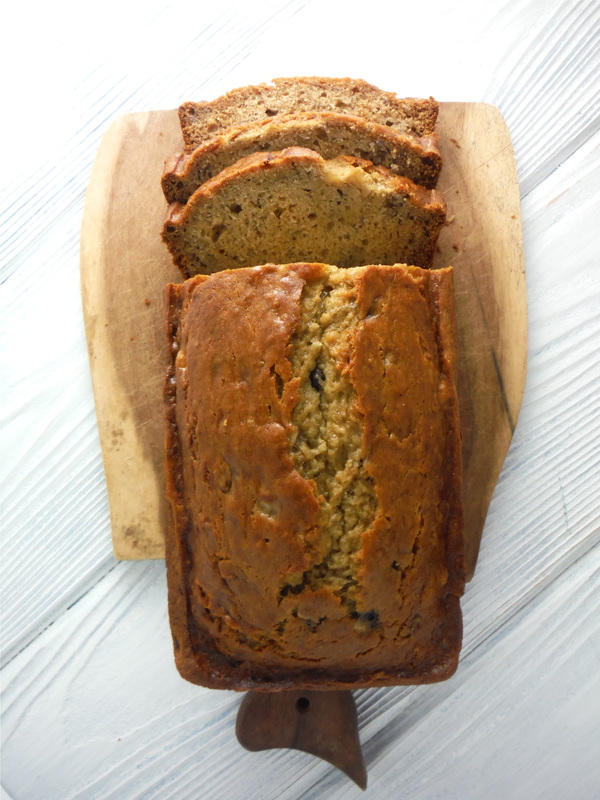
Truly moist and delicious...each bite has just the right amount of sweetness. 
Like any busy Mom, I like feeding my family homemade food, but I also like simplicity in the kitchen. I make this banana bread batter in one bowl to save myself time both cooking and doing dishes. For more time saving and delicious recipes see my slow cooker recipes. 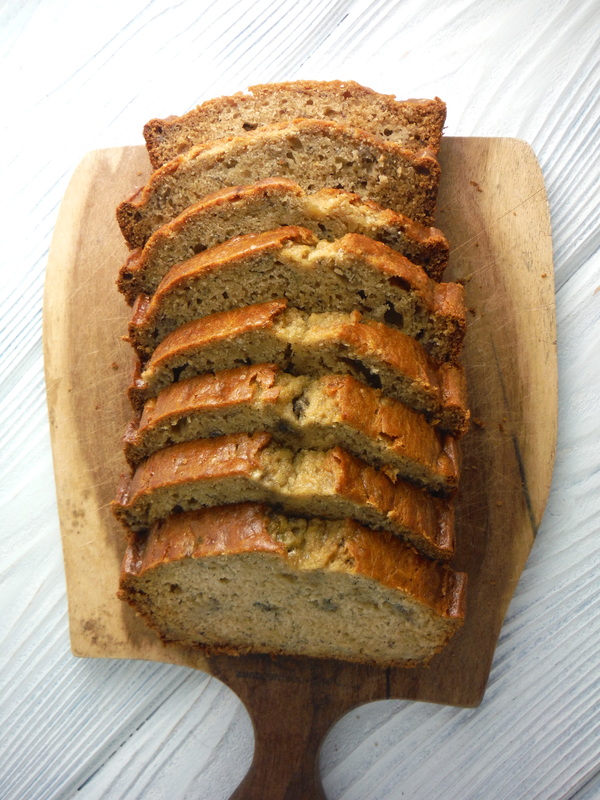
Ingredients: 1 1/2 C. (about 3) bananas, mashed 2 eggs 1/2 C. butter, melted 1 tsp. vanilla 1/4 C. granulated sugar or coconut sugar 1/4 C. brown sugar or coconut sugar 1/4 C. honey 1 3/4 C. all-purpose flour 1/4 tsp. salt 1/2 tsp. baking powder 1 tsp. baking soda 1/4 C. chopped walnuts (optional) 1. Pre-heat oven to 350 degrees F. Butter a loaf pan. 2. With a wooden spoon mix bananas, eggs, butter, and vanilla in a mixing bowl. 3. Next stir in the sugars and honey. 4. Lastly, stir in the rest of the ingredients, stirring until combined. Batter will be thick. 5. Pour batter into pan and bake for 50-55 minutes until golden brown. 6. Cool on a wire rack, then remove from pan. Let bread cool completely before slicing.
Pin on Pinterest


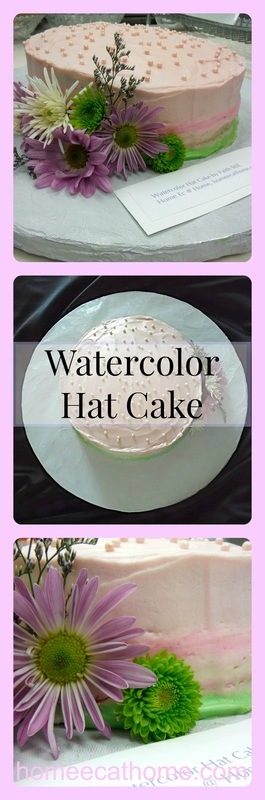
One of my best friends asked me to make a cake to auction at the recent Holy Cross trivia night which was a fund raiser for the school. I was happy to help our church and school family, but I didn't put a lot of planning into a cake design. So there I sat the day before the event trying to figure out what amazing creation I was going to come up with from my simple round cake and oversized cake board. I knew the cake board was too big for the cake, but with three little ones in tow I did not feel like running out to a craft store or making a new cake board.
Mother's Day was the day following the event so I decided on pale pink and green thinking the cake would be a nice purchase for a Mother's Day treat. I looked online for some inspiration and fell in love with the idea of a watercolor cake. 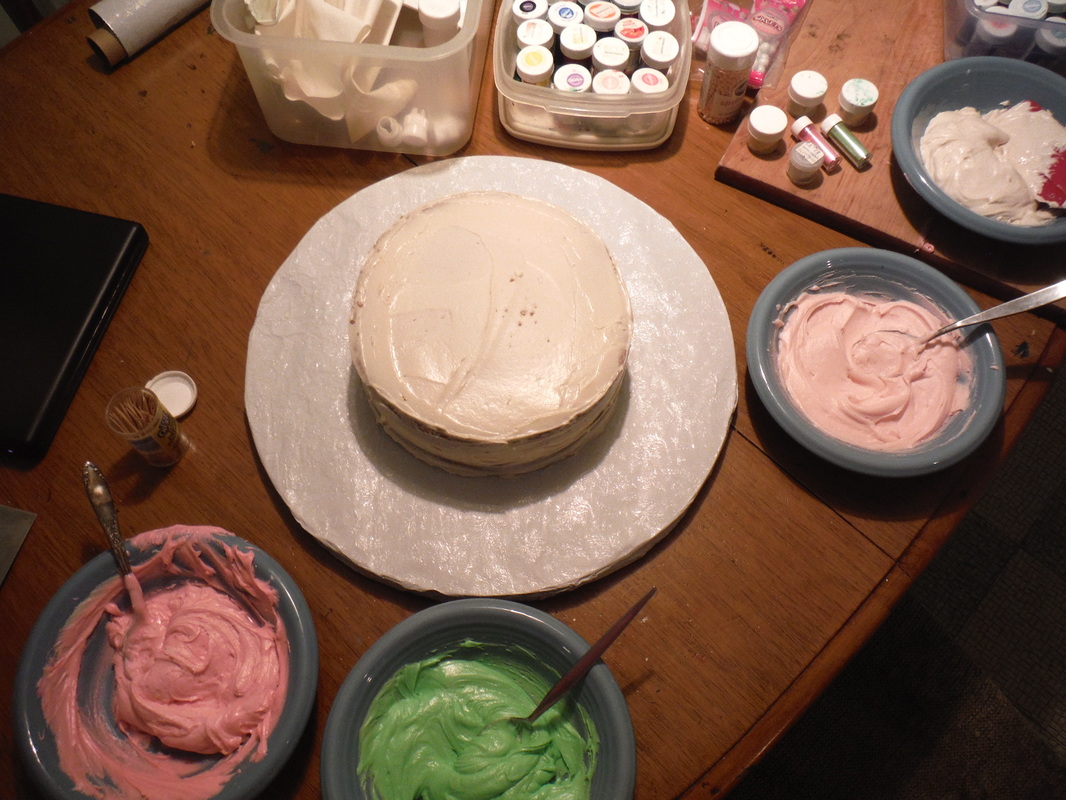
I frosted the cake with a crumb coat of white frosting then colored icing in pink, pale pink, and green.
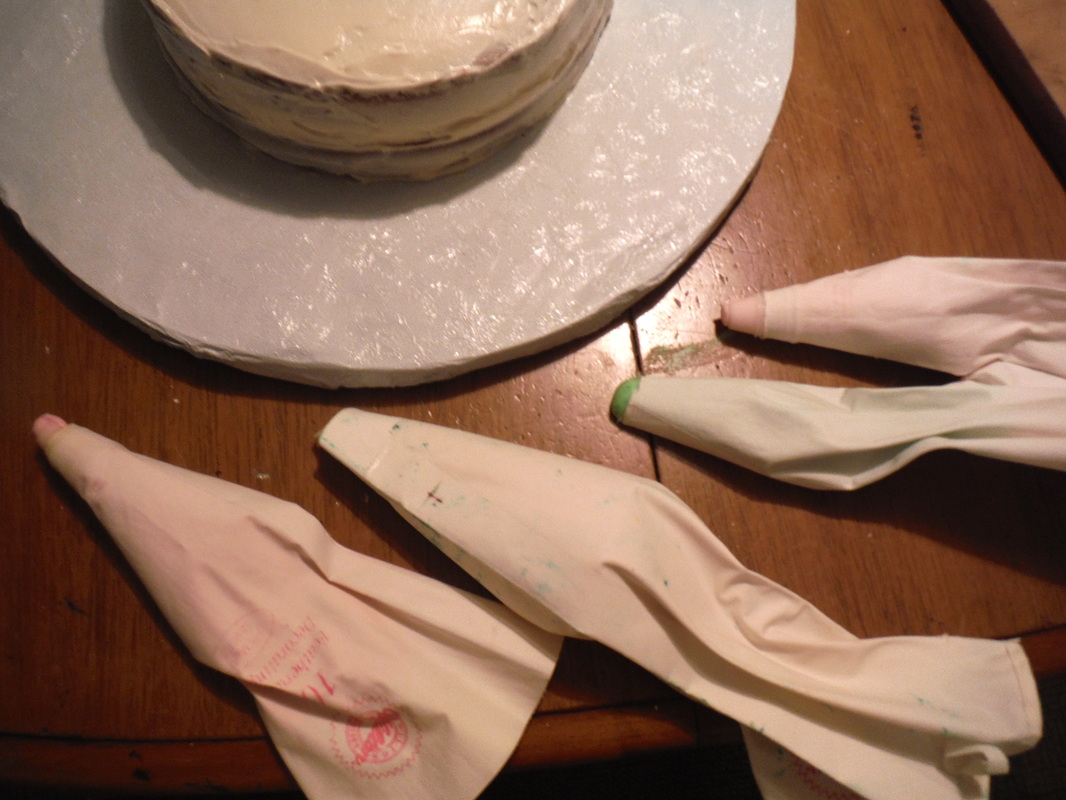
I put the colored frosting along with some white frosting in decorating bags to pipe onto the cake.
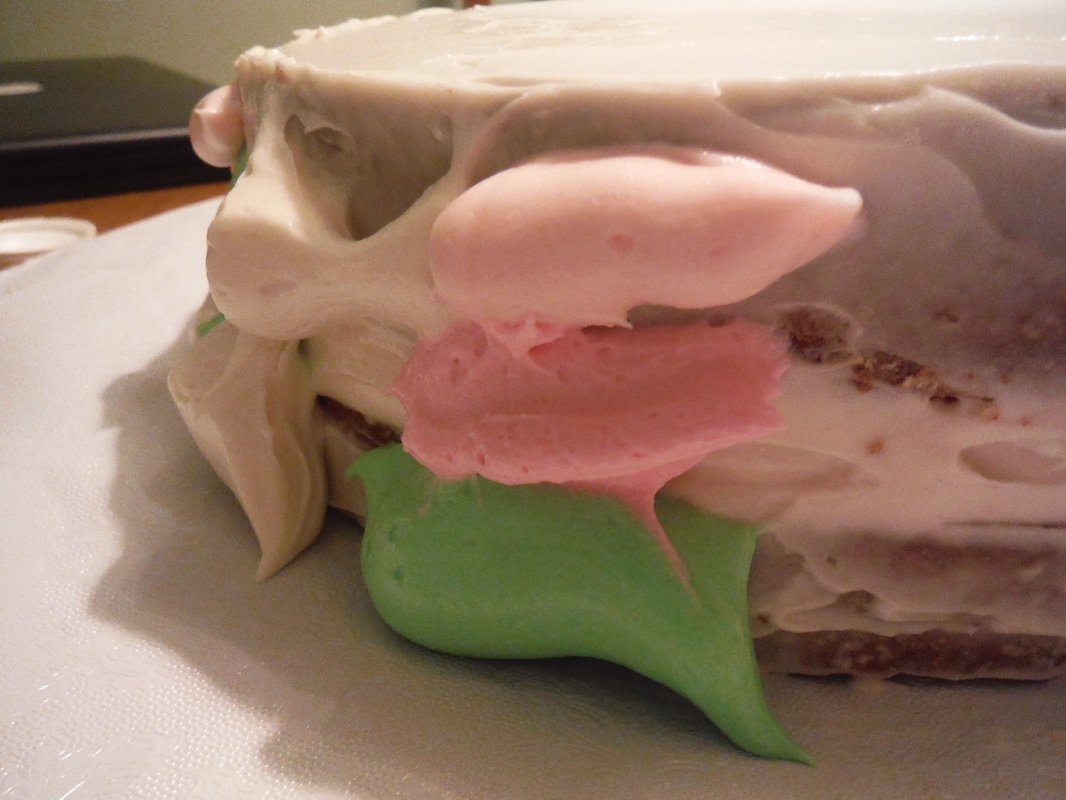
I piped the icing onto the cake similar to the water lilies cake that inspired me, only without realizing it I made a pink and green striped effect. I forgot to mix up the colors and striped the colors all around with areas of white in between the colored areas which simply lightened the overall color.
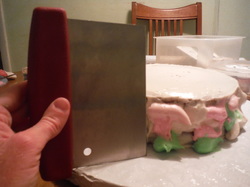
I used a dough blade to smooth and blend the icing on the sides of the cake. I wanted the color to be delicate so lightening was good, but I was hoping for a more mottled effect. Lesson learned. I then decided that the striped round cake reminded me of a hat on it's oversized cake board.
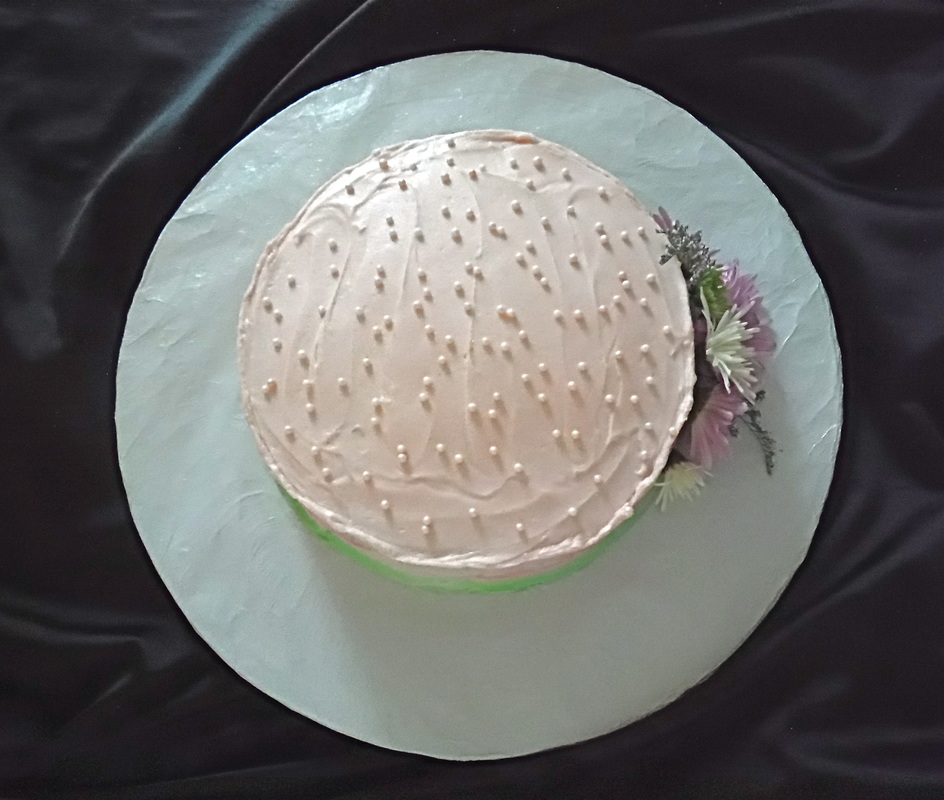
So I frosted the top with pale pink frosting to blend easily with the sides. Then I sprinkled some white shimmer dust for cake decorating on the top of the cake to give it a delicate sparkle followed with some pale pink edible pearls.
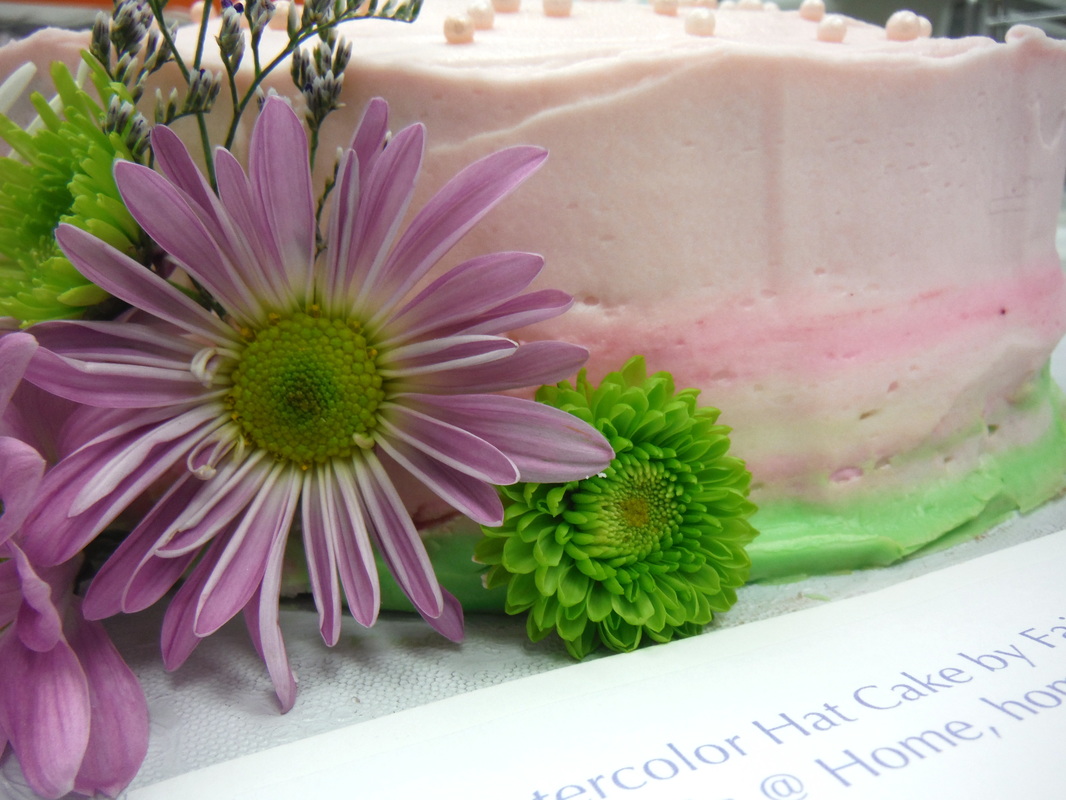
I was happy with the finished cake, but thought it was missing something.
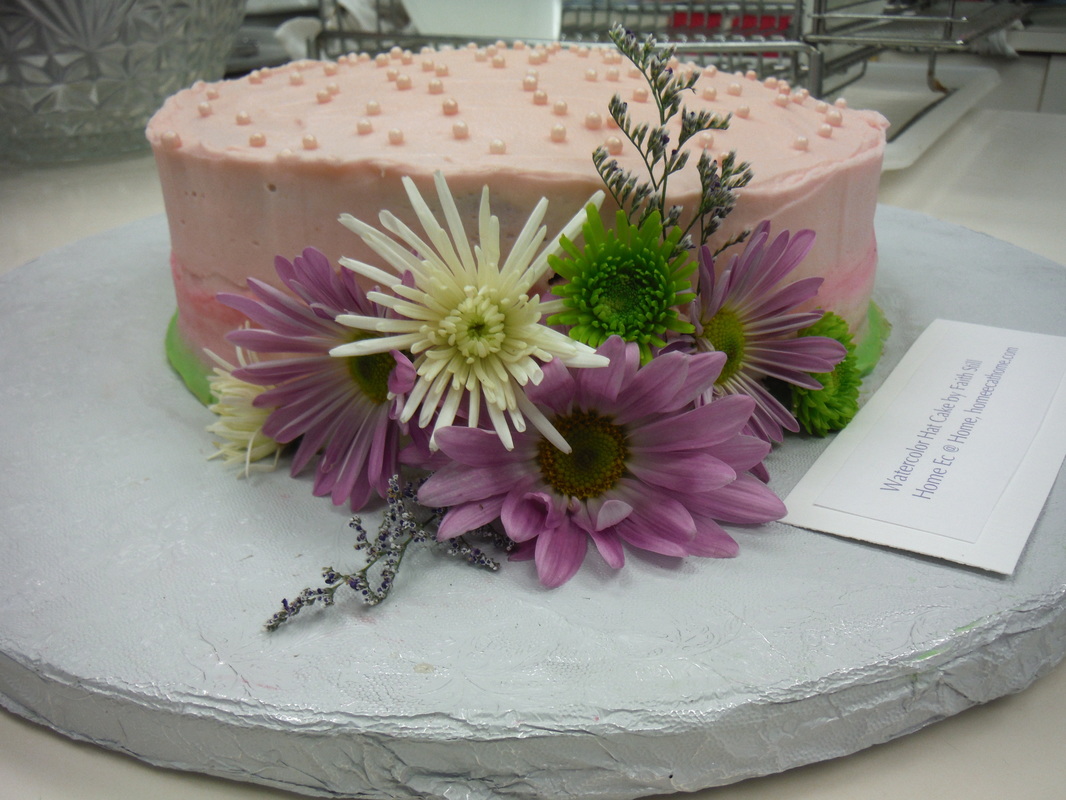
My husband stepped in and added a beautiful floral arrangement to the cake. (It helps to have a husband who teaches floral design.)
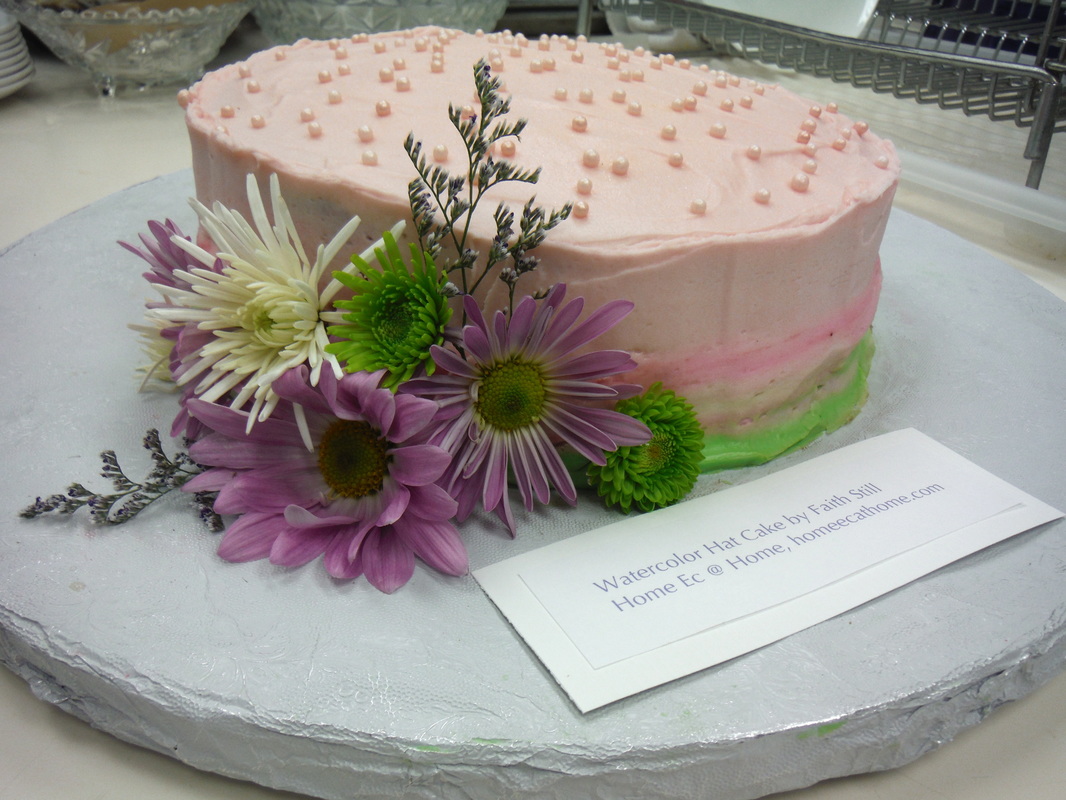
I love the design with fresh flowers, but you could use a big bow instead. So now you know how I stumbled upon making a watercolor hat cake.
I used the icing and cake recipes from this tiered cake post. 
Linking up at Share the Wealth, Create with Joy, Do Tell Tuesday, The Mommy Club, Dream Create Inspire, Fabulous Friday
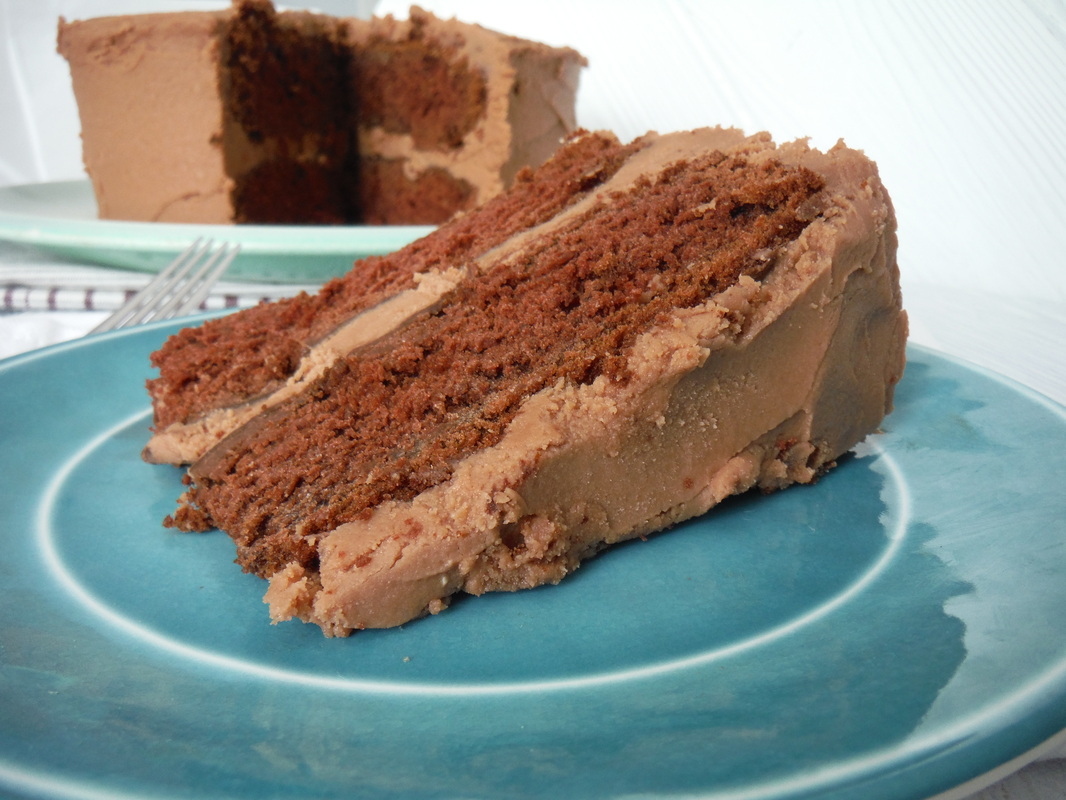
I have been making a lot of chocolate cakes lately, but that has given me more time to work on getting it just right. I think I have it. A perfectly moist, rich chocolate cake.

I made one for a cub scouts banquet a couple of weeks ago and doubled the icing ingredients except I forgot to double the powdered sugar. The icing was slowly making its way down the sides of the cake like slow moving lava. I put the whole cake in the freezer while we ate dinner hoping the lava flow would stop and I could salvage the cake. It did stop and the cake was devoured. I think we brought home two slices. Lesson learned: Make sure to double all of the ingredients when doubling a recipe and people will eat it anyway. It is chocolate after all.
I made a cake last week for my son's school staff. Parents are asked to bring things in once a month for staff birthday celebrations. I would have loved that when I was teaching. It was always exciting to find treats in the teacher's lounge and it did make me feel appreciated when the PTA did something for the school staff. When my husband saw that I had made yet another cake that would be exiting our house, he said, "I wish you would make a cake for us and not just for other people." I thought about it and realized that he was right, although I know he ate a big slice of cake at the cub scout banquet so he wasn't completely deprived of all things delicious and chocolate. So alas here we are...a great big chocolate cake for our family. The boys have been loving this. One morning I even let them have cake at breakfast. 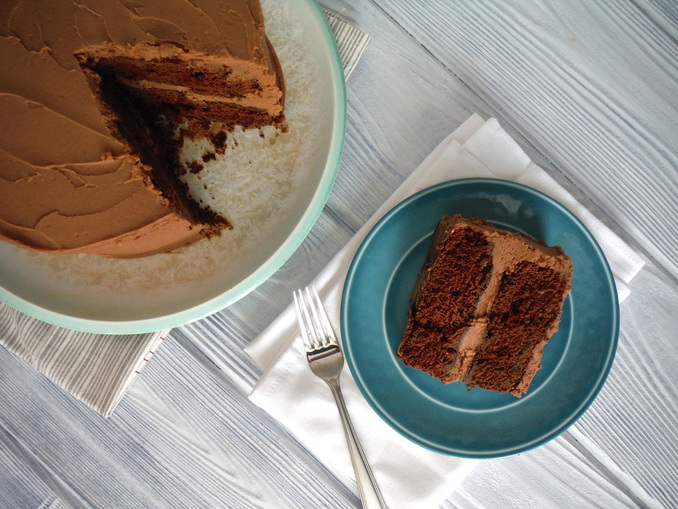
A little goes a long way. Enjoy this rich chocolate cake with a tall glass of cold milk.
Cake Ingredients:
2 3/4 cups flour 1 cup cocoa powder 2 1/2 cups sugar 2 tsp. baking soda 1/2 tsp. baking powder 1/2 tsp. salt 1 cup (2 sticks) butter, softened 2 cups buttermilk 1 1/2 tsp. vanilla 4 eggs 1. Preheat oven to 350 degrees F. 2. Grease and flour two 9" cake pans , one 9 X 13 pan, or line cupcake cups with paper liners. 3. Place all ingredients in mixer. Start on a low speed to blend ingredients then increase speed to medium high and mix for about 3 minutes. Scrape down sides of bowl as needed. 4. Pour batter into prepared pans and bake. To test cake doneness, stick the center with a toothpick and when it comes out clean the cake is done. Two 9" rounds = 40-45 minutes 9 X 13 pan = 50-55 minutes Cupcakes = 20-25 minutes Chocolate Frosting Ingredients: 1 12-ounce package semi-sweet or milk chocolate chips* 1 cup half-and-half 1 1/2 cup butter (3 sticks) 5 cups sifted confectioners' sugar (powdered sugar) 1. Combine the chocolate chips, half-and-half and butter in a heavy saucepan. 2. Cook over medium heat, stirring constantly, until chocolate chips melt. Remove from heat. 3. Gradually add the confectioners' sugar, stirring well. 4. Put icing in mixing bowl and refrigerate until cold and firm (overnight or for several hours). Then mix with electric mixer until light and fluffy. *Use semi-sweet chocolate chips to make a dark chocolate frosting and milk chocolate chips to make a milk chocolate frosting. 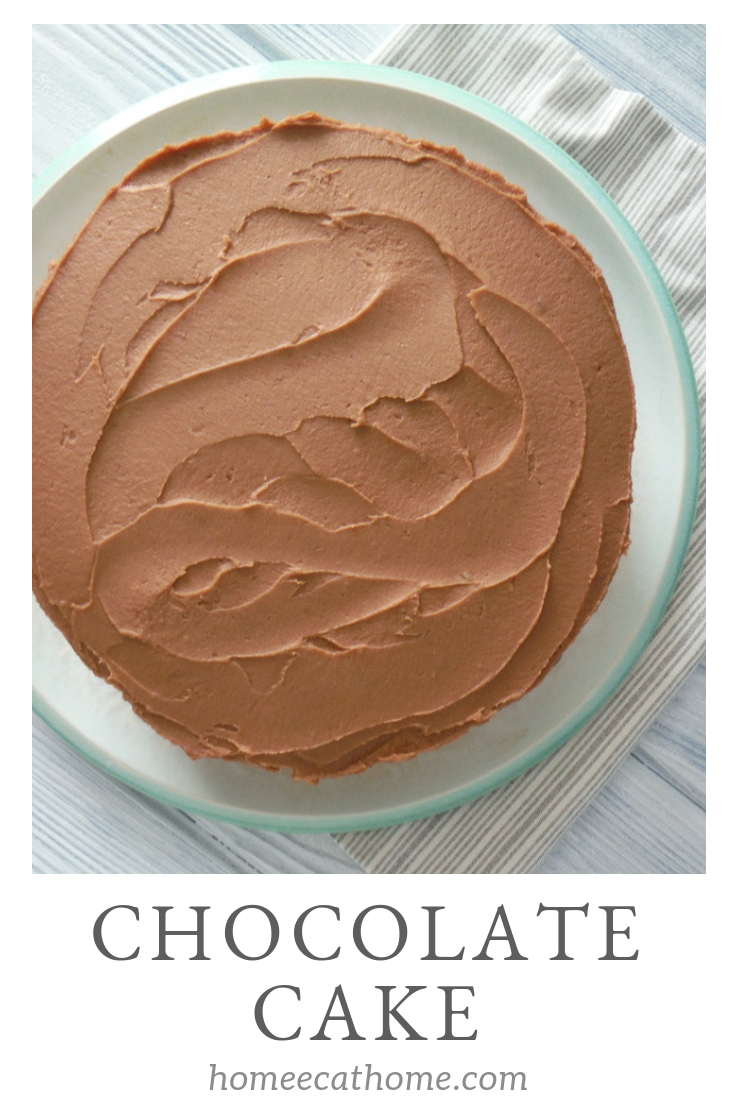
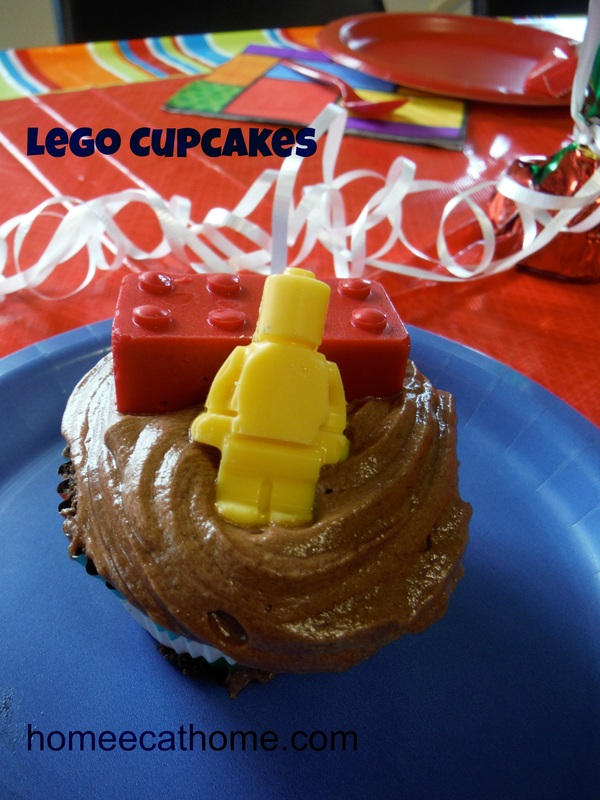
These easy homemade lego candies are the perfect topper for cupcakes and add something fun to the table scape at a lego themed birthday party.
We are a participant in the Amazon Services LLC Associates Program, an affiliate advertising program designed to provide a means for us to earn fees by linking to Amazon and affiliated sites.
I made these lego cupcakes for my son's 7th birthday party. They were super cute, but I made a yummy chocolate butter frosting that was not strong enough for the weight of the lego candies. They were sliding off and we had to reposition a few of them when distributing the cupcakes to party guests. I would suggest either refrigerating cupcakes frosted with a butter frosting prior to your party or using a frosting made with butter and shortening.
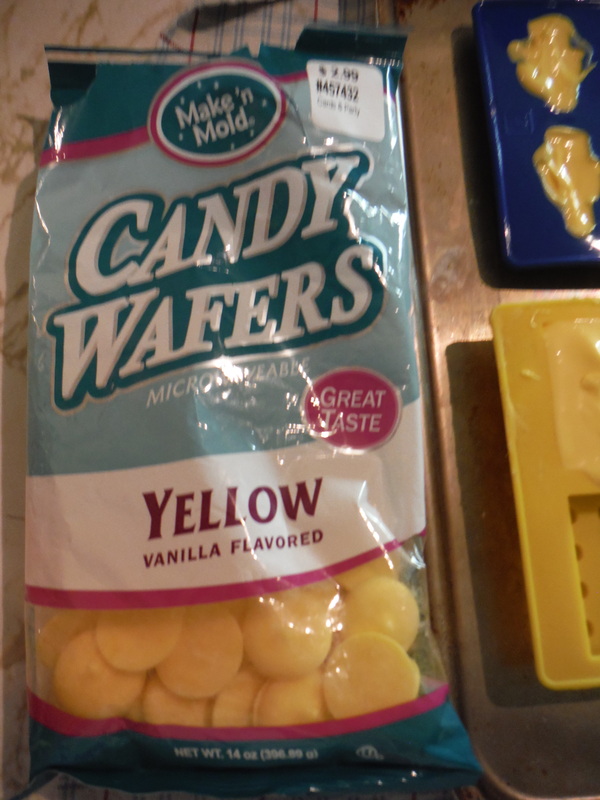
I bought some candy wafers for melting at Hobby Lobby. You can find these in many colors at most craft stores. I ordered Lego silicone candy molds from Amazon (affiliate link).
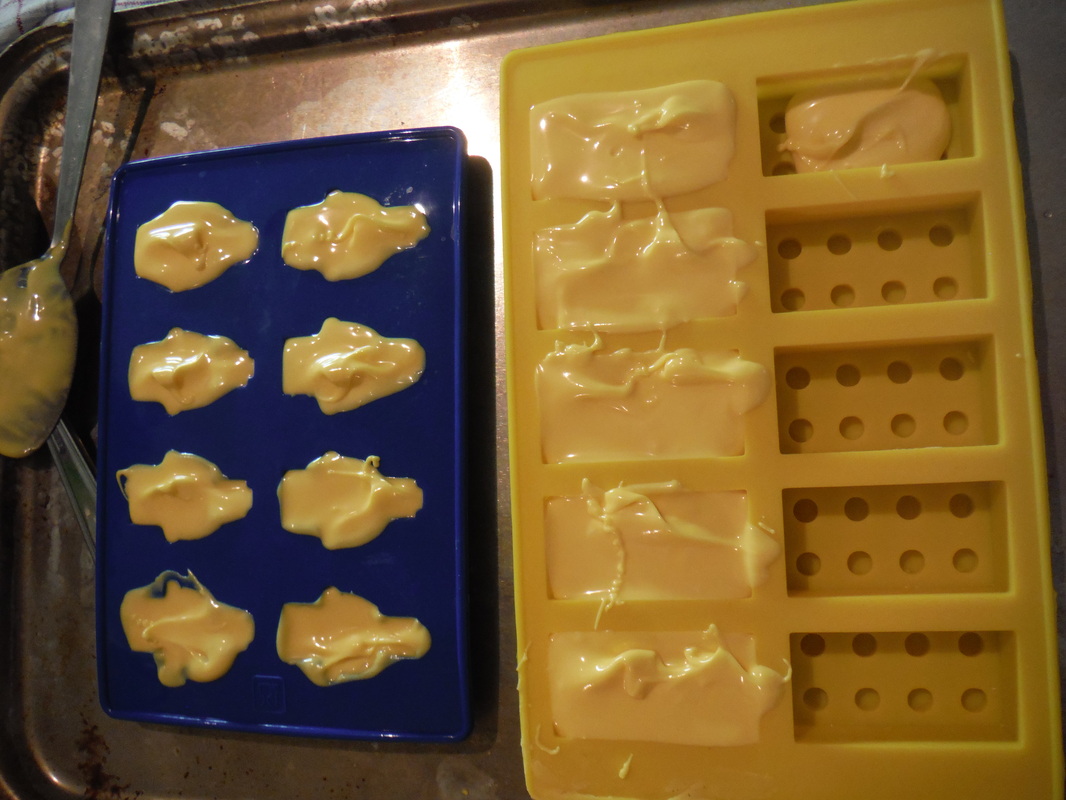
I followed the simple microwave melting instructions on the candy melts package and spooned the melted candy into the molds. I then put them in the freezer until firm. Once firm, they easily push right out of the candy molds. Start making these a day or two before your party so that you have plenty of time to make multiple colors and the quantity that you need.
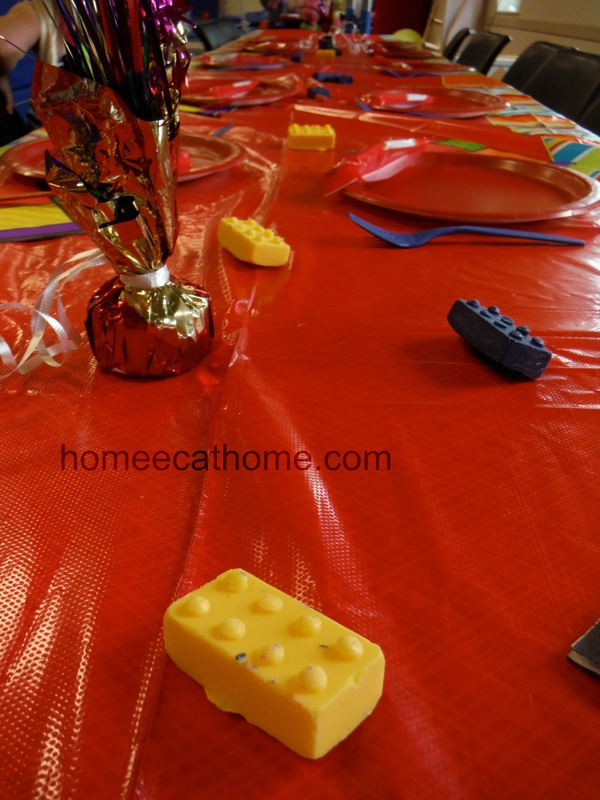
I used extra lego candy pieces to decorate the party table.
I had a hard time finding anything lego themed for the birthday party that wasn't super expensive and only available online. I was able to find the silicone molds on Amazon (affiliate link), but couldn't find much else. I went with neutral themed bright colored tableware that I bought locally and on sale. If you have any awesome ideas or resources for a lego party please share in the comments.
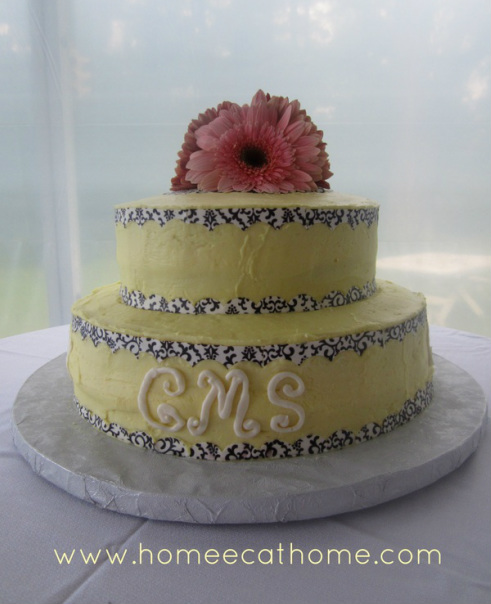
In the fall, we celebrated my mother-in-law's birthday. I offered to make the birthday cake and went with a formal design. In keeping with the more formal theme, I kept the cake simple and put only initials on the sides. All four sides of the cake were embellished with initials.
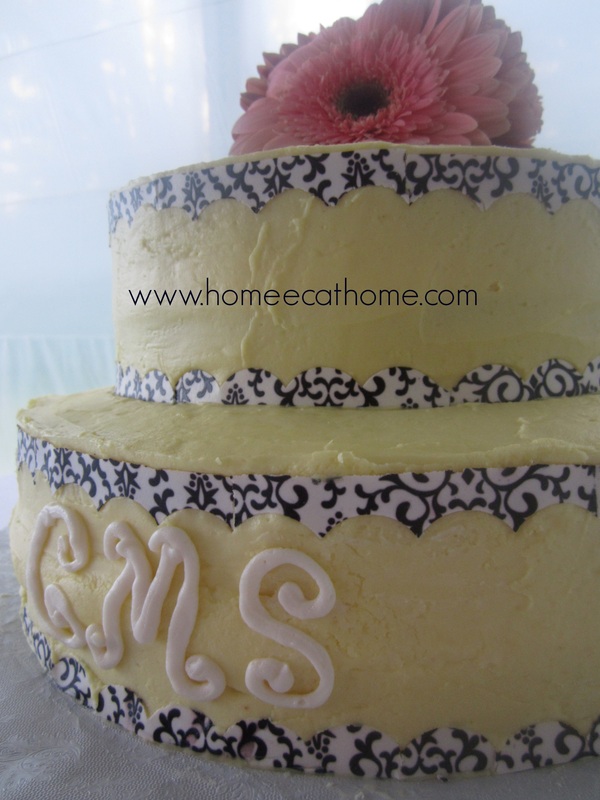
I made three batches of Fluffy Yellow Cake batter from Annie's Eats, adding a little homemade crème bouquet and purchased princess emulsion to give it that wedding cake flavor. I think I used a tsp. or two for each cake recipe. I bought the Princess emulsion at Hobby Lobby, but could not find crème bouquet flavoring locally and made a homemade version.
This cake is constructed of two 9 inch layers stacked on top of two 12 inch layers. I placed two wooden and two plastic dowel rods through the layers to help hold everything together. I also spread a little frosting between the bottom layer and the cake board to help anchor the cake to the board. I used this recipe for Cream Cheese Celebration Frosting from Veronica's Cornucopia. This recipe makes a thick icing which is both delicious and lends itself well to decorating. It will hold its shape when used in piping designs. This recipe also uses crème bouquet flavoring which gives the icing a wonderful hint of citrus. I used paste and gel icing colors to create a warm light yellow frosting. I have found that icing gets darker the next day, so I tend to go slightly lighter when trying to get a light color. Homemade Crème Bouquet:
I combine the ingredients and store in a small squeeze bottle. 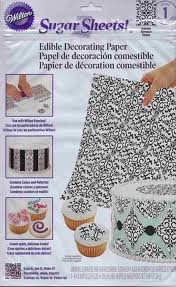
I used a scallop cutter designed especially for using with sugar sheets to achieve the scalloped edges on the cake. This was time consuming, but I thought the end result was worth the extra effort. I cut a circle out of the sugar paper and placed it on top of the cake to provide a place to set fresh flowers.
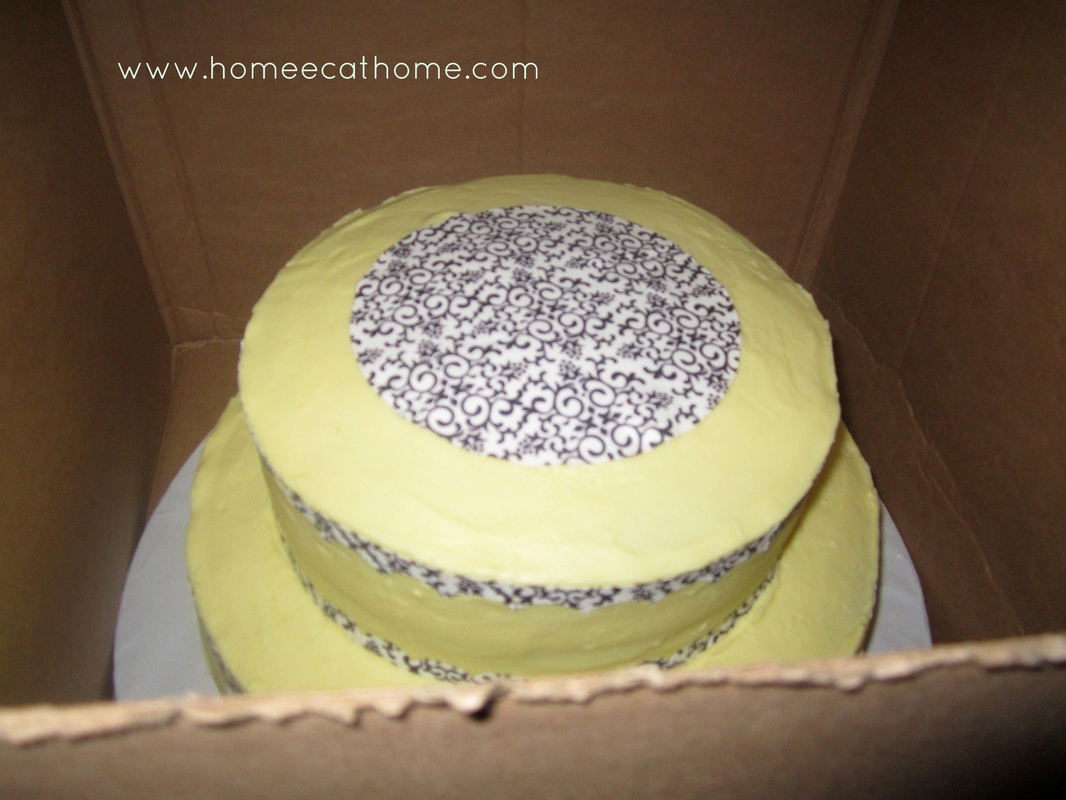
Since I needed to travel about 5 hours with this cake, I repurposed a large box as a cake box large enough to safely hold the cake. The cake board should fit snuggly into the box so that it does not shift. The cake board should also be larger than the base of the cake so that the cake does not touch the sides of the box.
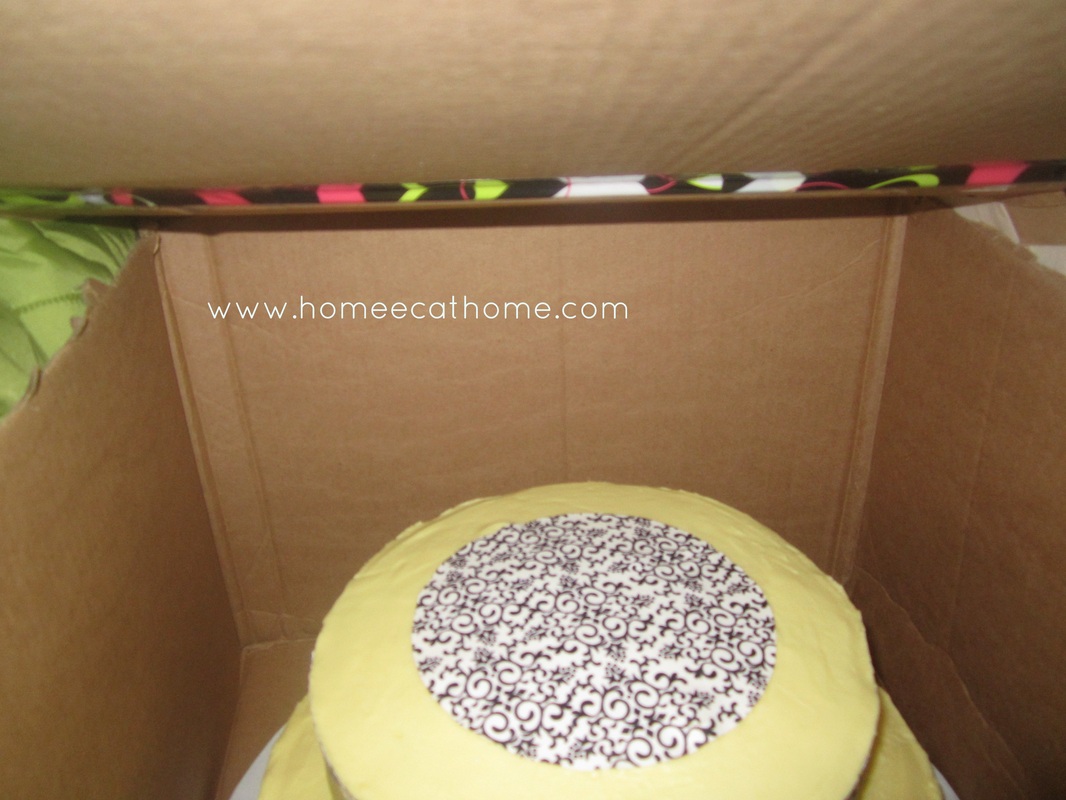
I taped a large piece of cardboard to the top of the box as a lid that hung over the edge so that it would not fall into the box and damage the cake. I first removed the original lid which flapped in and could have fallen into the cake.
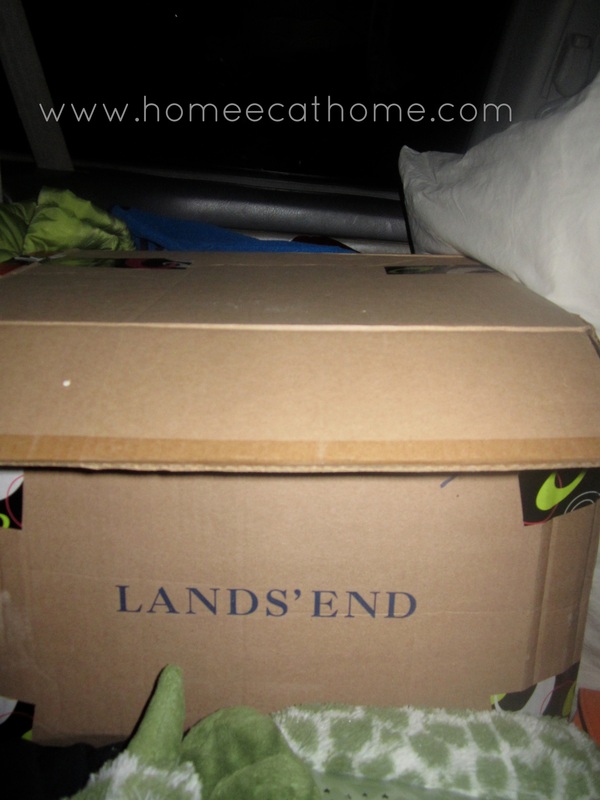
I positioned the cake box on the back bench seat and wedged it in securely with pillows, blankets and coats. We had plenty of padding in the car since we were traveling with kids.

For a finishing touch, I found some pretty flowers at Trader Joe's and placed them on top of the cake. I was pleased with both the flavor and the look of this cake and would use these recipes again. The icing was especially delicious and easily gave a smooth finish.
Veronica's Cornucopia gave a great tip for using a water spray bottle to help achieve smooth icing. In the past I have used a straight edge dipped in water, but found the spray bottle much easier for smoothing icing.
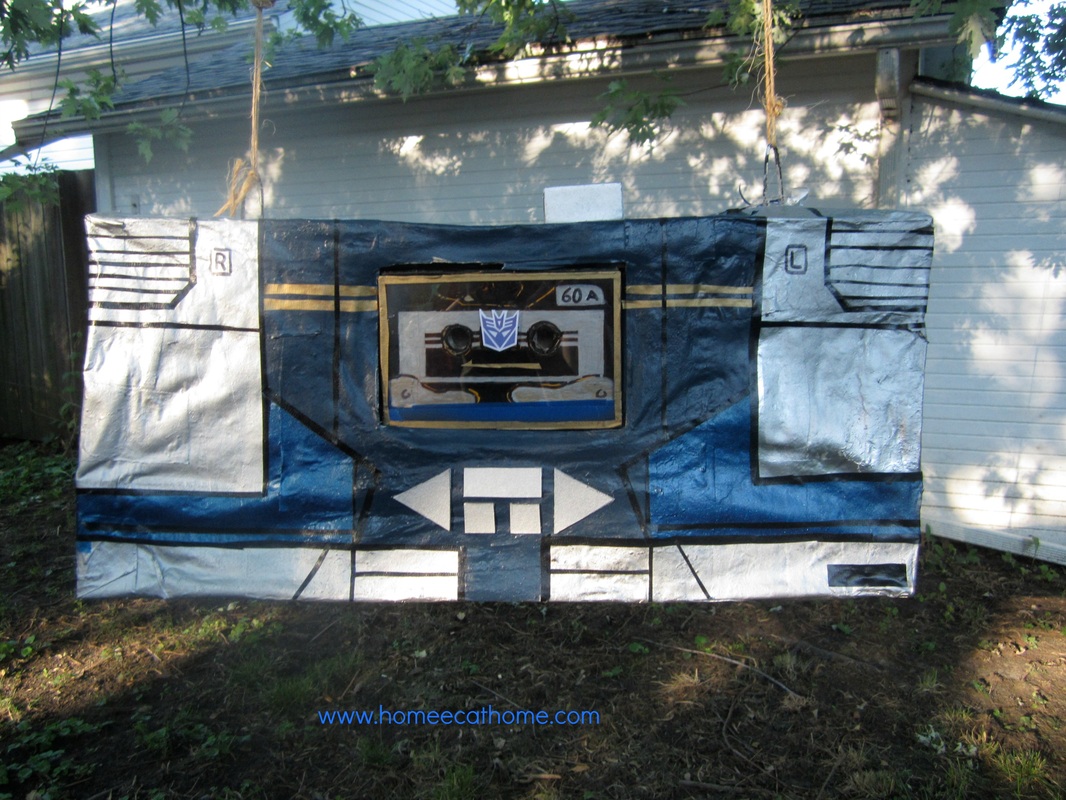
Last summer we gave our oldest a fun backyard birthday party. He picked a Transformers theme and we had a lot of fun with it.
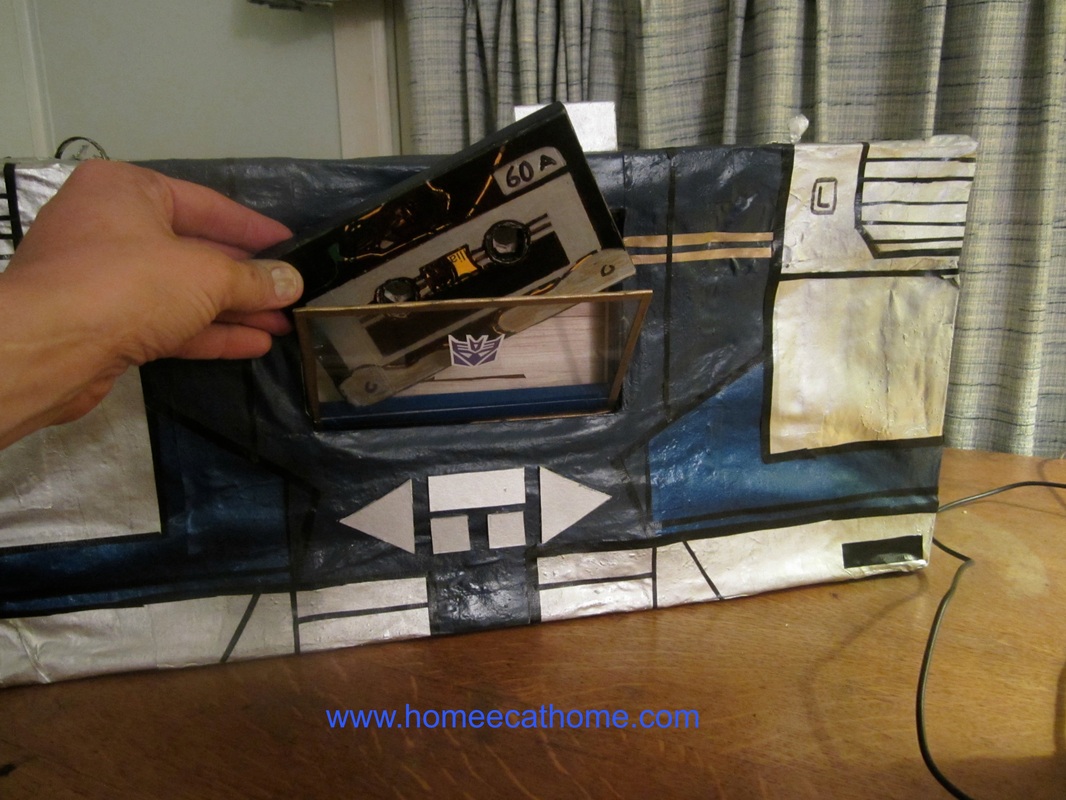
My husband has become quite the pinata maker. The year before, he made a Dr. Octopus pinata for a Spiderman themed birthday party and then he made this amazing Soundwave pinata for the Transformers birthday party. He used balsa wood to construct a frame and covered it in paper mache. He put so much detail into making this pinata. He even made a "cassette tape" and "tape deck" that opened. Finally, he painted the pinata to look like Soundwave. Well done, Honey!

Who's ready for some pinata action? I don't know much about Transformers, but apparently Soundwave is a Deceptacon which means that he is a bad guy so he is a perfect candidate for a pinata (since pinatas get beat up).
Dive in!
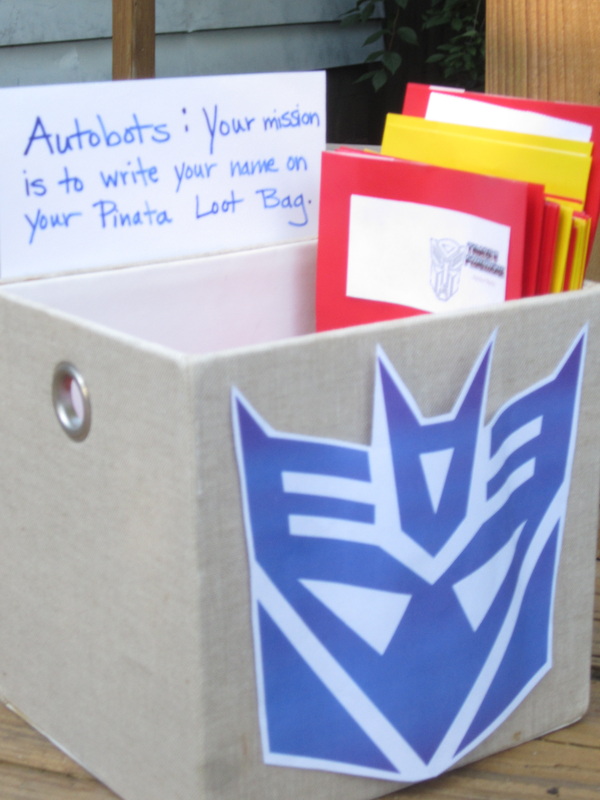
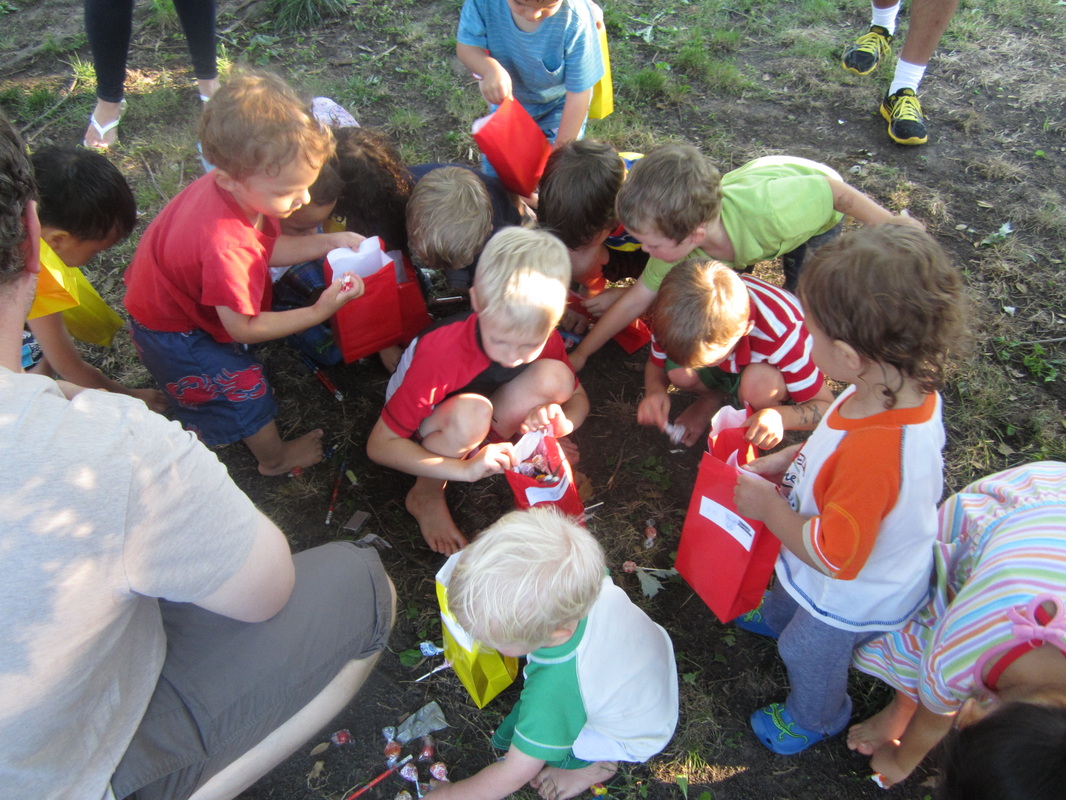
I was trying to be clever here, but I am not educated in the language arts of Transformers. Also, I didn't realize at the time that I put a Deceptacon (bad guy) image on the container. It was however, a nice way to distribute loot bags and make sure that names were on the bags. I bought solid color bags at Dollar Tree and glued on a transformer image that I found online. The bags were sold in 10 packs for $1.
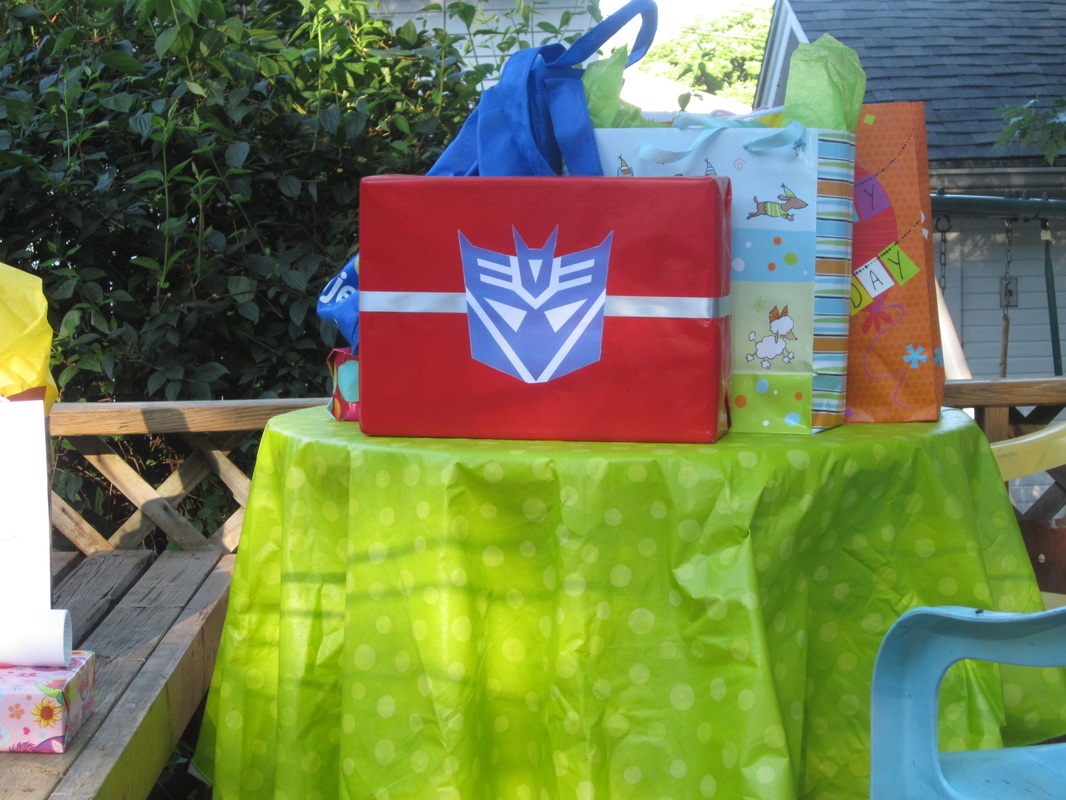
I was really proud of my Transformer wrapping job and then found out that I unknowingly glued a Deceptacon on the package instead of an Autobot. Oh well, the colors are really pretty together.
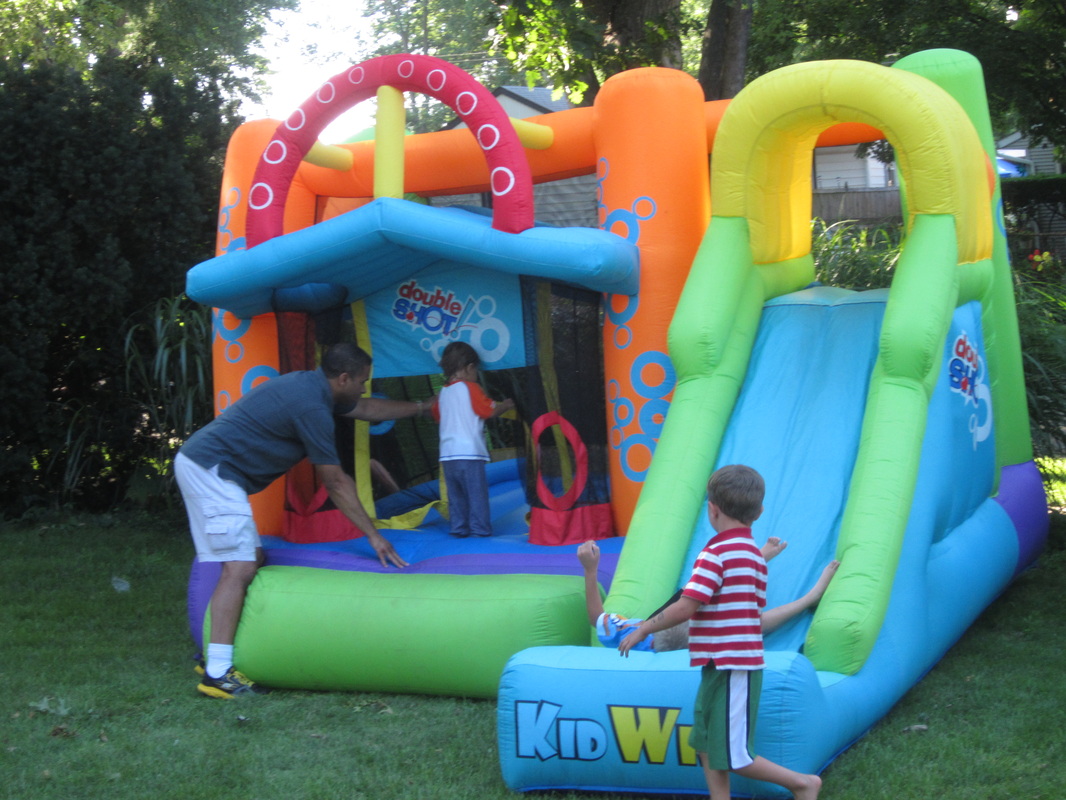
My cousin loaned us this awesome bounce house for the party. The kids loved it and played for hours.
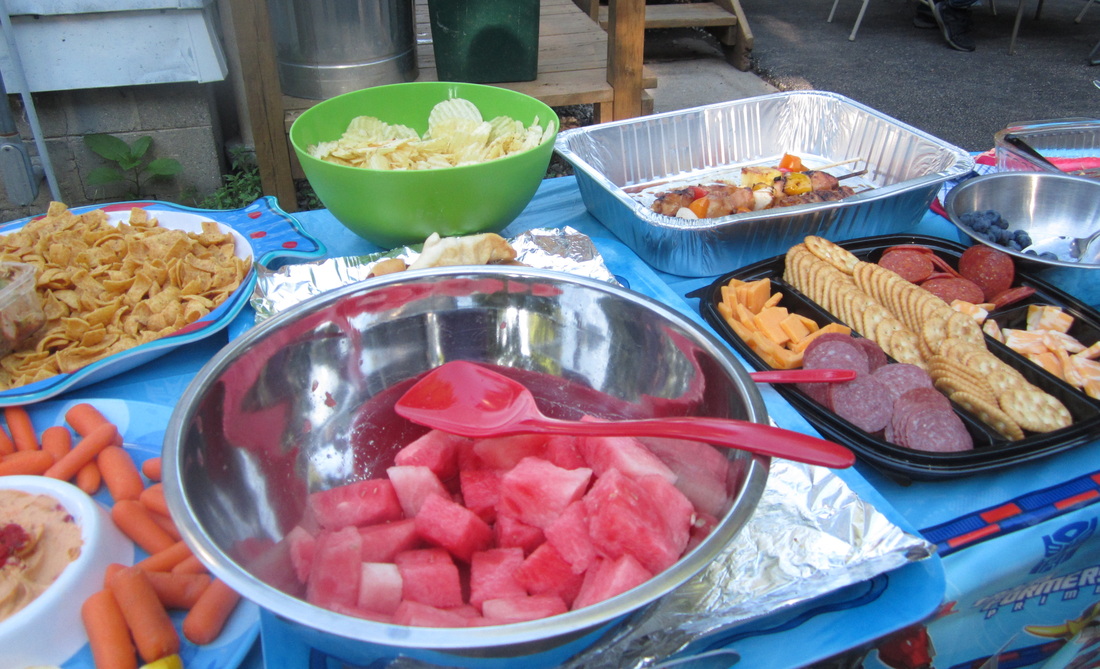
And lastly the menu... I don't have any fabulous food pictures to share. To simplify things, I combined a few homemade dishes with some easy store bought snacks. I used paper products form Oriental Trading Co. Another fun blog post if you haven't read it already. Oriental Trading Co. sent me some great Transformers products to review. They have a nice selection and my son was thrilled.
The menu: Chips and Dip Vegetables and Hummus Watermelon Blueberries Cheese and Cracker tray Honey Chicken Kabobs Pigs in a Blanket Hot Ham Sandwiches Corn and Black Bean Salad 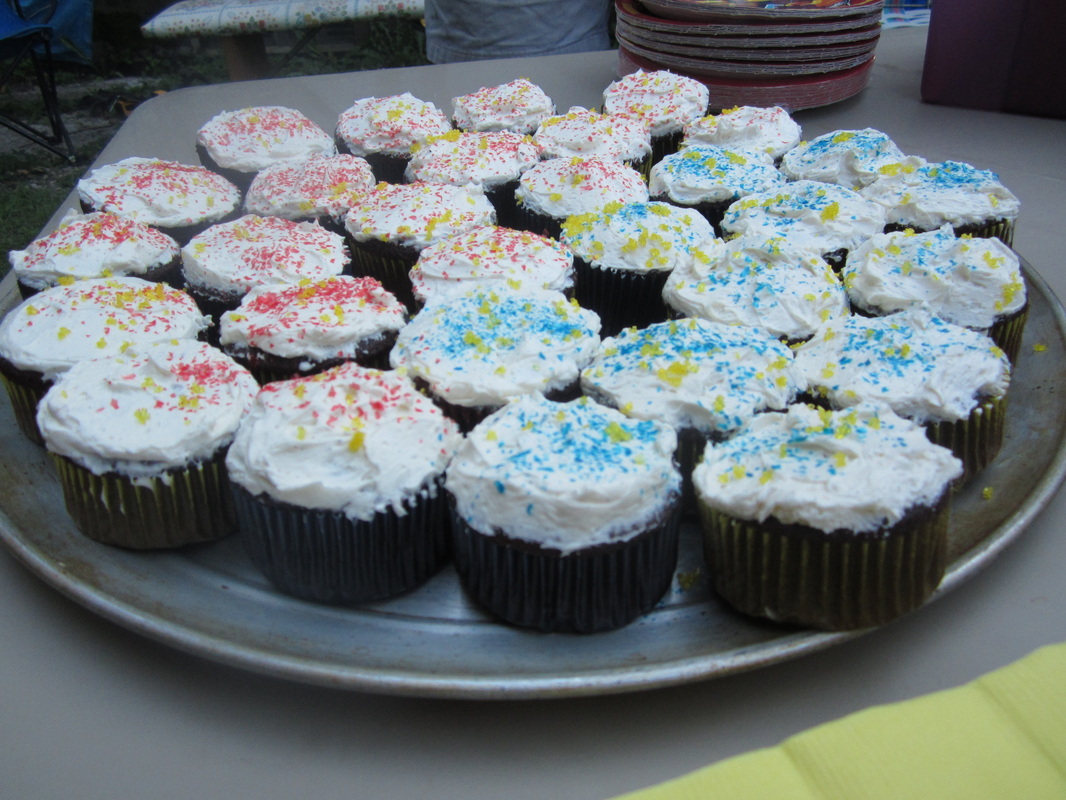
I went really easy with the cake for this party. I made chocolate cupcakes and frosted them with vanilla bean icing and sprinkles in the party theme colors. The link to the recipe is for a chocolate cake, so if you bake the recipe as cupcakes, bake for a lot less time. I think these took around 20 minutes.
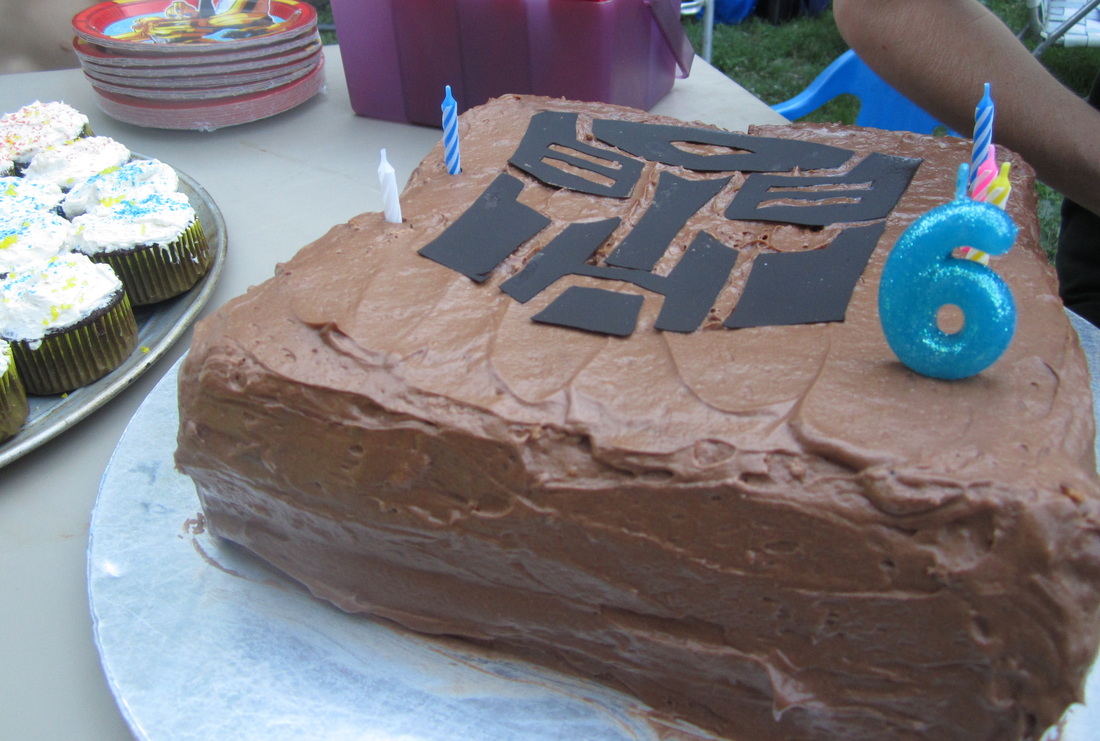
We also made an Angel Food cake in a 10" square pan. This is two Angel Food Cakes stacked together to get the desired height. My sister-in-law actually frosted this for me (It's nice having help on party day.) with chocolate frosting. I cut the autobot symbol out of a black sugar sheet I purchased at Walmart. I used a print-out as a stencil and cut the design out with an exacto knife on a cutting board.
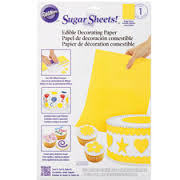
Sugar sheets come in this packaging and are usually sold one sheet to a package. I have seen them in craft stores, Walmart, and Meijer. They are versatile, edible, and come in handy when cake decorating.
Disclosure: I was not compensated for anything in this post. All opinions are honest and are my own.
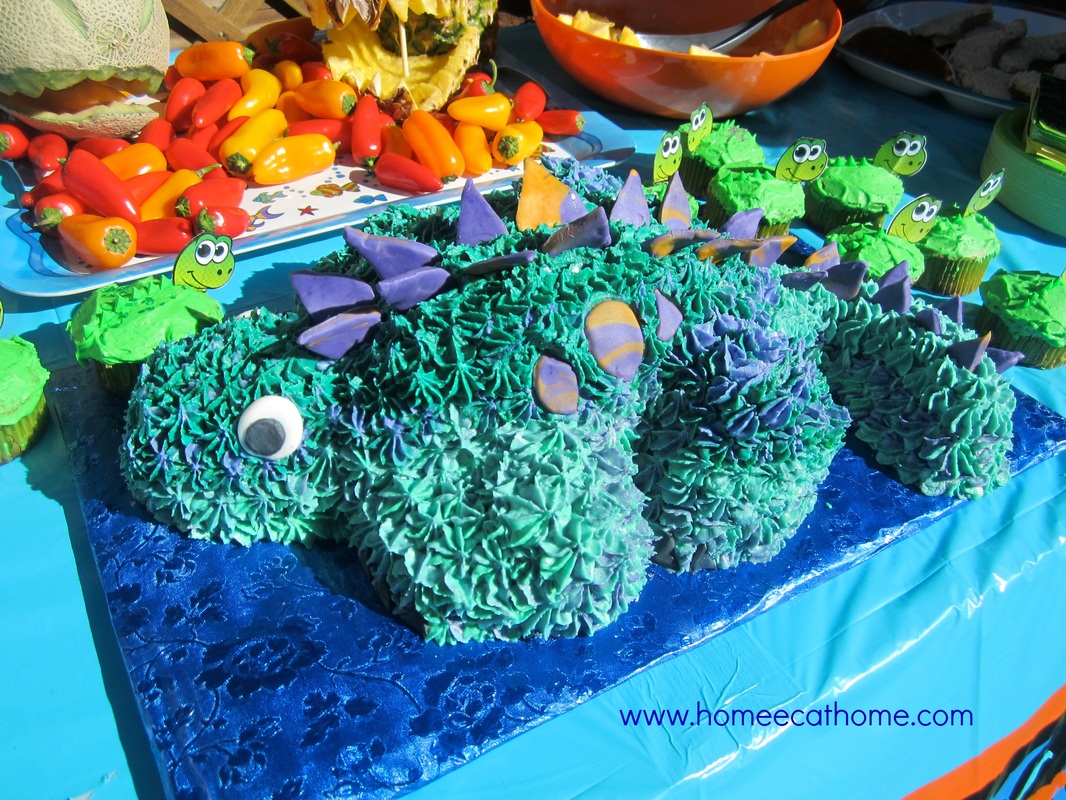
We gave our four year old a dinosaur birthday party this year. To make it extra special, I made a 3-D dinosaur birthday cake. To make sure I had enough cake (we invited my son's entire preschool class), I also made the green dinosaur cupcakes. They were super easy because I found a dinosaur cupcake kit at Meijer. (Thank you Mom for staying up late with me and putting dinosaur heads and spikes on the cupcakes.)
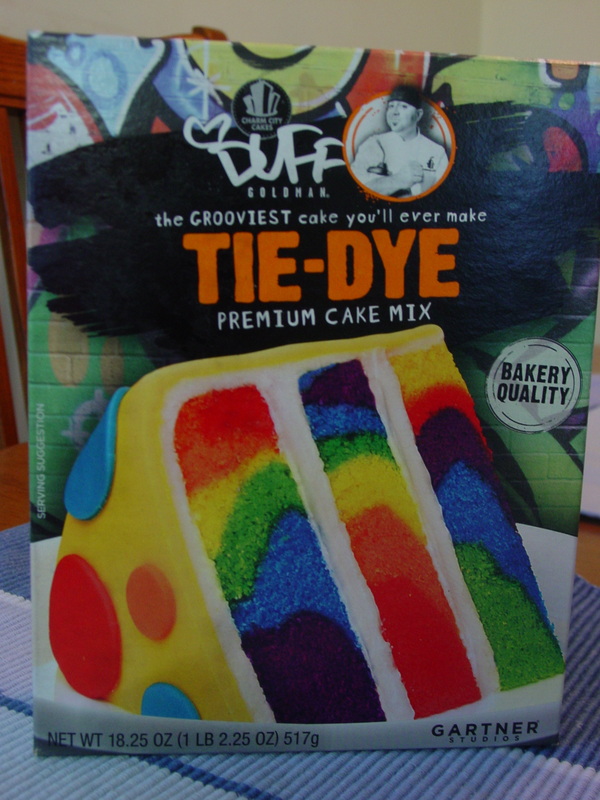
We were in Target a couple of days before the party and I had not decided on a cake recipe yet, when I saw these fantastic cake mixes from Duff Goldman of Charm City Cakes. I decided a cake mix sounded great at this point and let my son pick out his favorite. He chose this really cool tie-dye cake. I didn't realize at the time that I needed two boxes of this cake mix to make two 9 inch cakes that would be thick enough to create a 3-D dinosaur. I baked two very skinny cakes and went back to the store and bought 2 cake mixes. I then used one cake mix for each 9 inch cake pan. This cake mix worked well for the cake, just make sure and use 2 boxes.
My husband found the instructions for making a 3-D dinosaur cake years ago and printed them out and we still had them 5 years later. 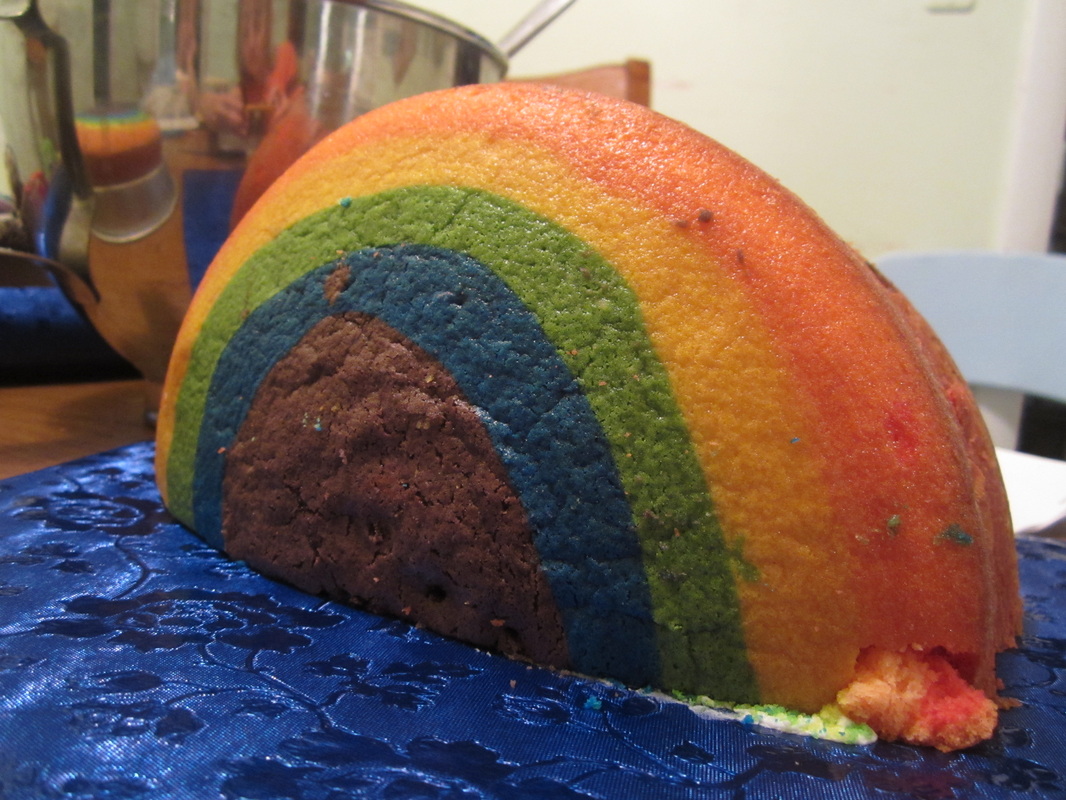
I love the way the tie-dye looks. You start with a body, by cutting one 9 inch cake in half and putting the flat sides together. Spread a little icing in between to help hold it together and put some icing on your cake board to help it stay in place.

Make a template following the instructions for making a 3-D dinosaur cake. I used the bottom of my cake pan as a stencil and cut out a 9-inch circle of wax paper, then penciled in the cutting lines from the guide online. I then cut out the wax paper pieces and placed them on the cake. I very carefully cut the pieces and assembled them into a dinosaur shaped cake.
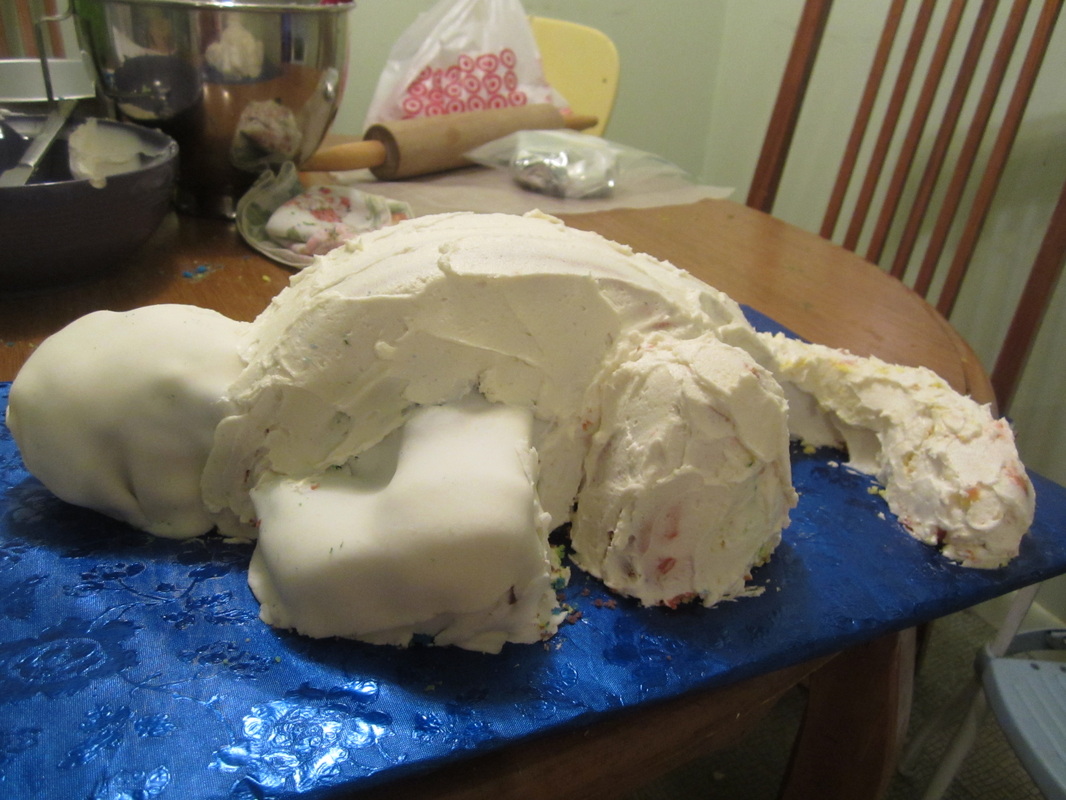
The head/neck and front legs were the hardest parts to assemble. I found them difficult to hold in place even with toothpicks so I covered the whole cake in a crumb coat of buttercream frosting and covered the difficult areas with a layer of fondant to help keep them in place.
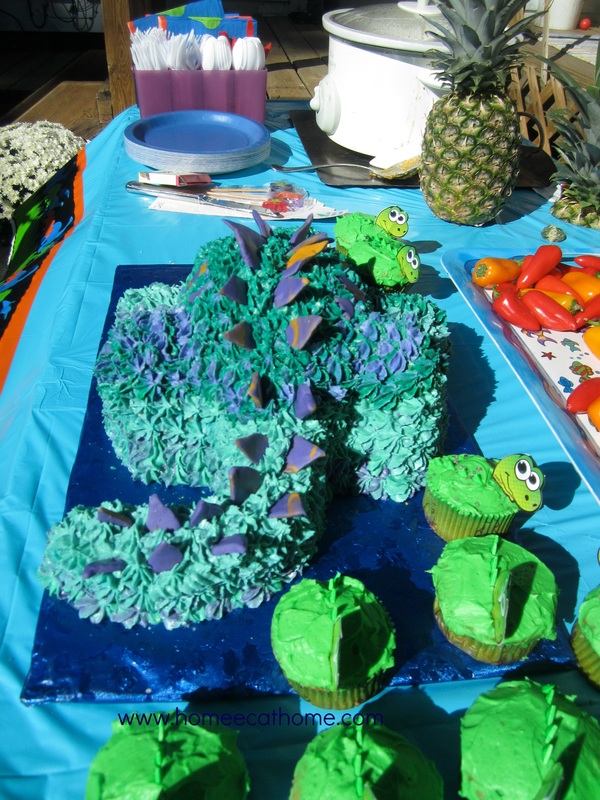
I used a large star tip to cover the cake with green and purple icing. I mixed purple and green icing in my icing decorator to get a nice mottled look. My favorite decorating tool is a pampered chef icing decorator that I have used for years. It has large tips and is great for cupcakes and less detailed work like this. I ran out of green before finishing the cake and when I made a second batch my green came out much darker, but I decided that was ok because it gave some variation in the color.
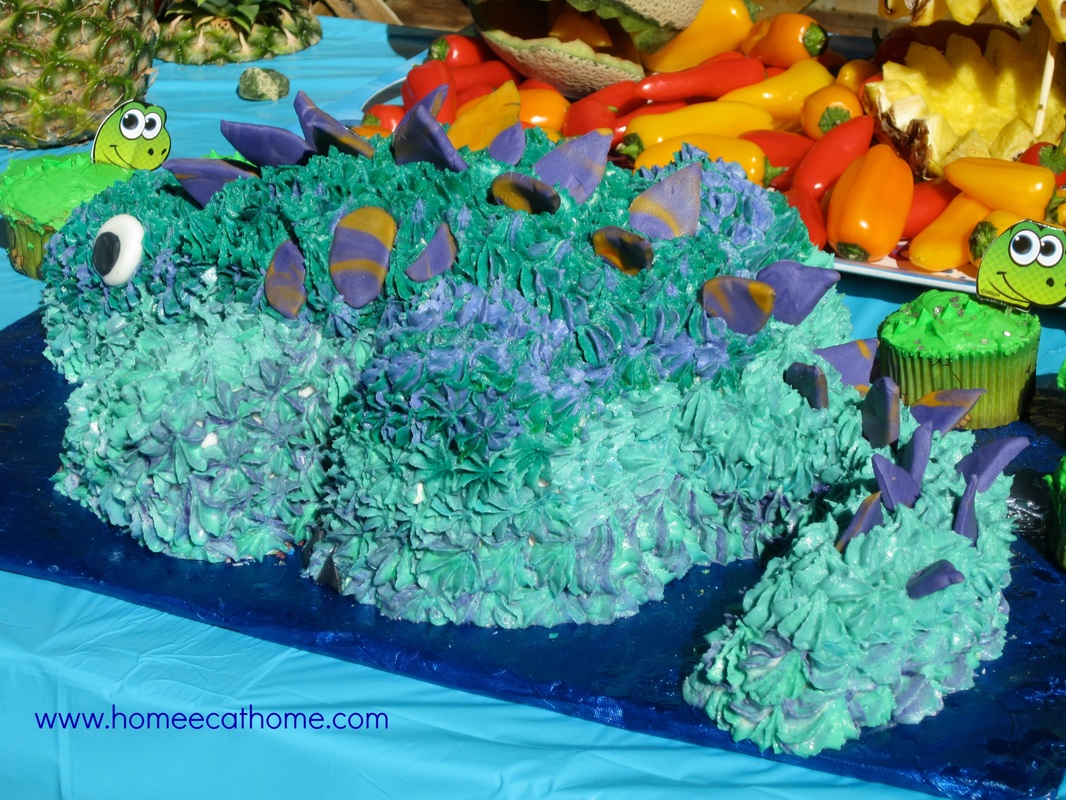
I colored some fondant gold and purple and cut out simple triangles for the spikes and random shapes for spots. The eyes are also cut from fondant. I did not leave my fondant pieces out to dry, I just put them directly on the icing while it was still moist and they held in place nicely.
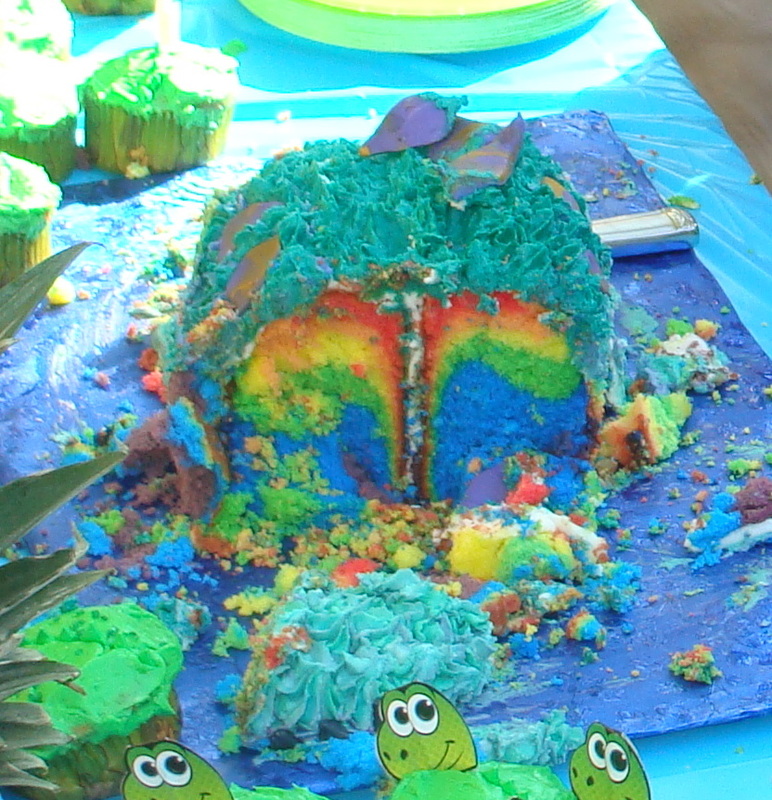
How cool is this? The tie-dye cake was most impressive. So fun for a kids party.
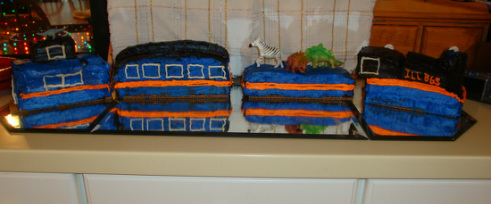
My son's 4th birthday is upon us so I thought I better go ahead and post last year's birthday cake. Better late than never, right? He wanted a safari, dinosaur, train birthday party. I baked chocolate cake and my husband assembled and decorated the train with a simple buttercream frosting. We put some clean toy dinosaurs and a zebra on top of one of the train cars to coordinate with the party theme.
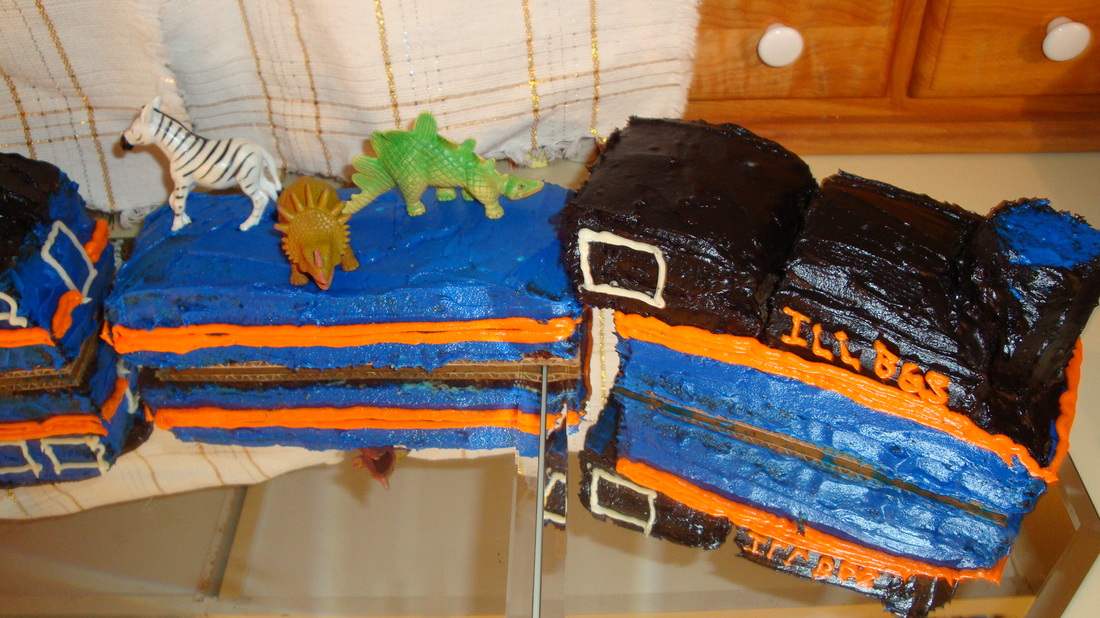
My very artistic husband was a natural at cake decorating.
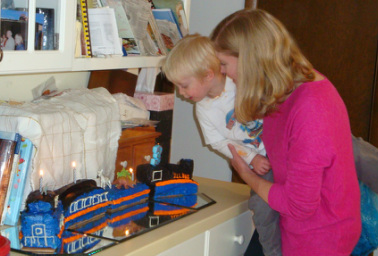
The birthday boy blowing out his candles
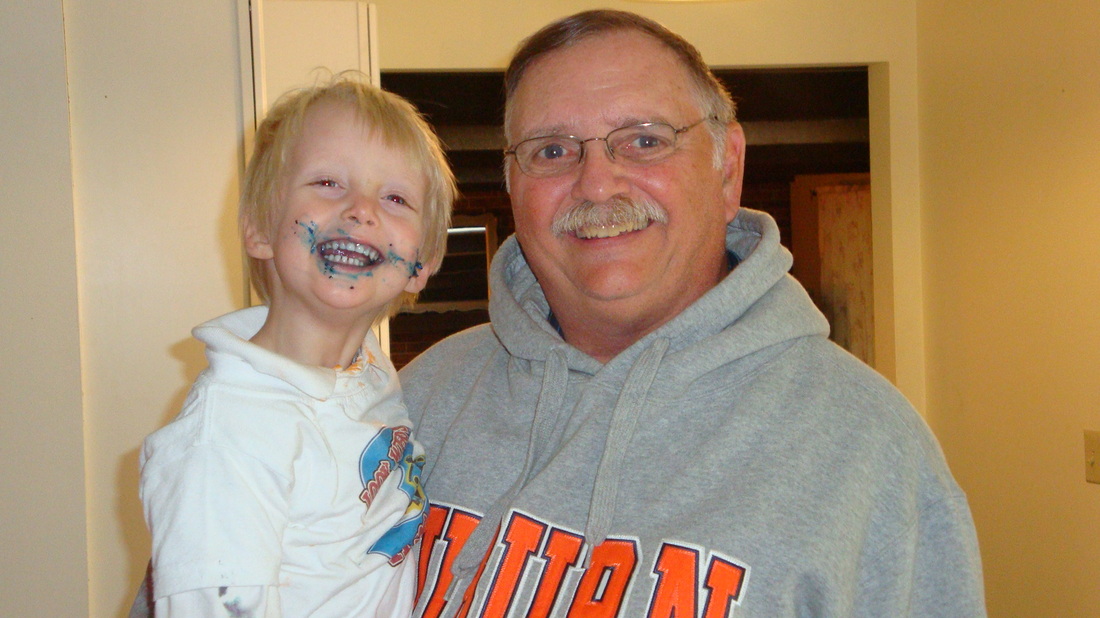
A happy birthday boy with Grandpa
|

Welcome to Home Ec @ HomeHi, I'm Faith, a former Family and Consumer Science teacher turned food blogger. I love God, my family, and food. You can usually find me in the kitchen preparing family friendly, homemade recipes and taking lots of pictures. 
Still Goldens, Southern, IL
 Fan Favorites

The Best Dry Brined Turkey with Citris and Fresh Herbs

 Dehydrating Pears and Apples in the Instant Pot Duo Crisp Dehydrating Pears and Apples in the Instant Pot Duo Crisp
 
 |
 RSS Feed