|
We are a participant in the Amazon Services LLC Associates Program, an affiliate advertising program designed to provide a means for us to earn fees by linking to Amazon and affiliated sites.
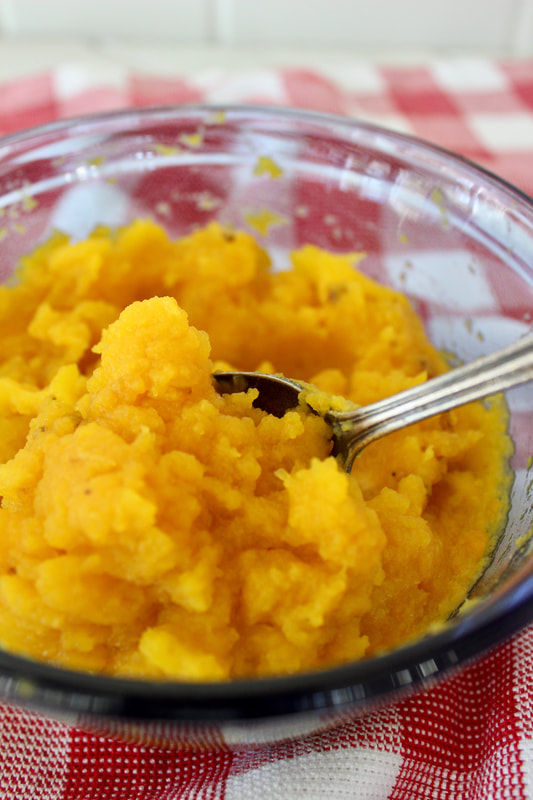
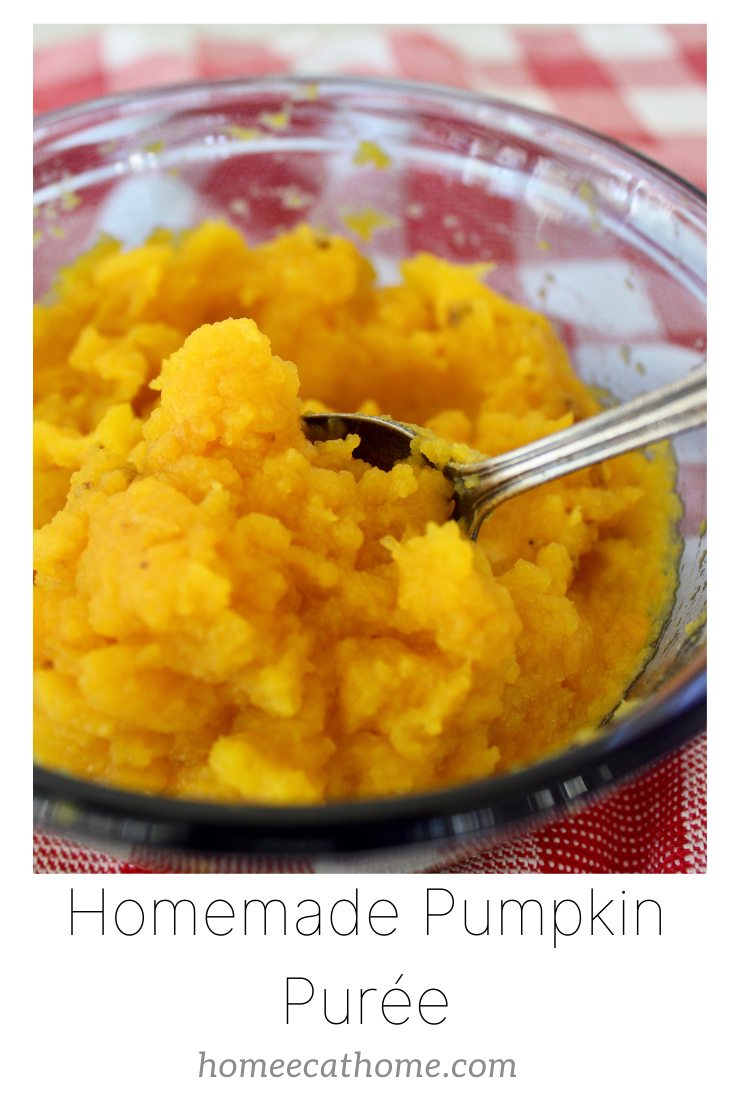
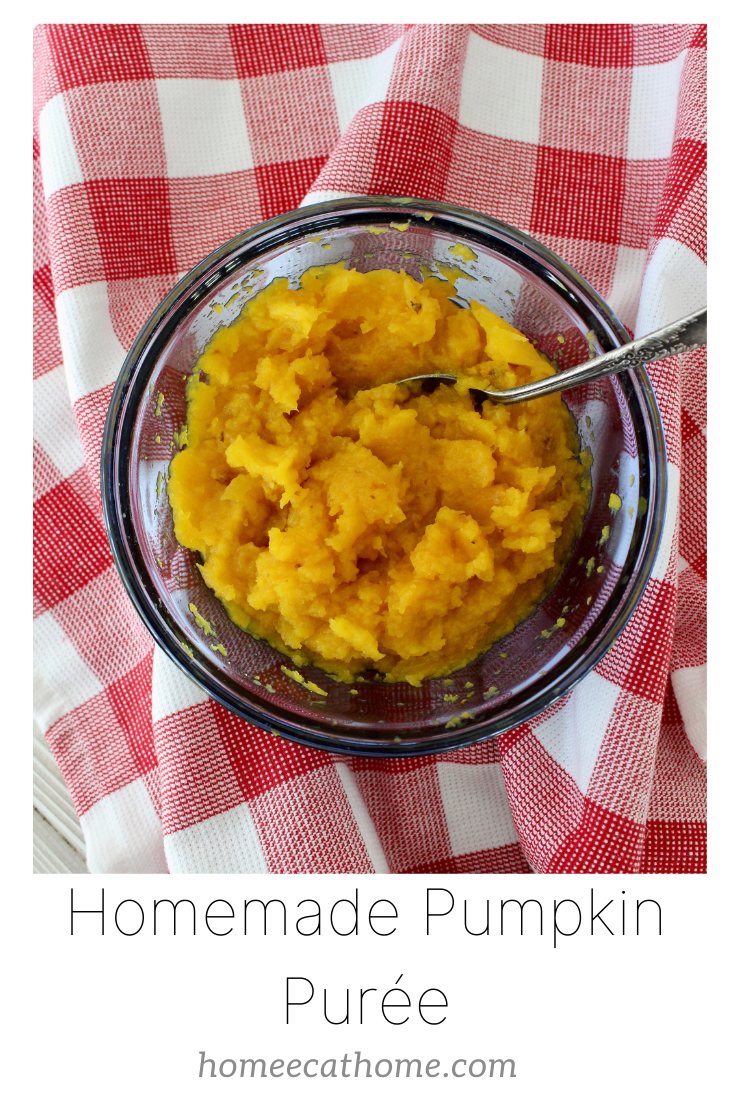
Still have any leftover pumpkins from Halloween? Don't throw them out, roast the seeds and make pumpkin purée for your Thanksgiving pumpkin pie. (The smaller pie pumpkins are best.)
We actually grew several types of pumpkins in our garden this year and although many were lost to squash bugs, we did manage to harvest a few nice pie pumpkins. I cooked and pureed them and froze the puree for future recipes. It will be fun making our pumpkin pie this year with our own homegrown pumpkin purée.

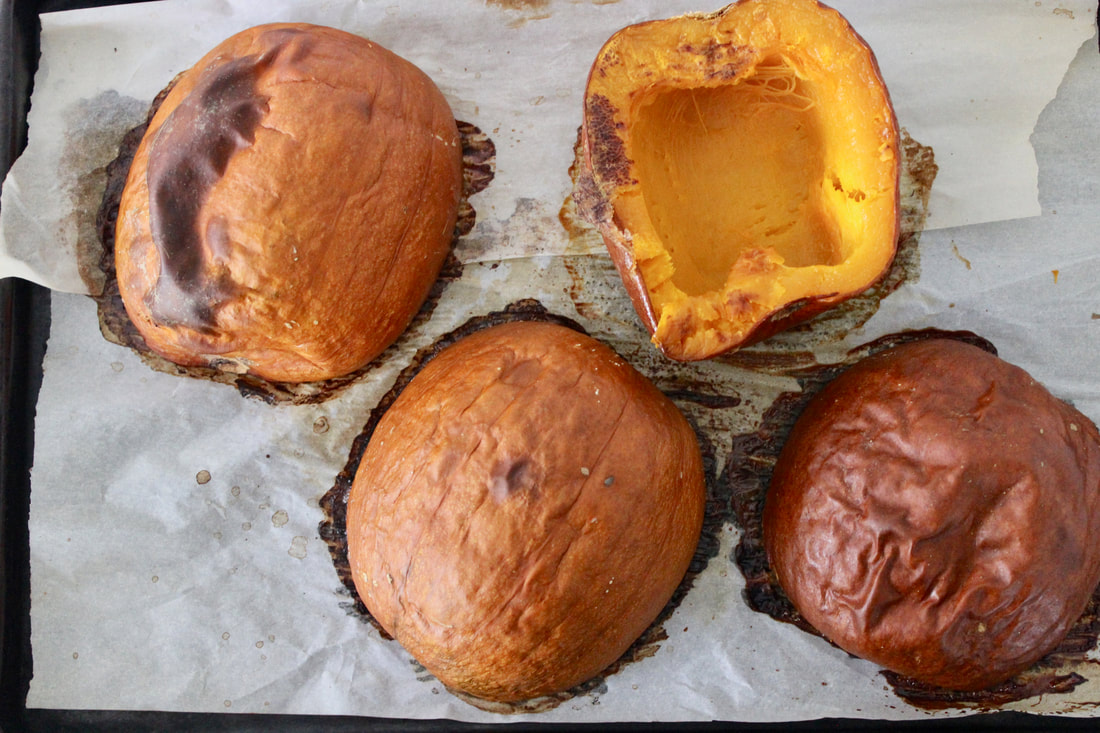
Cut the pumpkins in half and scoop out the seeds, then roast face down for about an hour at 350 degrees F.
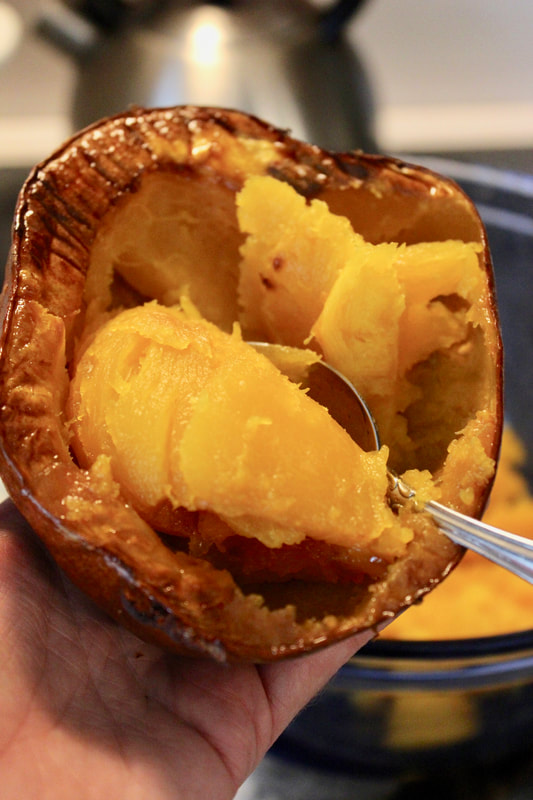
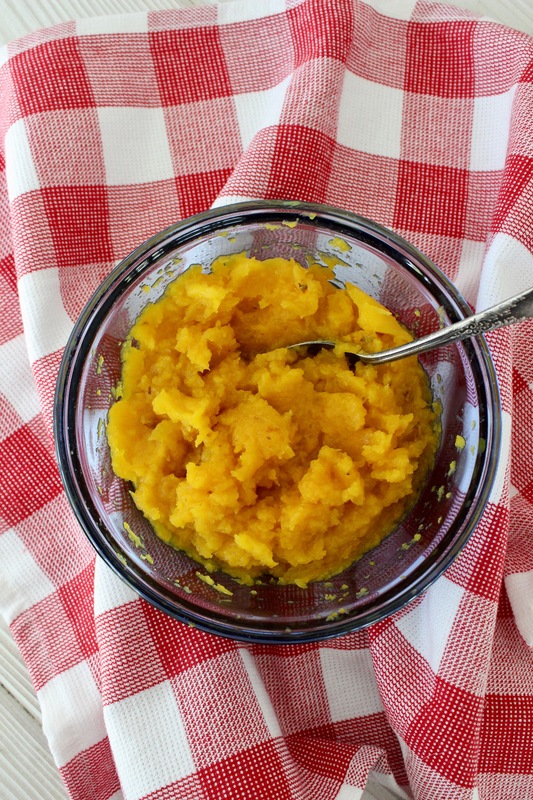
Scoop the pumpkin out to purée.
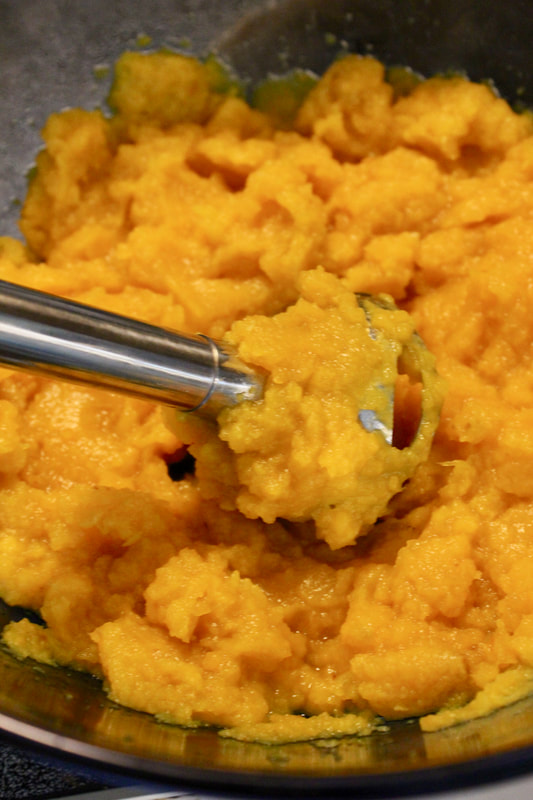
Purée with an emersion blender or food processor.
Robert and I made a Youtube video of how we purée pumpkin. You can subscribe to my youtube channel while you are there too.
Directions:
You will need a pie pumpkin 1. Cut your pumpkin in half. Scoop out the seeds. You can toast them or compost them. Bake the pumpkin halves in a 350 degree F. oven for about an hour or until it is tender enough to scoop out the pumpkin flesh. 2. Next you scoop out the pumpkin with a spoon and put it in a food processor or put it in a mixing bowl and use an emersion blender to puree it. This is the emersion blender I use. (amazon link) Puree until you have a smooth pumpkin purée. 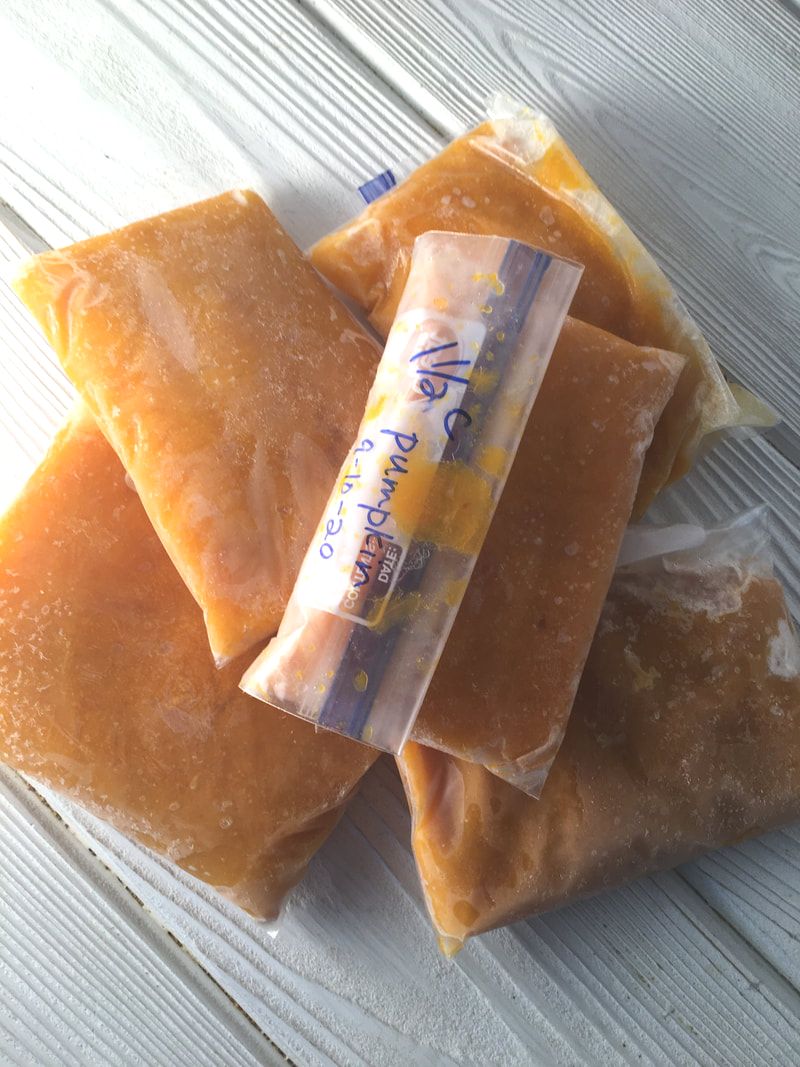
You can use in your favorite recipes and freeze extra for later. I pre-measure the exact amount that I will need for my favorite recipes before freezing. One of my favorite recipes that the boys love is pumpkin chocolate chip muffins. This browned butter pumpkin pie and these pumpkin cookies with browned butter glaze are also some of our favorite fall recipes.
Pin on Pinterest

7 Comments
Rich, creamy butter bean soup... I worked on this recipe for months, maybe even a year. Each time I made it, I took notes of how I thought I could improve it the next time. Then one day, when I made it for dinner we decided it was finally right.
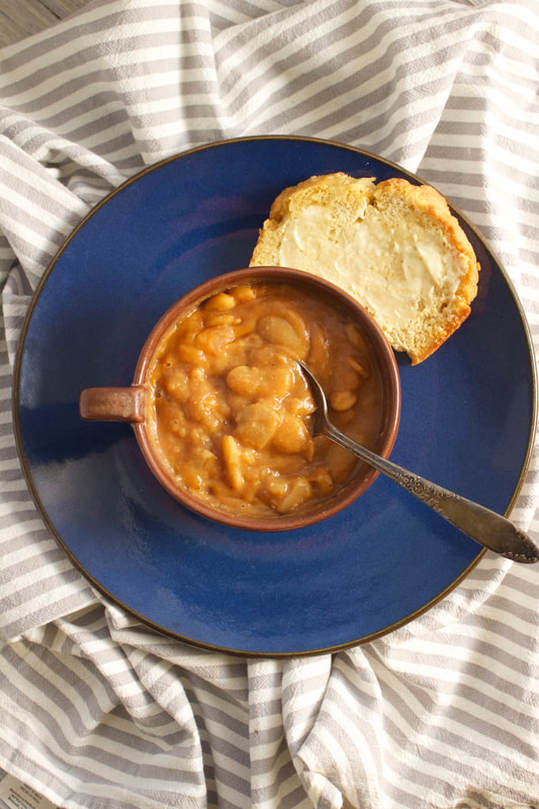
This is one of our favorites that has been on the blog for a few years. Since I made this a couple of times recently, I snapped some new pictures to update the post. I even made a video which you can see below. 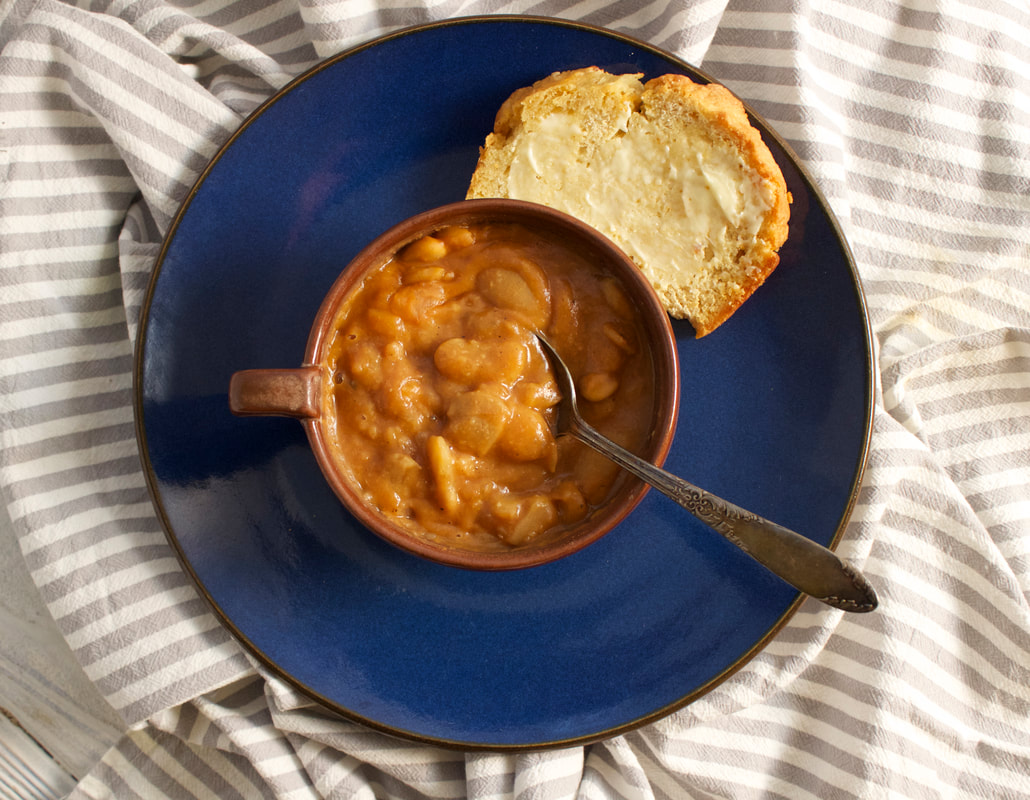
This recipe is one of my favorites because it is delicious, easy, and budget friendly. The boys love it too. Such an easy meal to throw together in the morning and have a hot cooked meal on a busy weeknight.
This recipe was inspired by our favorite butter bean soup from Taylor's Chili Parlor in Carlinville, IL. I make it less spicy than Taylor's, but still very good. It is more kid friendly with a little less kick. If you want it spicier, just add more pepper. Watch my video and see how easy this is to make. You can even make it with a toddler on your lap:)
1 lb dried lima beans (also known as butter beans)
5 garlic cloves, minced 1 large sweet onion, diced 1/4 tsp. salt 1/2 tsp. or more freshly ground black pepper (I don't measure, just grind some pepper into the soup) 2 tsp. creole or cajun seasoning (you can see which kind I use in the video) 1 tsp. cumin 1 tsp. corriander 1 quart (4 cups) vegetable broth 2 cups water 1 stick real butter 1 (8 oz.) can tomato sauce Directions: 1. Soak the beans overnight. 2. Rinse and drain the beans before placing them in the crock pot. 3. Put the rinsed beans, garlic, onion, salt, pepper, creole seasoning, cumin, and corriander into the crock pot along with the broth and water. 4. Cover crock, and cook on high for around 8-10 hours, or until beans are tender and creamy. You can turn it down to low if you think it needs it, but I have discovered high works well and produces creamier, softer beans. Usually longer is better to get the beans to break down and become soft and creamy giving the soup a slight pureed effect. It is always thicker the next day too so leftovers are amazing. 5. During last hour, add 1 stick butter and tomato sauce. You can turn it down to low now as the beans should be soft. 6. I like to take the lid off and let the soup thicken a bit before serving. Delicious with some homemade beer bread or bread machine bread. 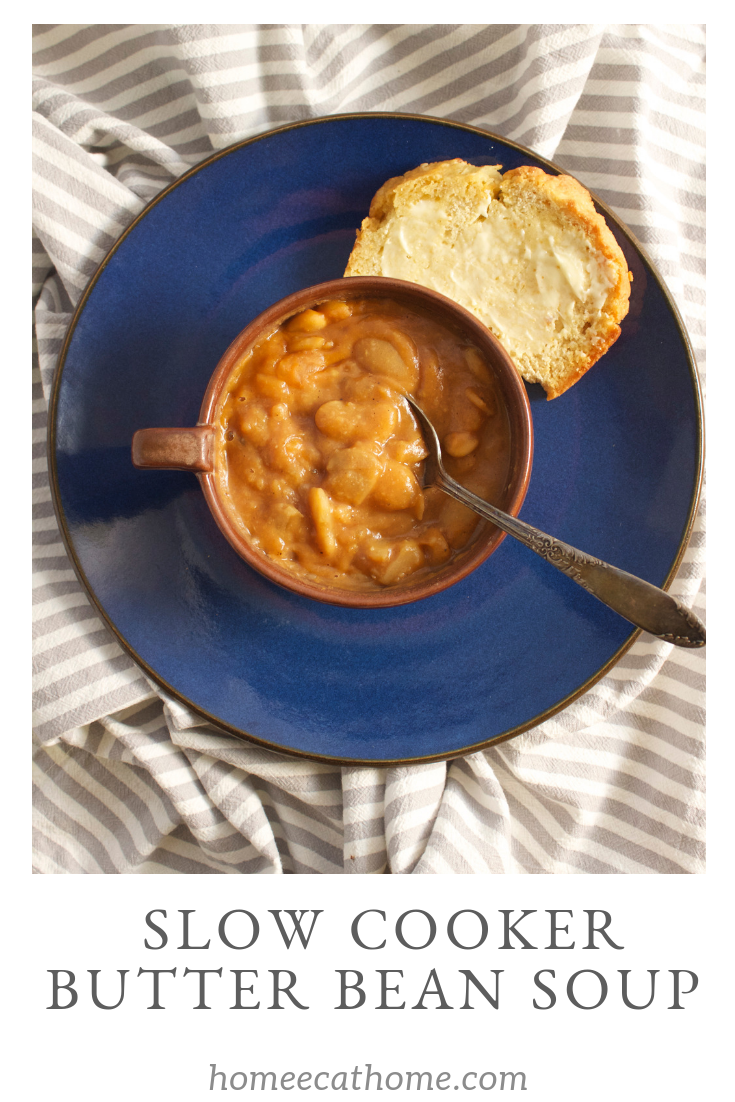
One of my favorite things about summer is grilling and one of my favorite things to grill is cabbage.
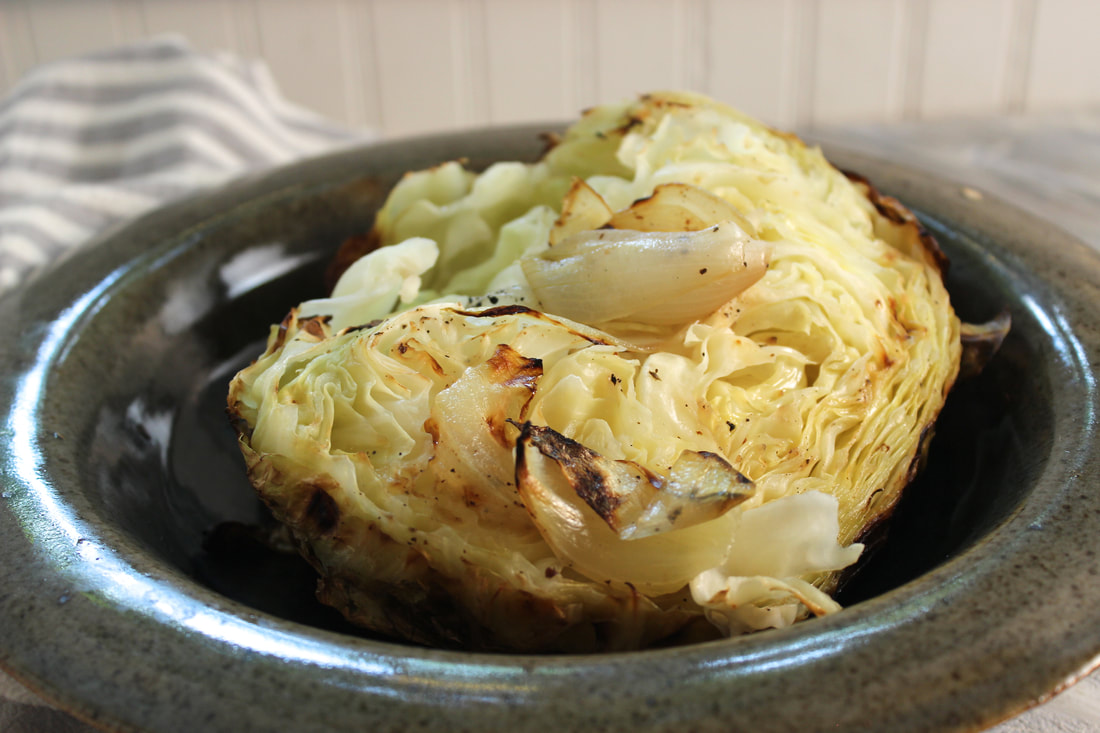
Our relatives Don and Ruthie shared how they make grilled cabbage with us a few years ago and we have been making it ever since.
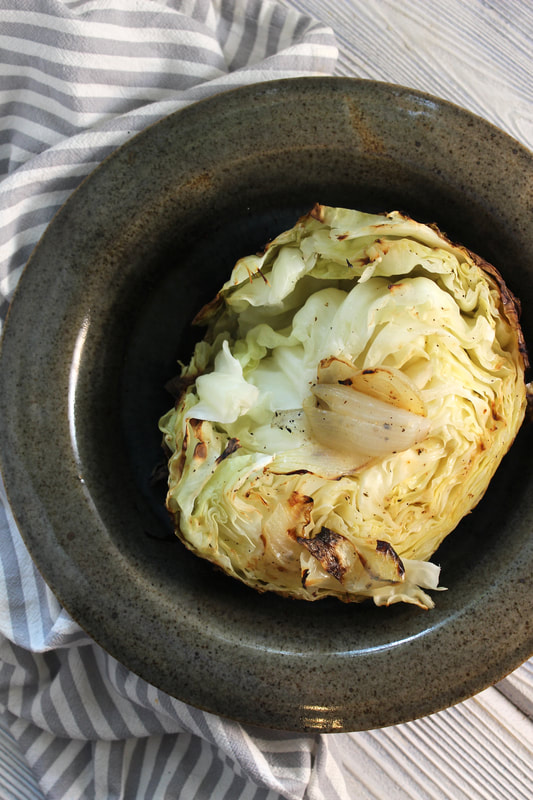
This is so simple...a head of cabbage, butter, a little onion if you like, and salt and pepper.
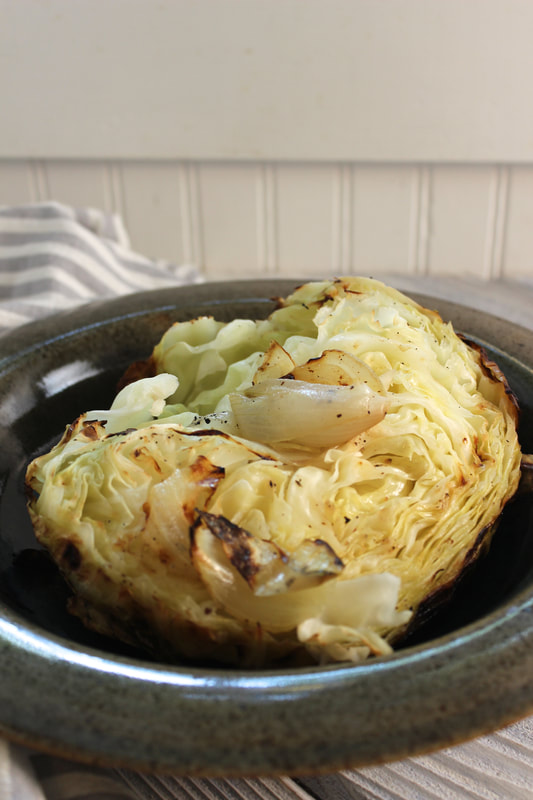
You simply wrap it all in foil and grill till tender and caramelized on the edges.
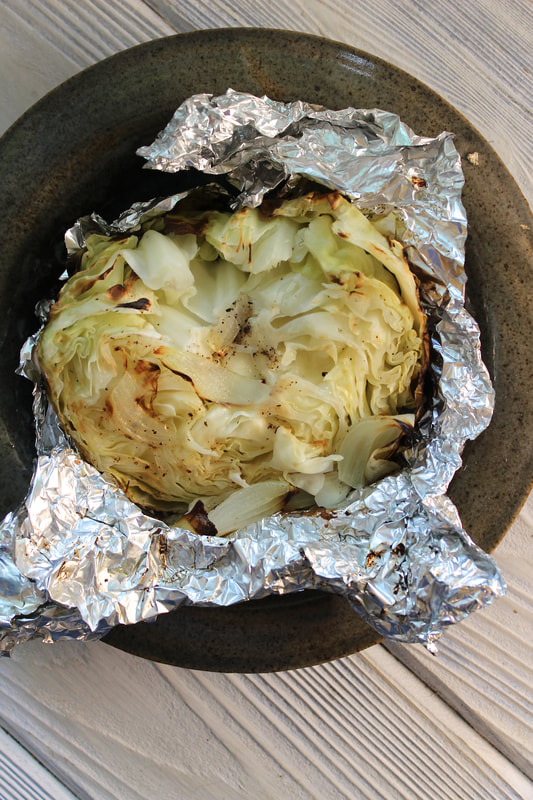
Simply delicious...buttery tender cabbage with caramelized edges.
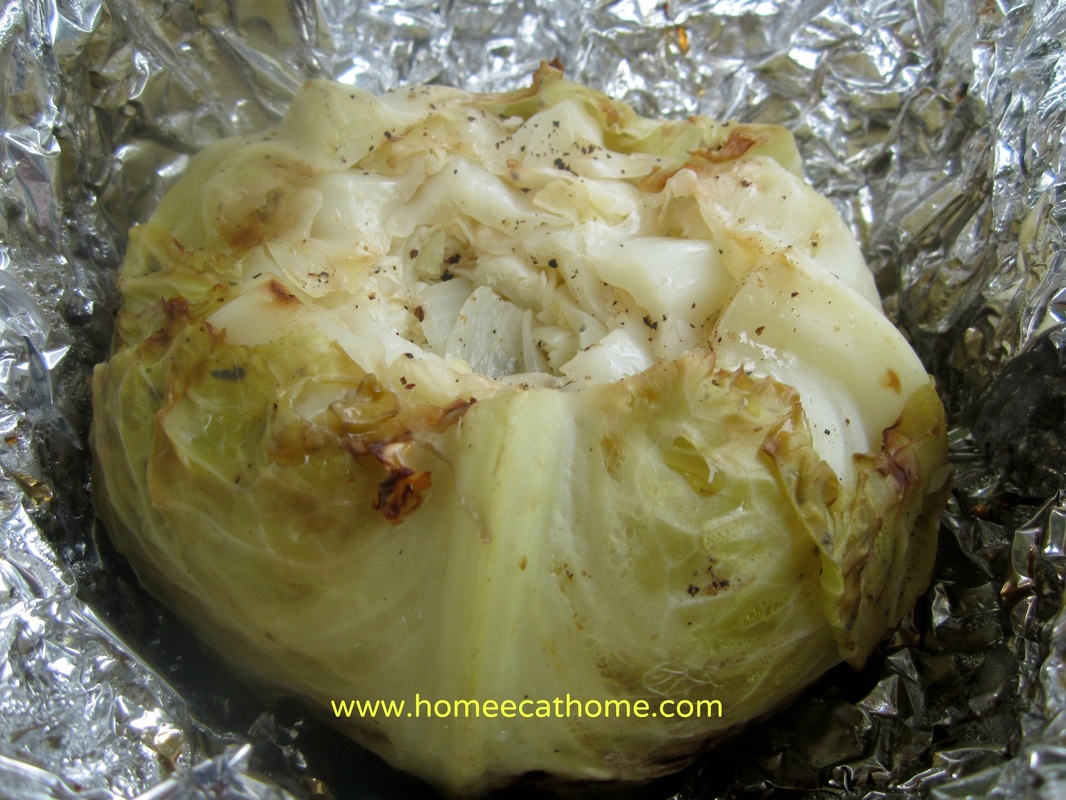
This simple, delicious recipe for grilled cabbage is as easy as it gets. You can grill a whole cabbage or cut it in half and grill two sections. I started cutting it in half to try to cook a little faster and to get more caramelized edges.
You will need: 1 head cabbage butter onion (optional) salt and pepper foil 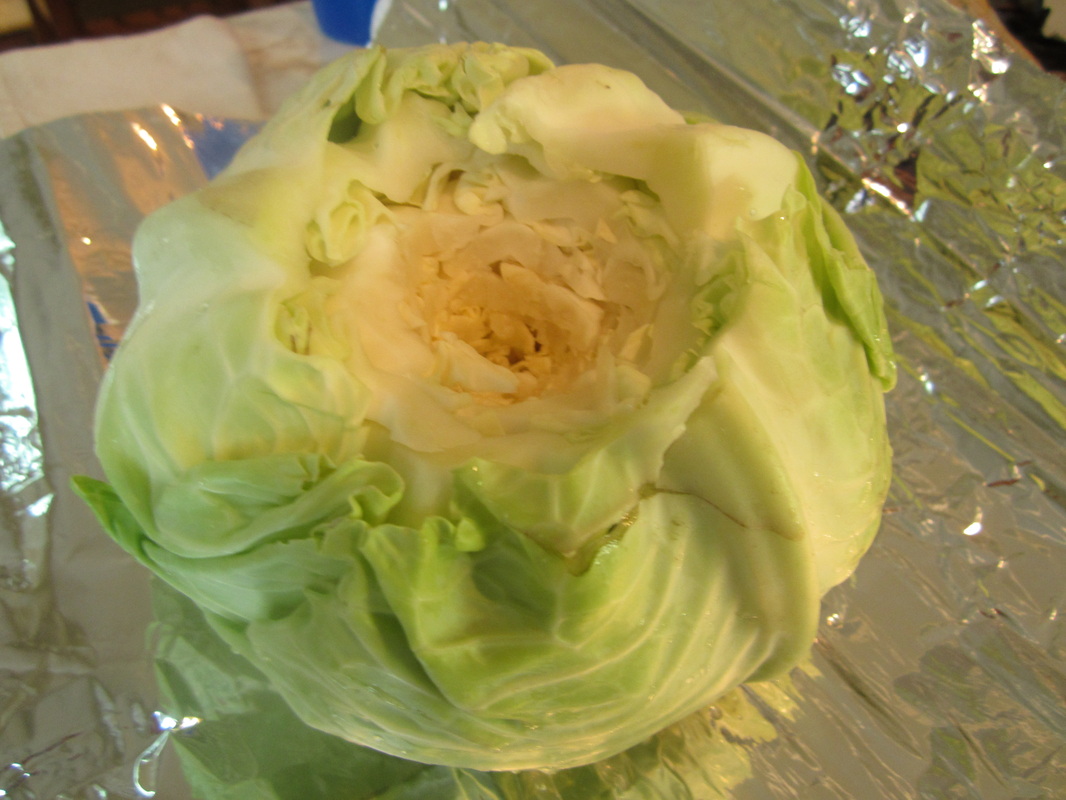
Cut out the core of the cabbage. Cut a deep whole into the center of the cabbage so that you can stuff butter and onion into the cabbage.
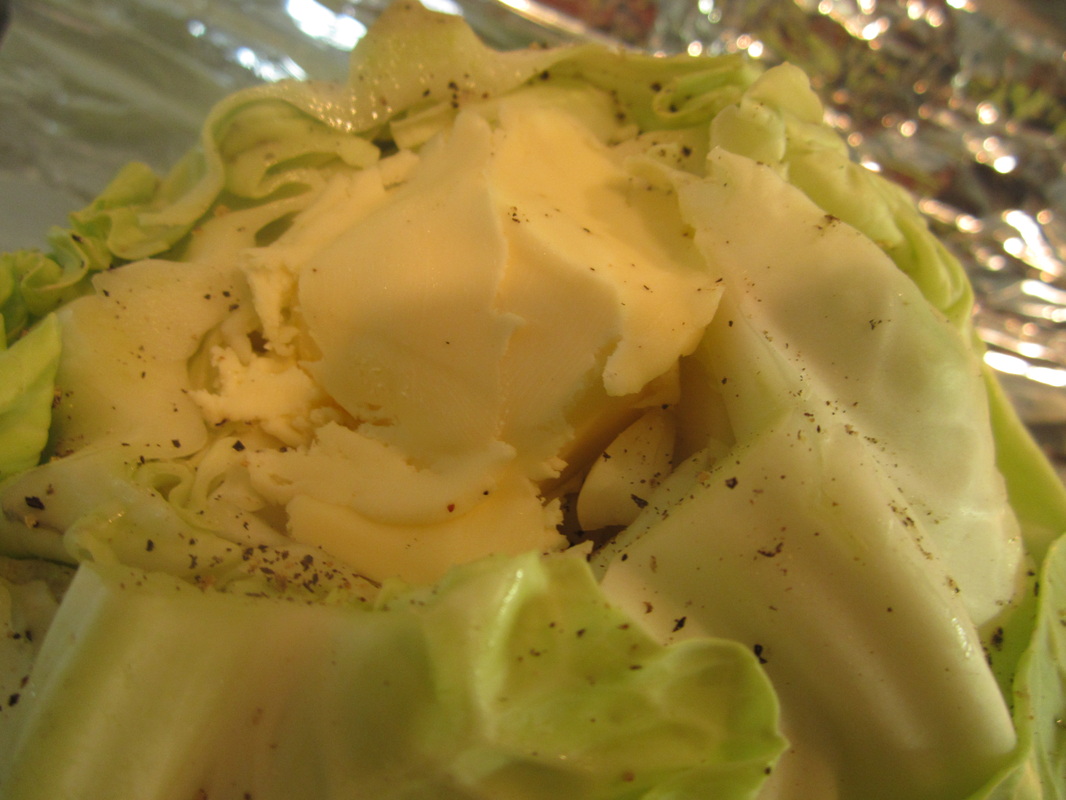
Salt and pepper the inside and outside of the cabbage. Stuff butter and small onion chunks into the center of the cabbage. I use 1/2 stick butter or more. You want to use enough butter to give it flavor and moisture.
Fold foil up around cabbage and seal it before putting it on the grill. Grill directly on the grill rack at a low to medium heat for an hour or more until the cabbage is tender. You can turn the heat up at the end if needed to cook meat along with the cabbage. I don't turn the cabbage or flip it because I want to keep all of the butter inside. 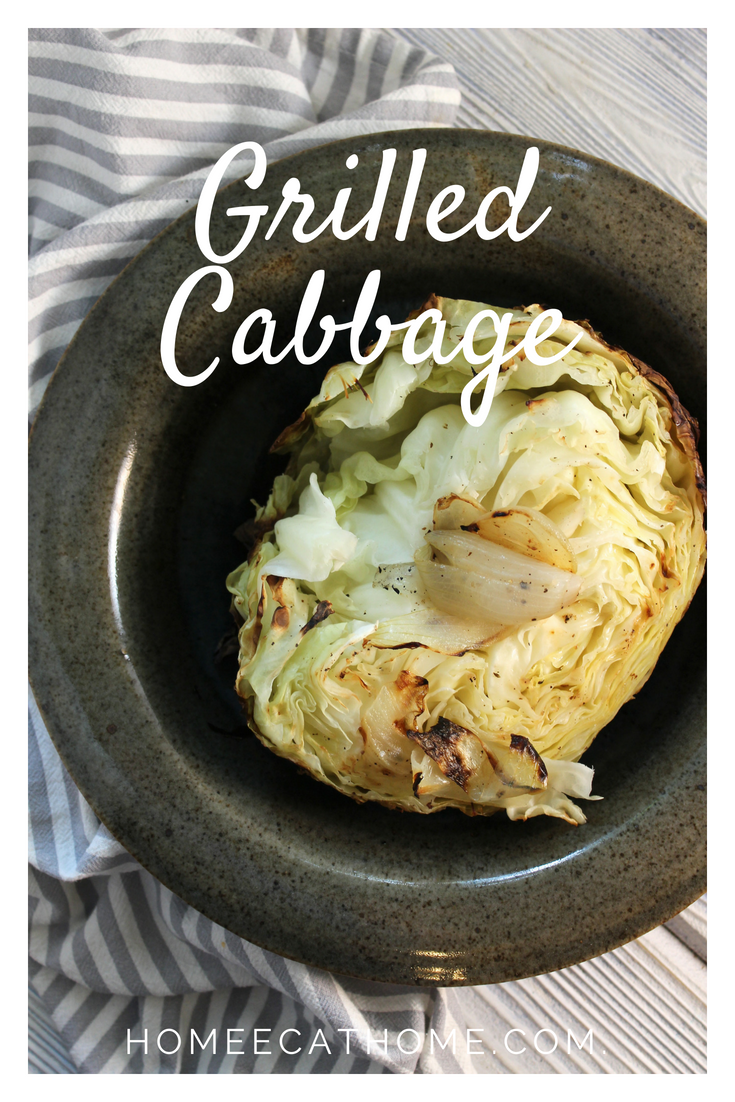
One of my favorite things about summer is the food. These hot days call for cool crisp salads and slaws. This is one of our old favorites. We love vidalia chicken slaw!
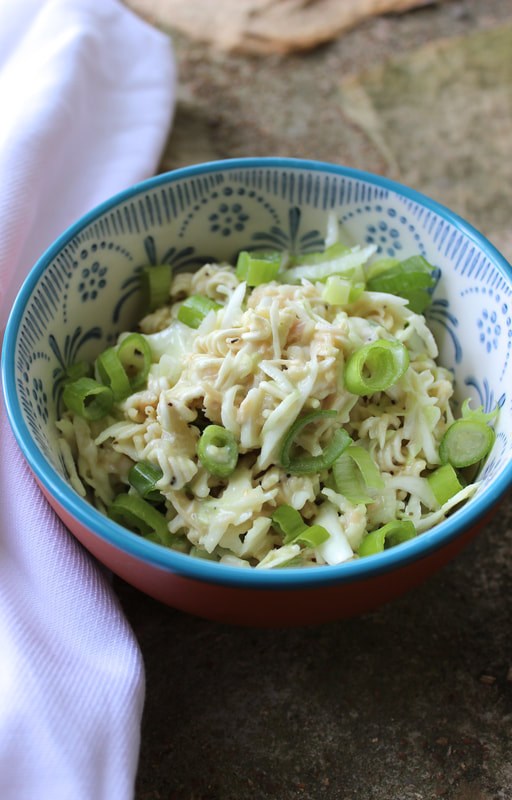
No need to turn on the oven and heat up the kitchen. I use a can of cooked chicken or slow cook a chicken breast. Delicious as a main dish or a side. You can also leave the chicken out and just make a delicious vidalia onion slaw. The ramen noodles add the yummiest crunchy texture with the cabbage but soak in the dressing so they aren't too crunchy.
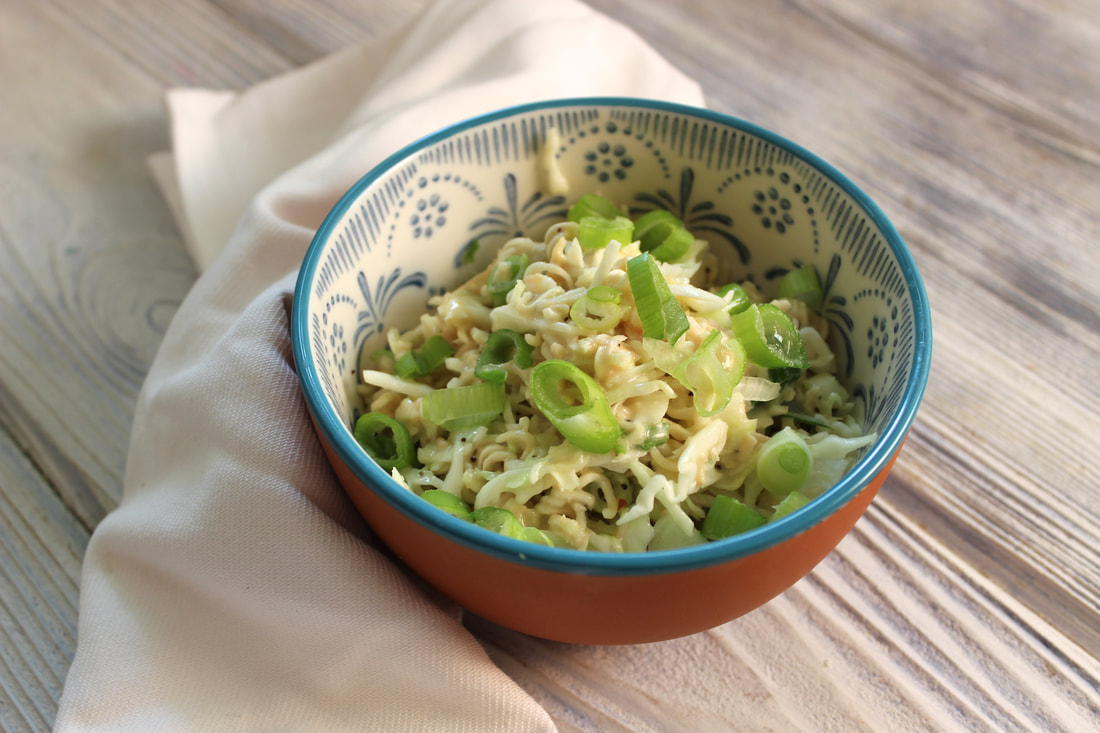
Vidalia onion slaw needs to sit in the fridge for a couple of hours to blend the flavors so it is a great make ahead dish and always goes over well at potlucks. The leftovers are great the next day too, great for packing in the lunchbox.
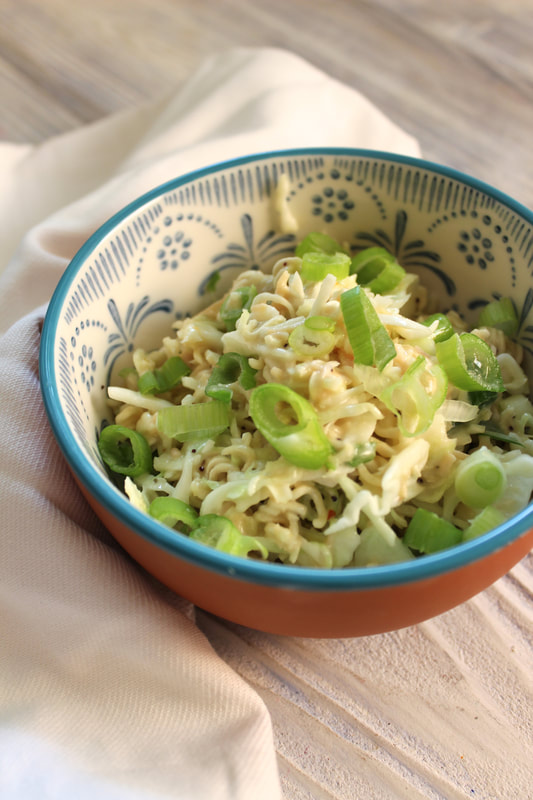
Ingredients:
Two 10 oz. bags angel hair shredded cabbage or about 9 cups shredded cabbage 2 packages chicken flavored ramen noodles 1 chicken breast cooked and shredded/diced* or 1 can chicken, drained 12 oz bottle (1 1/2 cups) Vidalia onion dressing 1 bunch green onions, sliced Break up ramen noodles. Mix all ingredients together including ramen noodle flavor packets. Chill in fridge to blend flavors. *I cook a chicken breast in the crock pot all day. Simply cover with water and cook on low in slow cooker. 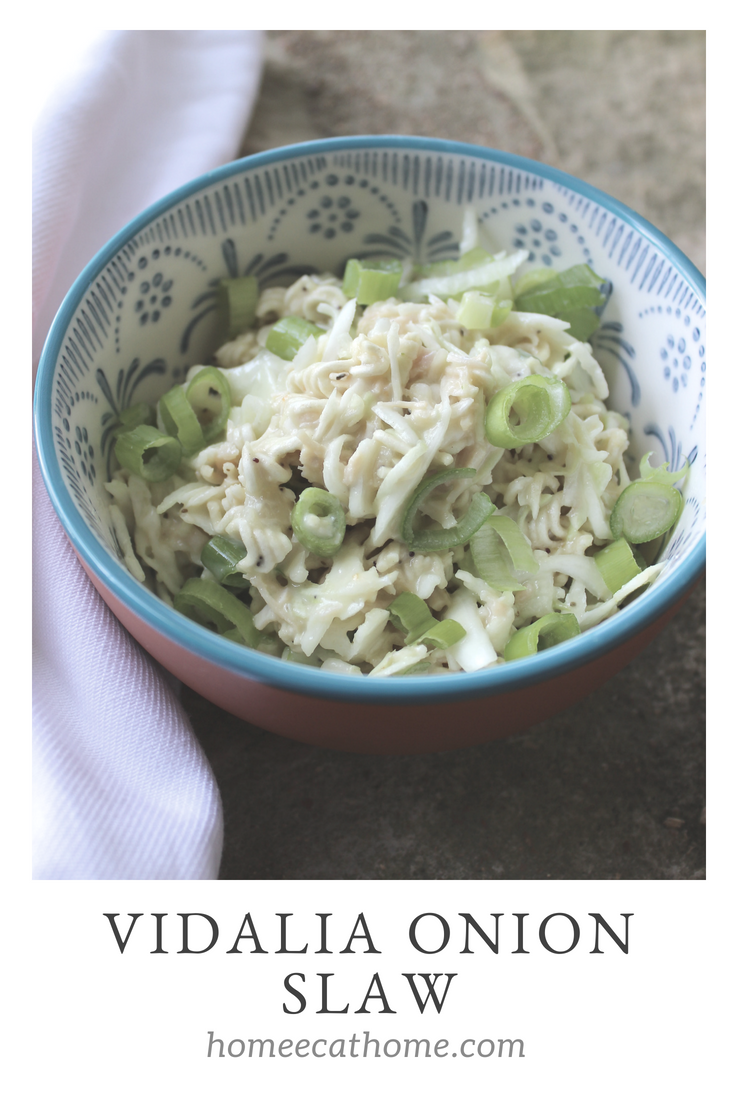

Greek Skillet Supper is one of my favorite quick and easy one-skillet meals. Start to finish you can have this on the table in 30 minutes or less. Perfect for busy weeknights and feeding hungry kids fast. Between the boys' activities, my grad class work, and my husband's work schedule, life has been crazy busy around here, so I have been relying on easy meals like this. I have been using my slow cooker a lot lately too which is especially convenient on nights when we don't get home until dinner time.
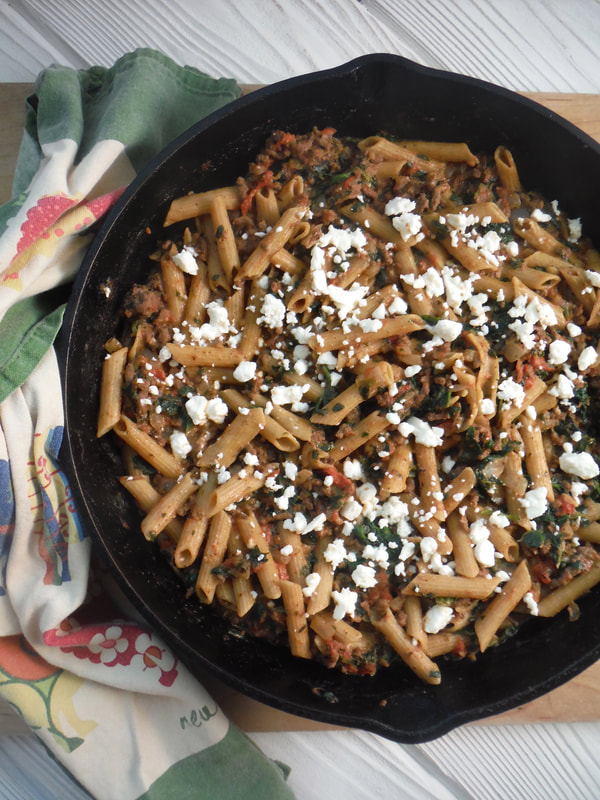
Try Greek Skillet Supper and change things up a bit in your dinner rotation. We love this hearty dish with so much delicious flavor.
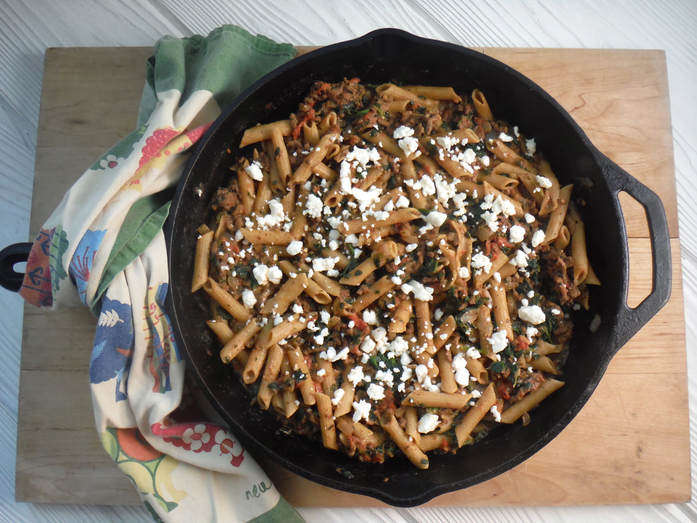
The combination of oregano, cinnamon, and garlic powder give a wonderful and unique flavor to this dish. I just put the spinach in without thawing and it works well since it is loose in a bag of frozen spinach and not compact in a box of frozen spinach. It thaws quickly and blends right in.
Greek Skillet Supper
Serves 6 1 lb. lean ground beef or lamb 1/2 sweet onion, diced 2 tsp. dried oregano 1/2 tsp. ground cinnamon 1/2 tsp. garlic powder 1 3/4 C. beef broth 1 can (14 ½ oz.) diced tomatoes, undrained 2 Tbsp. ketchup 1 1/2 cups uncooked penne pasta (I use ancient grain pasta) 1 bag frozen leaf spinach (10-16 oz.) ¾ cup crumbled feta cheese, divided 1. Cook ground beef and onion in large skillet on medium-high heat until beef is no longer pink, stirring occasionally. 2. Add oregano, cinnamon and garlic powder, mix well. 3. Stir in broth, tomatoes and ketchup. 4. Bring to a boil. Stir in pasta. Reduce heat to medium; cover and cook 10 minutes or until pasta is nearly tender. 5. Stir in spinach and ½ cup of the feta cheese. Cover. Cook 5 minutes longer or until pasta is tender. 6. Sprinkle with remaining ¼ cup feta cheese. 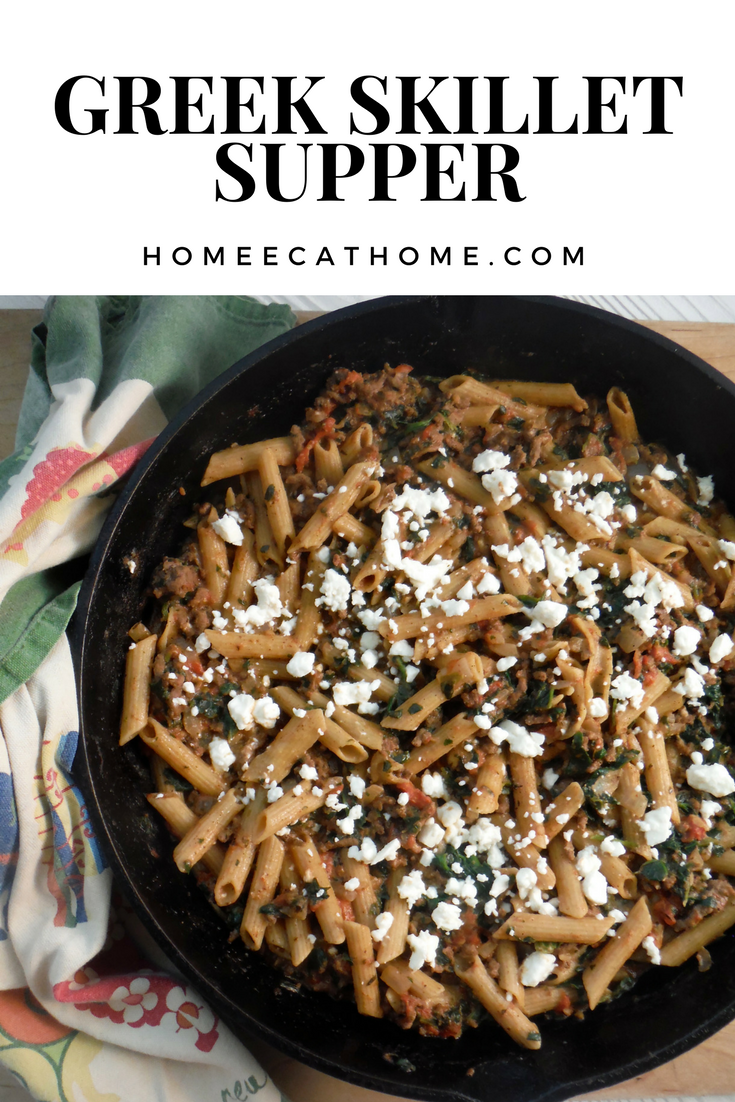
To be honest, I am notoriously bad at making pork chops. (Notorious with my own family because I would never make pork chops for company because then they would see how dry I always make them.) In fact, I usually avoid making pork chops because it's no fun to always make them so badly. I ventured back into this scary world of pork chops because I vaguely remembered having made them good once and remembered that I had blogged that recipe many moons ago, as I passed the thin pork chops on sale in the store yesterday. I decided to take the plunge and dove into the blog archives to this buried recipe and am so glad I did.
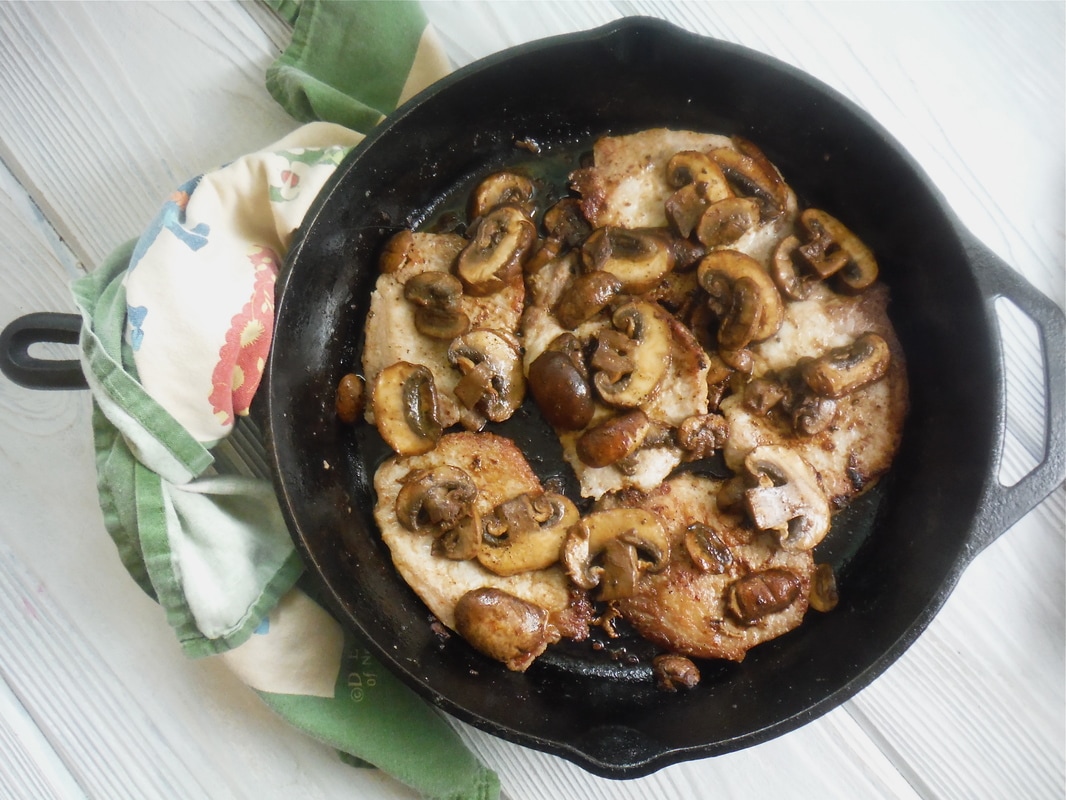
So here it is revitalized because sometimes you feel like thin buttery perfectly crispy and juicy pork chops.
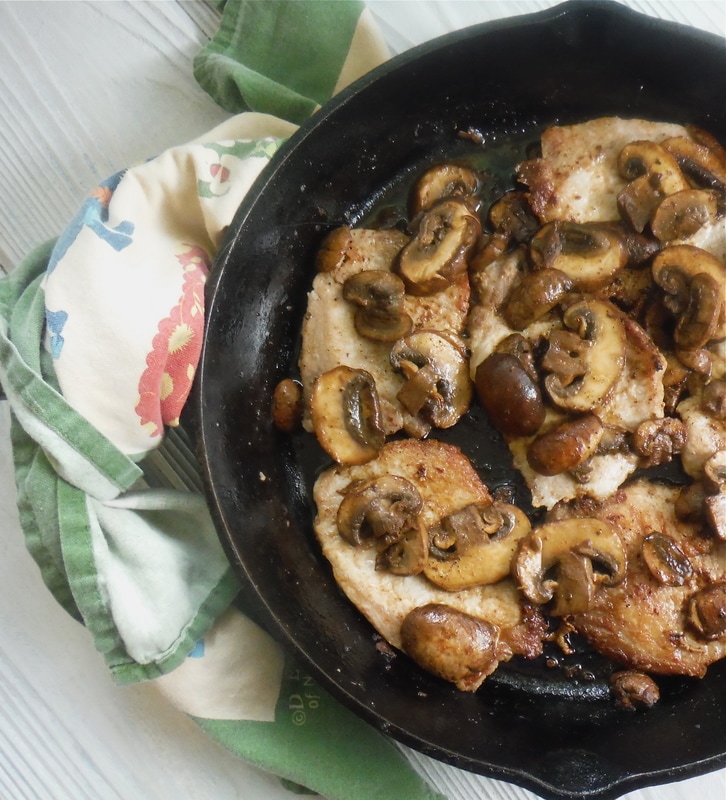
Since we're talking crispy and juicy chops that crisp right in the butter soaking in it's buttery goodness, what's not to love? These delectable little gems will melt in your mouth with these perfectly paired wine seared baby bella mushrooms.
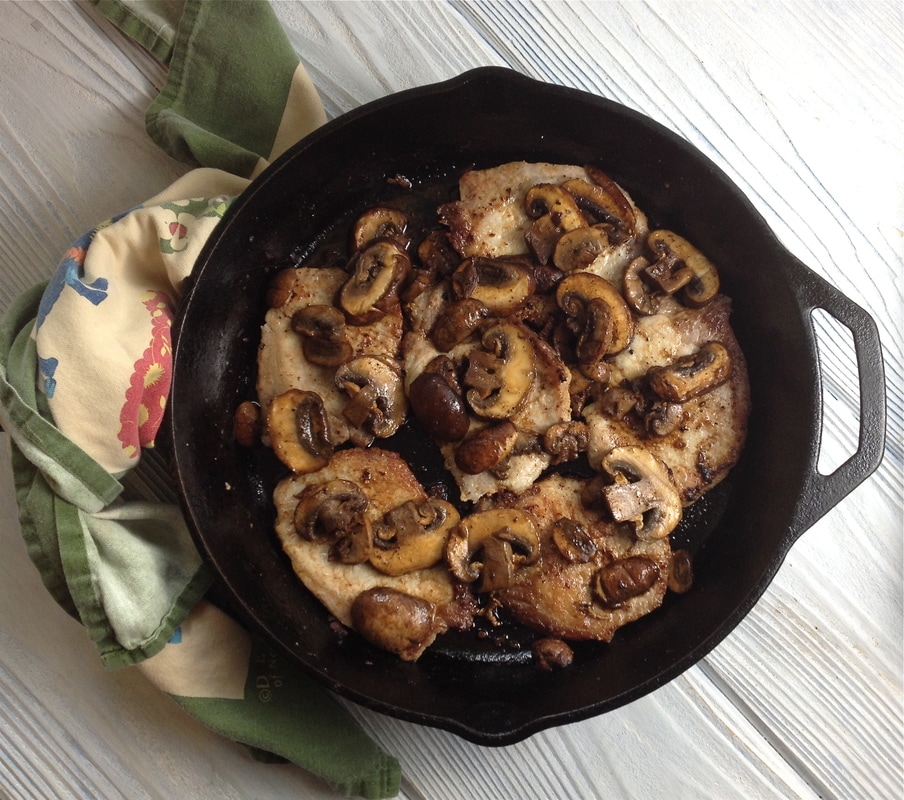
You can also whip up these amazing chops in no time at all. There's not much to it. Simply cook pork chops in olive oil and butter occasionally flipping them to brown on both sides until done. Season with salt, pepper, and garlic powder while cooking. Then quickly saute mushrooms in butter and wine and wallah you just made an amazing entree.
Serve with a simple salad and quinoa or rice pilaf and dinner is done.
Ingredients:
Olive oil Butter 6 thin pork chops Salt Pepper Garlic powder 2 T. to 1/4 C. white wine 8 oz. baby bella mushrooms, sliced 1. Heat a large skillet over medium heat. Drizzle olive oil in the pan. Add a pat of butter. Cook pork chops, browning each side. Season chops with salt, pepper, and garlic powder while cooking. 2. Set chops aside once done. Add some white wine to the skillet to deglaze scraping up any browned bits. Add sliced mushrooms and a couple of pats of butter (2-3 Tbsp. should do) and saute the mushrooms until desired tenderness. 3. Add chops back to the pan to warm topping them with sauteed mushrooms. You can turn off the heat at this point. They will warm up quickly from the hot skillet. Serve and enjoy. 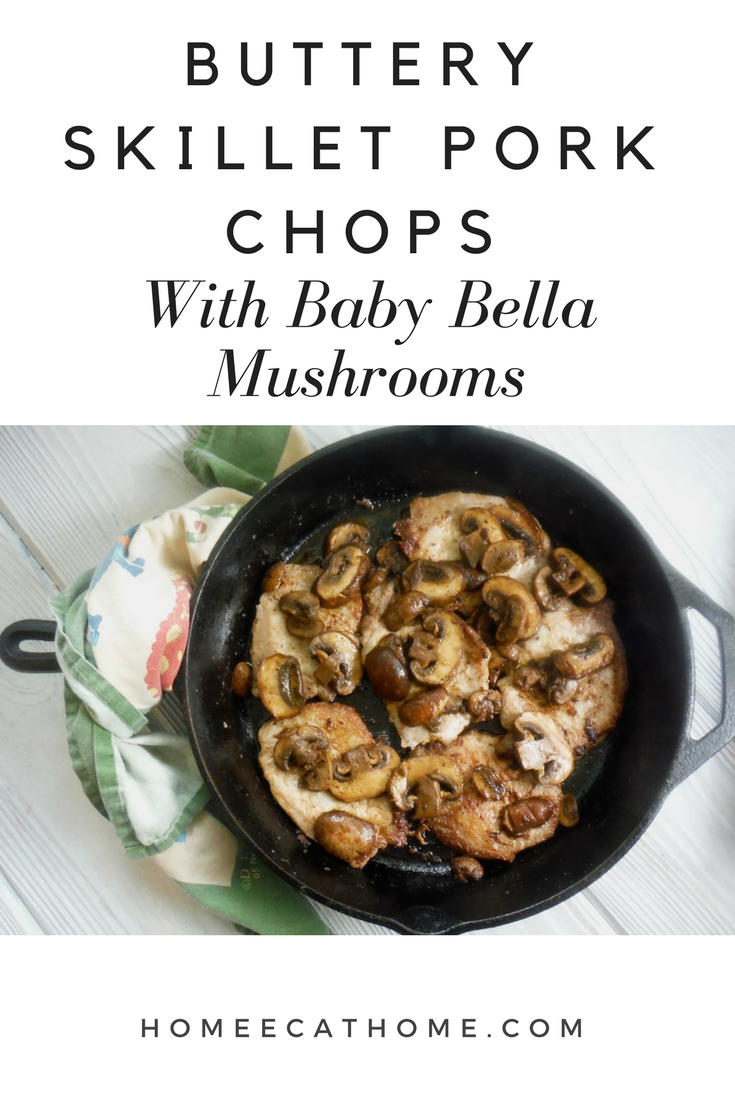
This is one of our favorite desserts ever and since I made an apple crisp last week, I thought it was time to update the photos for this old favorite recipe.
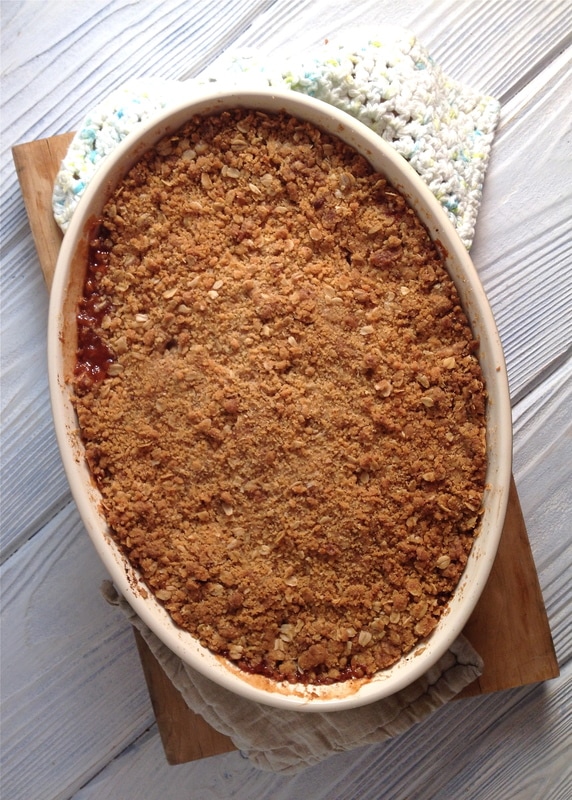
This apple crisp is truly amazing. You can taste a hint of citrus which complements the apples and sweetness perfectly. Honestly, I think it's a little too sweet, but my husband likes the sugary crunchy coating just the way it is. If you are sugar conscience (we really need to work on using less sugar too) you can easily reduce the sugar and try using some coconut sugar as a substitute for some or all of the granulated sugar.
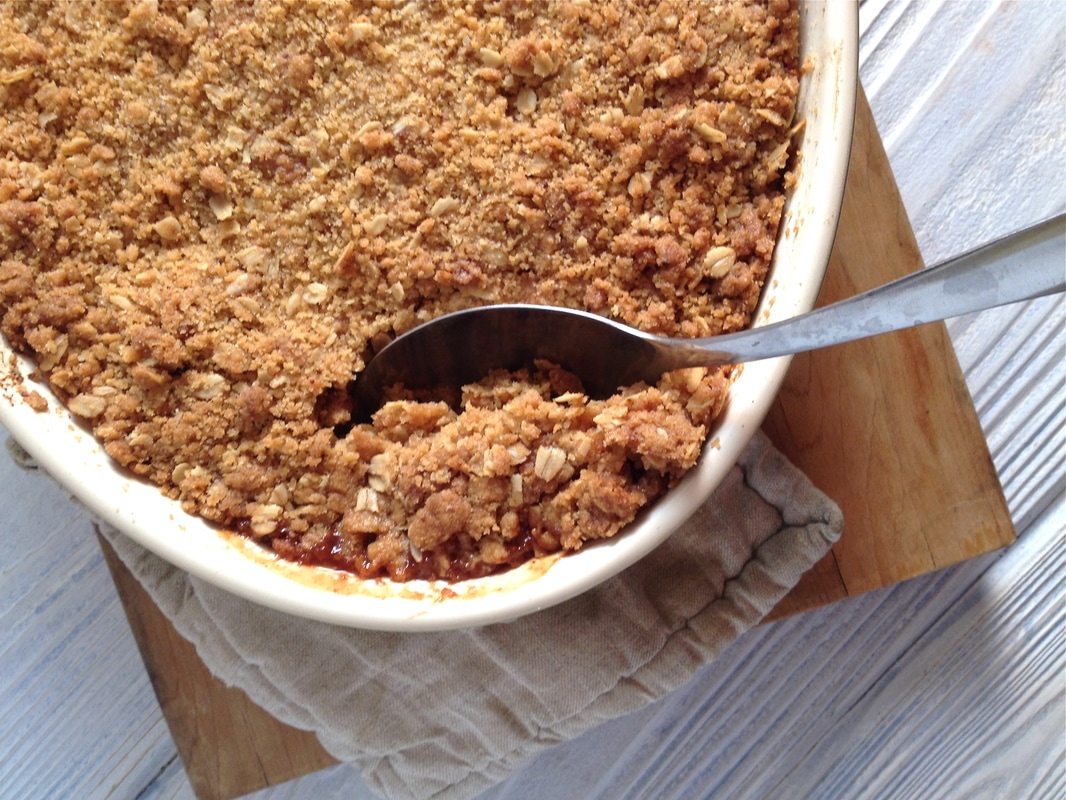
My husband likes his apple crisp unadulterated. I like it served warm with vanilla ice cream. However you like it, this is seriously good stuff. Good enough for company, good enough for potlucks and it serves a crowd. But don't worry if you don't have a crowd to feed, you can easily halve the recipe and bake in a 9 X 9 square pan. This apple crisp will keep nicely in the fridge for several days. You can also prepare ahead and refrigerate to bake later in the day or the next day. I do give myself about an hour to prepare. Prepping the apples and blending the topping takes a little time and effort, but the results are completely worth it.

I think my old photo circa 2013 still deserves a place here on the blog.
Apple Crisp
Ingredients: 4 pounds baking apples 1 tsp. dried orange peel (sold in spices) 1 tsp. dried lemon peel (sold in spices) 2 tablespoons orange juice or apple juice 2 tablespoons lemon juice (in a pinch, you can use lime juice) 1/2 cup granulated sugar 2 teaspoons ground cinnamon 1/2 teaspoon ground nutmeg or just grate some whole nutmeg For the topping: 1 1/2 cups flour 3/4 cup granulated sugar 3/4 cup light brown sugar, packed 1/2 teaspoon sea salt 1 cup oatmeal 1/2 pound cold butter, cubed (2 sticks) Directions: 1. Preheat the oven to 350 degrees F. Butter a 9 X 14 by 2-inch oval baking dish. (A 9 X 13 rectangular baking dish will work just fine too.) 2. Peel, core, and slice the apples. Combine the apples with the zests, juices, sugar, and spices. Pour into your buttered baking dish. 3. To make the topping, combine the flour, sugars, salt, oatmeal, and cold butter in a large bowl. Use a pastry blender or two butter knives to cut the butter into the dry ingredients until the mixture is crumbly and the butter is the size of peas. Sprinkle evenly over the apples. 4. Bake for about an hour or until the apple filling bubbles and the crisp topping is golden brown. Adapted from a Barefoot Contessa recipe. 

We are a participant in the Amazon Services LLC Associates Program, an affiliate advertising program designed to provide a means for us to earn fees by linking to Amazon and affiliated sites.
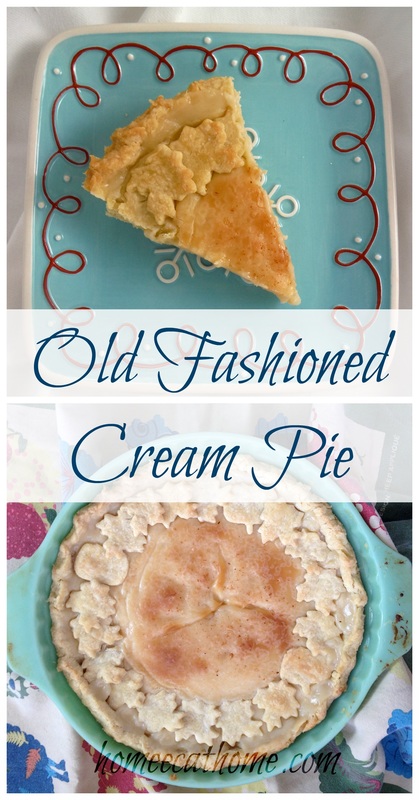
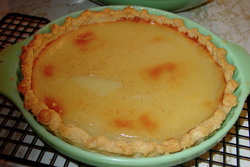
Old Fashioned Cream Pie is one of the first recipes I posted on Home Ec @ Home a little over six years ago. It is one of the most popular recipes on the site so when I made it at Thanksgiving this year, I decided it was high time to update this post with new photos.
I found this recipe several years ago in a Harvest Holiday Cookbook my Mom gave me from The Sidney Daily News in Sidney, OH. It was submitted by Mary Morrison. There is a restaurant in Sidney called The Spot to Eat which serves an amazing Old Fashion Cream Pie. I don't know if it is the same recipe or not, but it sure is good. When President Bush came through Sidney during his campaign, he made sure to stop at The Spot.
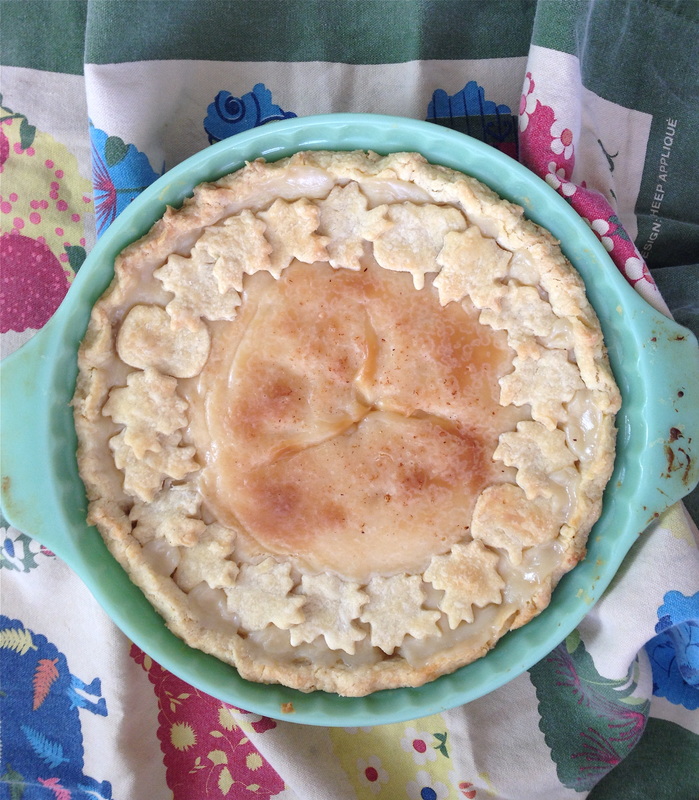
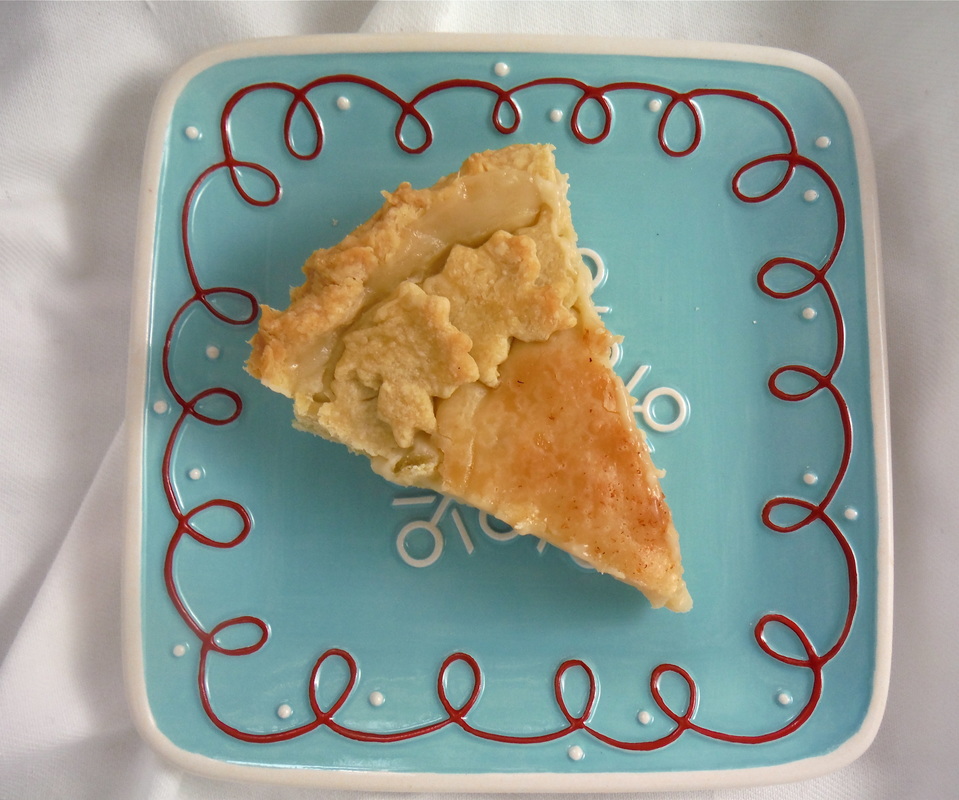
This is one of my favorite recipes for cream pie because it is both delicious and pretty simple. You make the pie filling on the stove and then pour it into an unbaked pie shell and bake in the oven. If you want to make a pretty trim like the leaf trim in these pictures, cut any extra dough with small cookie cutters and layer around the edges .
Old Fashioned Cream Pie would make a lovely addition to your Christmas dessert menu!
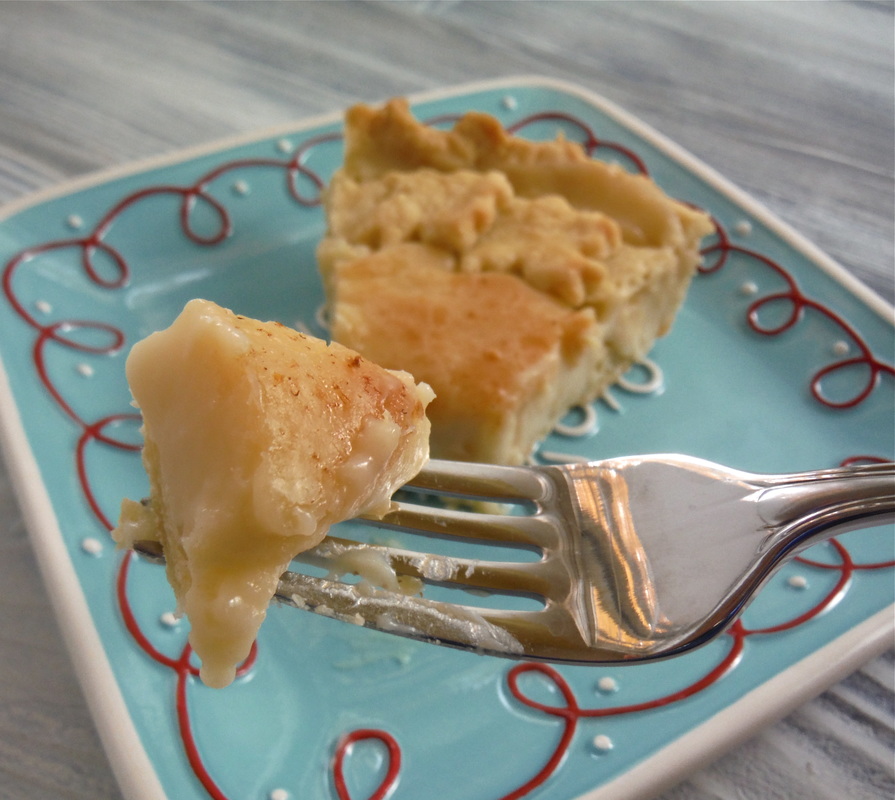
Look at that creamy rich delicious pie filling with just a touch of nutmeg sprinkled on top.
I usually make this recipe with my Aunt Carol's Never Fail Pie Crust. This recipe makes two pies so it is great for a crowd. It is really sweet and is especially good with some whipped cream. You can easily halve the recipe to make a single pie if two pies would be too much for your group. Aunt Carol's Never Fail Pie Crust I now use real butter instead of shortening in this pie crust recipe because butter is a healthier fat. All Butter Never Fail Pie Crust I haven't tried it with lard yet, but plan on it, since lard should give a nice flaky crust. Let me know if you try it. 3 cups flour 1 1/4 cup shortening 1 tsp. salt 1 egg, well beaten 5 Tbsp. water 1 Tbsp. vinegar 1. Cut shortening, flour, and salt to coarse crumbs. 2. Combine egg, vinegar, and water. Pour liquid into flour mixture all at one time. 3. Blend with a spoon just until all the flour is moistened. 4. Roll 1/2 of the dough out on a lightly floured surface. Fold flattened dough in half and then in half again so that it can be easily lifted into the pie pan. Lift the dough into the pan and unfold so that it covers the pie pan. 5. Press the dough into the pan and trim and shape the edges. Repeat with the extra ball of dough or freeze for future use. You will need two pie crusts for Old Fashioned Cream Pie (unless you halve the recipe). Old Fashioned Cream Pie 2 cups sugar 1 stick butter (1/2 cup) 5 Tbsp. cornstarch 1 pint heavy whipping cream 1 pint 1/2 and 1/2 1/2 tsp. vanilla 2 unbaked pie crusts (recipe above) Nutmeg (affiliate link) (I grate whole nutmeg directly onto the pie) 1. In a large pot, warm cream and 1/2 & 1/2. 2. Add butter and let melt. 3. Premix sugar and cornstarch. Add to warm mixture. 4. Cook until thick, stirring constantly (This will take a few minutes. It will thicken, but will be thinner than pudding-it will still be pourable). 5. Add 1/2 teaspoon vanilla. Pour filling into pie crusts and sprinkle with nutmeg. 6. Bake at 350 degrees for 45 minutes. Makes 2 pies. Cool to room temperature then refrigerate. This is perfect with whipped cream. 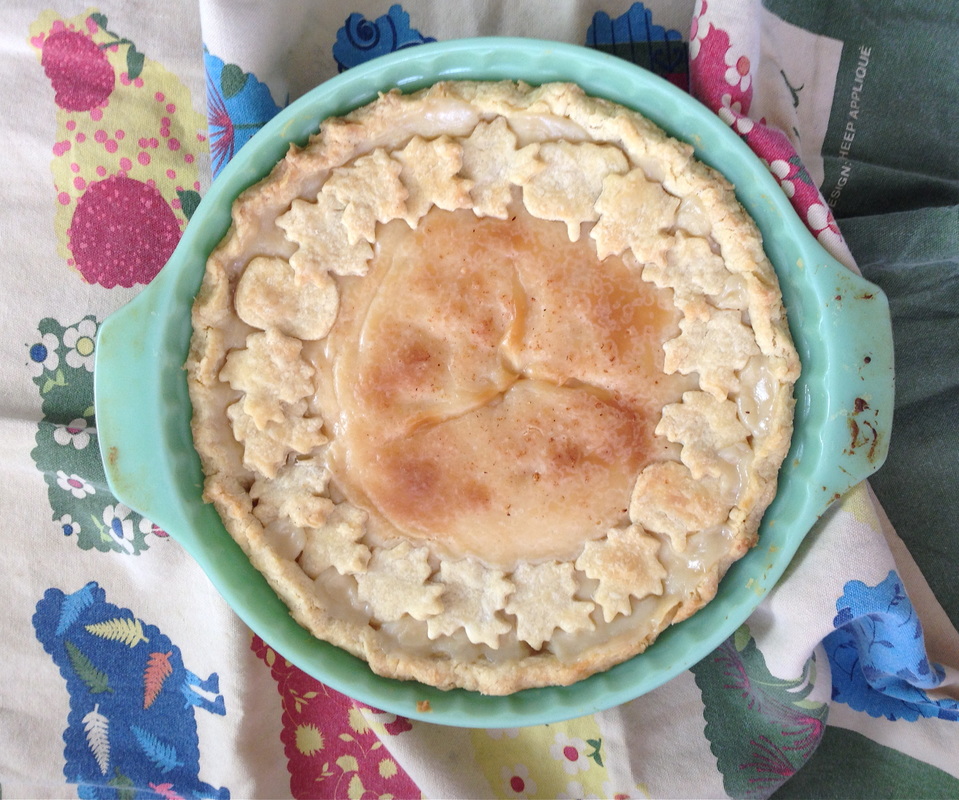
If you are an aspiring food photographer, you should check out Tasty food Photography (affiliate link below). Reading this ebook helped transform the way I photograph food. Below is the original photo I used in this post six years ago. As you can see, this book really helped me with my food photography skills.
We have been enjoying this family favorite for a couple of years. In fact this is an update with new photos and to let you know that we still love our favorite chicken and dumplings.
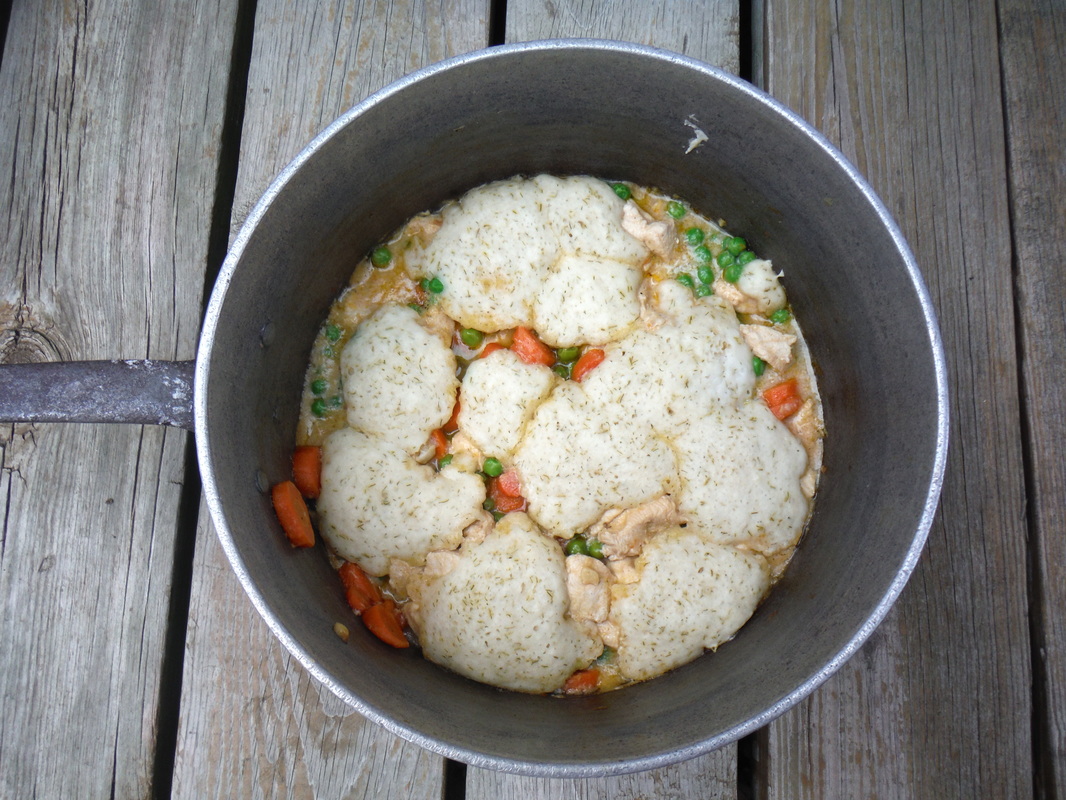
First the chicken and dumplings are amazing, second, it's not that hard to make. Give yourself some time though. This will take about an hour to prepare, but a lot of it is cooking time and you can get the kitchen cleaned up while it is cooking. I love sitting down to dinner knowing that the kitchen is already mostly clean.
This is the ultimate comfort food. As the weather turns colder, I love making this hearty, delicious meal for my family. The boys clean their plates every time. So do I. More chicken and dumplings please. 
Serves 4-5
Ingredients:
1. In a Dutch oven (or a 5- to 6-quart heavy pot), heat butter over medium heat. Add onion, carrots, garlic and thyme. Cover and cook, stirring occasionally, until onion is soft, about 5 minutes. 2. Add 1/4 cup flour and cook, stirring, 30 seconds. Add broth and bring to a boil, stirring constantly; season with 1/2 to 3/4 tsp. salt, fresh ground pepper to taste, and creole seasoning. Stir in the chicken; reduce heat to medium-low. Cover and cook, stirring occasionally, 20 minutes. 3. Meanwhile, make dumplings: In a medium bowl, whisk together remaining 3/4 cup flour, dill, baking powder, and 1/2 teaspoon salt. With a fork, gradually stir in 1/2 cup milk to form a moist and soft batter. It should be just a little thicker than pancake batter and should easily drop from the tip of a spoon. (Add additional 2 tablespoons milk if too thick.) Set aside. 4. Stir peas into the pot. Drop batter in simmering liquid in 10 heaping tablespoonfuls, keeping them spaced apart (dumplings will expand as they cook). Cover, and simmer until chicken is tender and dumplings are firm, 20 minutes. Serve. This recipe is adapted from Martha Stewart.
Linking up at Share the Wealth, Mom Advice
We love panko crusted tilapia so I always return to this favorite meal every lenten season. Crispy on the outside, tender on the inside and perfectly seasoned...it's a treat we enjoy every time.

This is a family favorite I have been making for a couple of years. Since I made it for dinner last night, I decided to update my old photos on this post.
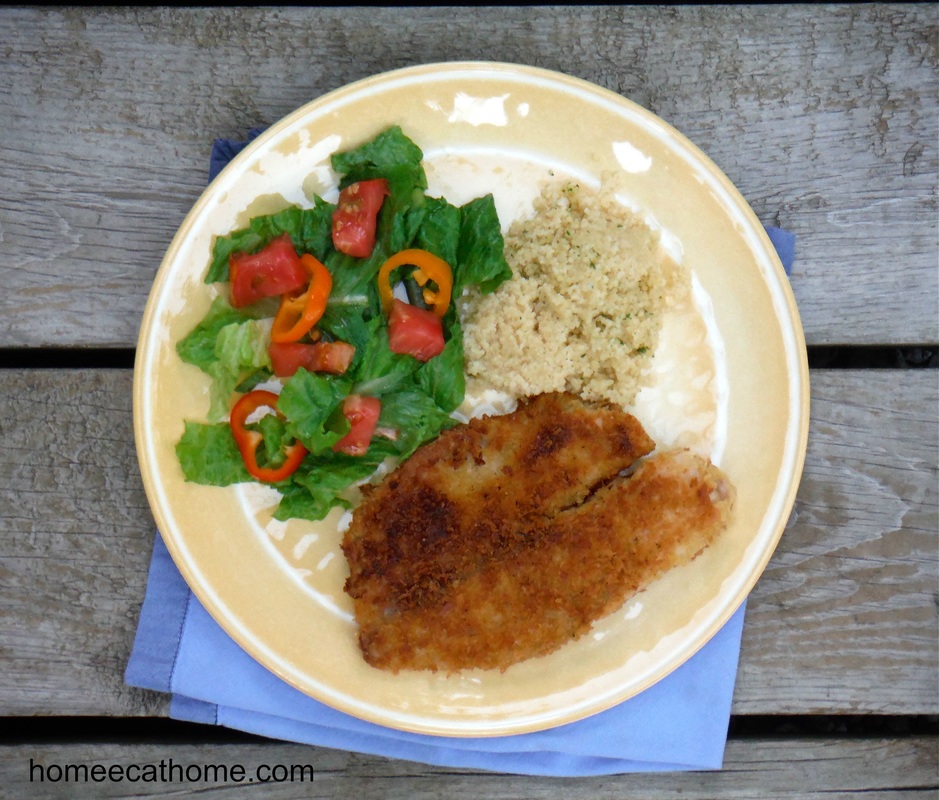
I adapted my pork schnitzel recipe to make this delicious Panko Crusted Tilapia. We love it. It is especially good with lemon juice squeezed on top. This is pretty easy to make and tilapia is an affordable fish. I paid just over $5 for two pounds of frozen tilapia filets at ALDI the other day. That's less than $3 a pound!
Our boys really like fish so I double this recipe for our family of five. Last night we had one fish filet leftover after making eight. If you buy frozen filets, they are easy to thaw in the fridge or in cold water. Read the package for detailed instructions. This recipe works well with other fish too. I am thinking of trying it with shrimp sometime. This may look complicated since you have three bowls of batter dipping ingredients, but it's not. My four year old helped me last night with the battering. The fish cook quickly in the skillet too so even though you have to cook in batches, it doesn't take too long.
Ingredients:
4 Tilapia filets 1/4 cup flour 1 teaspoon seasoned salt 1/4 teaspoon freshly ground black pepper 1 egg, beaten 2 Tbsp milk 1 cup Japanese style Panko bread crumbs 1 teaspoon paprika Old Bay Seasoning Olive oil 1. Set out 3 shallow bowls. One with a mixture of the flour, seasoned salt, and pepper. The second with the egg and milk whisked together. The third with a mixture of the panko bread crumbs and paprika. 2. Drizzle a little olive oil in a large skillet and heat at medium heat. Dredge the filets first in the seasoned flour, then dip the filets in the egg mixture, and then into the mixture of bread crumbs and paprika. 3. Working in batches, sauté the filets for 4-5 minutes on each side. While cooking, sprinkle each side with Old Bay seasoning. When you flip the filets, drizzle more olive oil in the skillet as needed. Remove the filets from the skillet and cover with foil or place in a warm oven to keep warm while you cook the remaining fish. 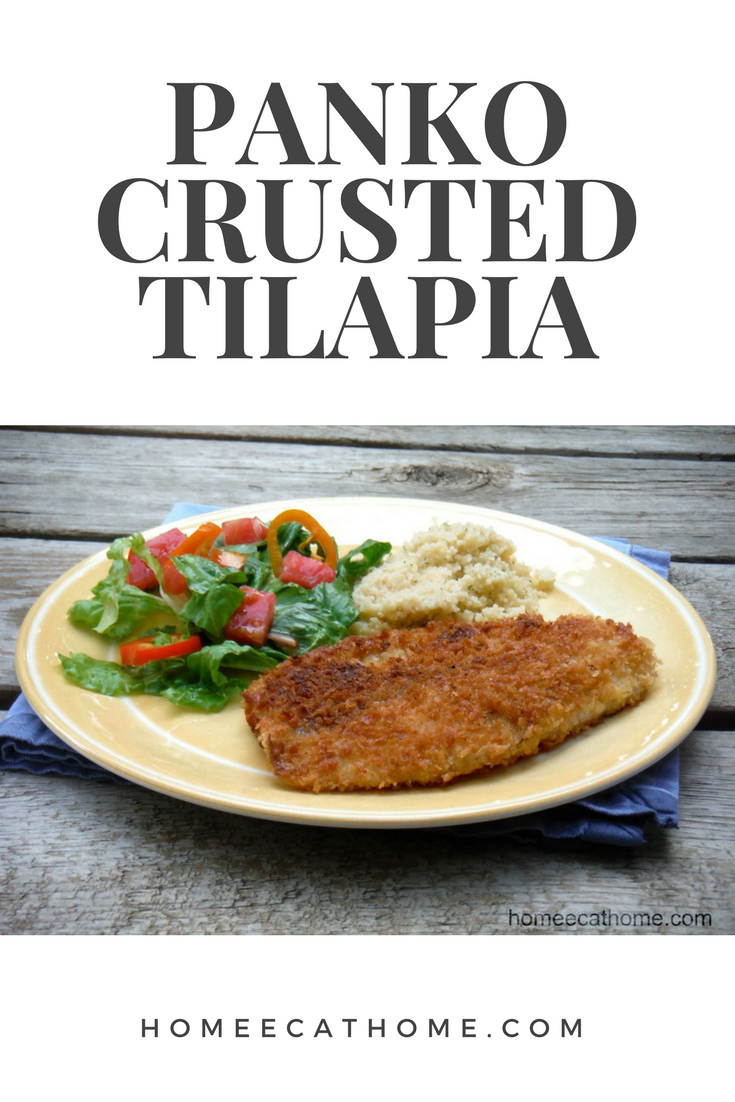
|

Welcome to Home Ec @ HomeHi, I'm Faith, a former Family and Consumer Science teacher turned food blogger. I love God, my family, and food. You can usually find me in the kitchen preparing family friendly, homemade recipes and taking lots of pictures. 
Still Goldens, Southern, IL
 Fan Favorites

The Best Dry Brined Turkey with Citris and Fresh Herbs

 Dehydrating Pears and Apples in the Instant Pot Duo Crisp Dehydrating Pears and Apples in the Instant Pot Duo Crisp
 
 |
 RSS Feed